How to Crochet Your Own Adorable Amigurumi Chicken

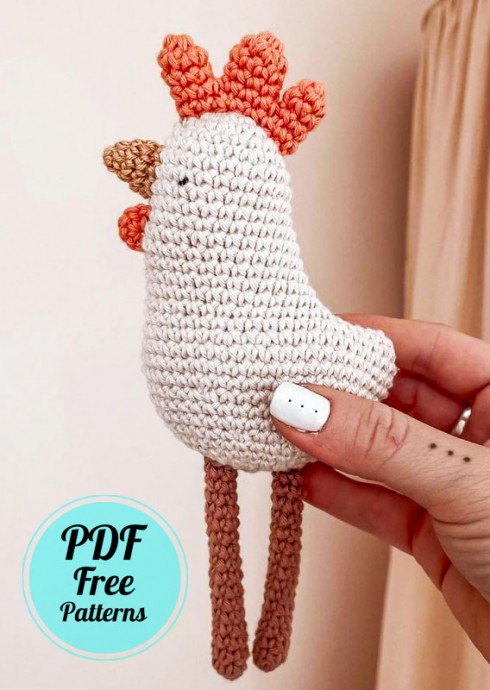
Create your very own adorable amigurumi chicken using the art of crochet! This fun and creative craft involves using yarn and a crochet hook to make cute stuffed animals or characters. By following a pattern and using basic crochet stitches, you can bring your chicken to life with unique colors and details. Whether you're a beginner or an experienced crocheter, making an amigurumi chicken is a rewarding project that allows you to showcase your skills and creativity. These charming little creatures can be customized with different accessories like bows, hats, or even tiny eggs. The possibilities are endless when it comes to designing your crochet chicken amigurumi. So grab your yarn, hook, and imagination, and get ready to embark on a fun and delightful crochet project that will bring joy to both you and those who see your adorable creation.
Materials Needed
- Ricorumi, cotton color 061 (off-white), 25g
- Ricorumi, cotton color 056 (brown), 25g
- Ricorumi, cotton color 071 (camel), 25g
- Ricorumi, cotton color 068 (orange), 25g
- Pearl cotton size 8, black (to embroider the eyes)
- 1 2.5 mm crochet hook
- 1 embroidery needle
- Fiberfill
Abbreviations
- Rd = round
- st = stitch
- ch = chain
- slst = slip stitch
- sc = single crochet
- dec = invisible decrease
- inc = increase
- “…* = repeat until the end of the round
Body Instructions
Color 061
- Rd 1: 6 sc in a magic ring - 6
- Rd 2: 1 inc in each st - 12
- Rd 3: *1 sc, 1 inc* (x6) - 18
- Rd 4: 1 sc in each st - 18
- Rd 5: *2 sc, 1 inc* (x6) - 24
- Rd 6 to 9 (4 rounds): 1 sc in each st - 24
- Rd 10: 1 inc, 23 sc - 25
- Rd 11: 1 sc, 1 inc, 23 sc - 26
- Rd 12: 2 sc, 1 inc, 23 sc - 27
- Rd 13: 3 sc, 1 inc, 23 sc - 28
- Rd 14: 3 sc, 1 inc, 24 sc - 29
- Rd 15: 3 sc, 1 inc, 25 sc - 30
- Rd 16: 4 sc, ch 7, insert your hook in the 2nd st from the hook and make 26 sc - 36
- Rd 17: *5 sc, 1 inc* (x6) - 42
- Rd 18: 3 sc, 1 inc, *6 sc, 1 inc* (x5), 3 sc - 48
- Rd 19 to 21 (3 rounds): 1 sc in each st - 48
- Rd 22: *6 sc, 1 dec* (x6) - 42
Stuff the Body
- Rd 23 and 24 (2 rounds): 1 sc in each st - 42
- Rd 25: *5 sc, 1 dec* (x6) - 36
- Rd 26: 1 sc in each st - 36
- Rd 27: 2 sc, 1 dec, *4 sc, 1 dec* (x5), 2 sc - 30
- Rd 28: *3 sc, 1 dec* (x6) - 24
- Rd 29: *2 sc, 1 dec* (x6) - 18
- Rd 30: *1 sc, 1 dec* (x6) - 12
Finish stuffing.
Finish with a slst then fasten off and close your work: using your tapestry needle, go through the BLO of each st from the last round with the tail then pull firmly. Hide the rest of the tail inside.
Legs (x2)
Color 056
- Rd 1: 6 sc in a magic ring - 6
- Rd 2 to 16 (15 rounds): 1 sc in each st - 6 (Do not stuff the legs).
Finish with a slst then fasten off. Make sure you keep a long enough tail for the assembly (about 30 cm).
Comb Instructions
Color 068
Big Comb 1:
- Rd 1: 6 sc in a magic ring - 6
- Rd 2: *2 sc, 1 inc* (x2) - 8
- Rd 3 and 4 (2 rounds): 1 sc in each st - 8
Fasten off and mark the last stitch.
Small Combs 2 and 3:
- Rd 1: 6 sc in a magic ring - 6
- Rd 2 and 3 (2 rounds): 1 sc in each st - 6
Fasten off and mark the last stitch.
For the third and last small comb, do not fasten off but assemble combs 1 and 2 as follows:
4 sc on comb 1, 6 sc around comb 2, 4 sc on comb 1 again then finish with 6 sc around comb 3 so 21 sc in total.
Continue the comb with one last round with 1 sc in each st - 21.
Finish with a slst then fasten off. Make sure you keep a long enough tail for the assembly (about 20 cm). Do not stuff the comb.
Wattle
Color 068
- Rd 1: 6 sc in a magic ring - 6
Finish with a slst then fasten off. Make sure you keep a long enough tail for the assembly (about 20 cm).
Beak
Color 071
- Rd 1: 6 sc in a magic ring - 6
- Rd 2: *2 sc, 1 inc* (x2) - 8
- Rd 3: *3 sc, 1 inc* (x2) - 10
- Rd 4: 1 sc in each st - 10
Finish with a slst then fasten off. Make sure you keep a long enough tail for the assembly (about 20 cm).
Assembly
Place the comb on the top of the head. Sew the legs at the bottom, 1 cm apart. Place the beak vertically on rounds 6 to 8. Place the small wattle vertically on rounds 10 to 12.
Embroider two small eyes on each side of the beak between rounds 7 and 8.
- Funny Pictures
-
 Hilarious Memes for Those Bored to Tears
-
 Weekly Treat of Funniest Parenting Memes for Good Laugh out Loud Right Now
-
 Really Funny Pics to End These Weekend Perfectly
- Recipes
-
 Crispy Baked Avocado Fries
-
 Scrambled Chickpea and Spinach Pitas
-
 Cinnamon Pancakes
- Lifehacks
-
 Crochet Basics: Aligned Cobble Stitch
-
 Brick Stitch Crochet Tutorial
-
 Crochet Basics: Wattle Stitch
- Crochet Ideas
-
 Crochet Snorlax Plushie Doll
-
 Crochet Beautiful Penguin Toy
-
 Crochet Tiny Snowman
- DIY
-
 DIY Santa Craft For Kids
-
 Paper Plate Angel Craft
-
 Upcycled Mason Jar Chicken Vase
- Knitting Ideas
-
 Knitted Bridger Cowl
-
 Knitted Keepsake Bag
-
 Knitted Cutie Cupcake Dolls