Easy Knitting Guide for a Beautiful Berry-Color Sweater


Materials Needed
You’ll need:
- 650 (700) 750g of berry-color Kara yarn (46% polyamide, 27% cotton, 27% polyacryl; 125m/50g);
- Knitting needles size 4;
- Crochet hook size 4;
- 5 purple buttons.
Size Options
Available sizes: S (M) XL.
Used Patterns
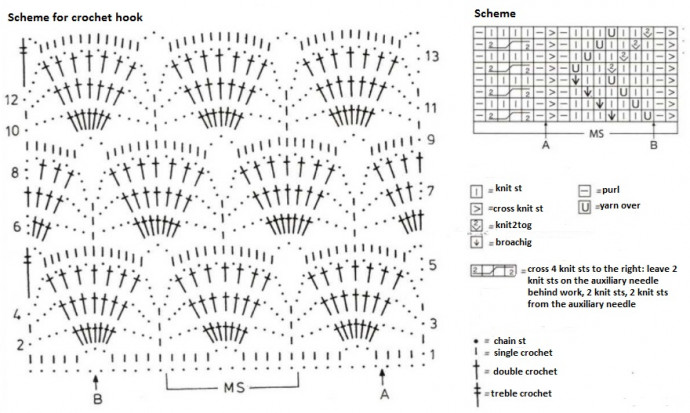
Fans Pattern
Work according to the scheme for the crochet hook. Turn rows as stated. Start with stitches before the pattern repeat, continue with the pattern repeat, and finish with stitches after pattern repeat. Execute the 1st-13th rows once, then repeat the 6th-13th rows.
Relief Pattern with Cables
Worked on 17 stitches: follow the scheme, where only RS rows are stated. Make WS rows as stitches face, make crossed stitches as cross purls, and yarn overs as purls. Repeat the pattern and finish with stitches before arrow A. Repeat the 1st-16th rows.
Stitches Control
- Fans pattern: 16.5 sts x 11 rows = 10 x 10 cm;
- Relief pattern with cables: 22.5 sts x 29.5 rows = 10 x 10 cm.
Knitting Instructions
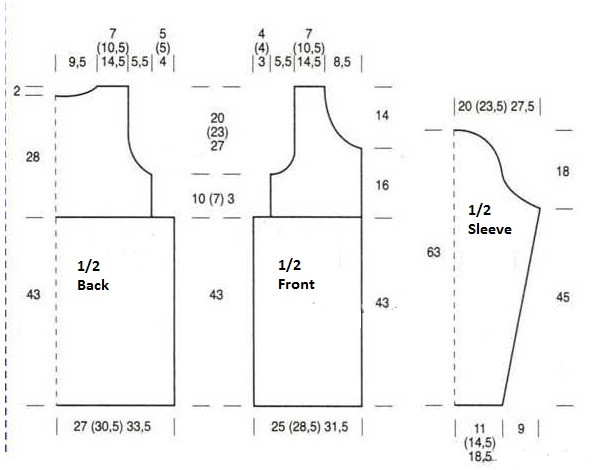
Back Section
For the lower part, make 89 (100) 111 chain stitches + 1 chain stitch increase and work with the fans pattern. Finish in 43 cm from the set-up row. For the upper part, make 98 (115) 132 stitches along the lower part and work with the relief pattern with cables between selvage stitches. At 10 (7) 3 cm height of the upper part, bind off 6 stitches from both sides for armholes and 1 x 2 stitches, 4 x 1 stitch in every 2nd row. At 18 (21) 25 cm height, bind off the central 30 (31) 30 stitches for the neck hole and finish both sides separately, binding off 3 x 2 stitches in every 2nd row. At 20 (23) 27 cm height of armholes, bind off the rest of the stitches of the shoulder from each side.
Right Front Section
For the lower part, make 41 (46) 52 chain stitches + 1 chain stitch increase and work with the fans pattern, starting with stitches from arrow A, making 2 (3) 3 pattern repeats, and finishing with stitches after the pattern repeat (for size M with stitches before arrow B). Substitute 4 double crochets for 7 double crochets at the beginning of the row in the 2nd-4th and 10th-12th rows as indicated in the scheme. Finish in 43 cm from the set-up row. For the upper part, cast on 47 (55) 64 stitches along the lower part and work with the relief pattern with cables between selvage stitches, for size M finishing with stitches before arrow B. Create the armhole in the same way as done for the back from the left side. At 6 (9) 13 cm height of the armhole, bind off 9 stitches from the right side for the neck hole and bind off 1 x 2 stitches, 6 x 1 stitch in every 2nd row and 2 x 1 stitch in every 4th row. At 20 (23) 27 cm height of the armhole, bind off the rest of the stitches of the shoulder.
Left Front Section
Make this section in symmetry to the right front.
Sleeves
Cast on 49 (66) 83 stitches and work with the relief pattern with cables between selvage stitches. For sleeve chamfers, increase 20 x 1 stitch in every 6th row from both sides, incorporating the increased stitches into the pattern. At 45 cm from the set-up row, bind off 5 stitches from both sides for the sleeve caps and bind off 3 x 2 stitches, 4 x 1 stitch in every 2nd row, 10 x 1 stitch in every 4th and 2nd rows alternately, 4 x 1 stitch in every row, and 1 x 2 stitches, 1 x 4 stitches in every 2nd row. At 18 cm height of the cap, bind off the remaining stitches.
Assembly Instructions
Join the shoulder seams. Sew in the sleeves and complete the sleeve and side seams. For the placket, fasten the neck hole and edges of the front with 2 cm of single crochets, making 3 stitches in 1 stitch at the corners. In 1 cm, create 5 buttonholes on the right front. Finish by fastening the lower edge of the sleeves in the same manner. Finally, sew on the buttons.
- Funny Pictures
-
 Hilarious Memes for Those Bored to Tears
-
 Weekly Treat of Funniest Parenting Memes for Good Laugh out Loud Right Now
-
 Really Funny Pics to End These Weekend Perfectly
- Recipes
-
 Crispy Baked Avocado Fries
-
 Scrambled Chickpea and Spinach Pitas
-
 Cinnamon Pancakes
- Lifehacks
-
 Crochet Basics: Aligned Cobble Stitch
-
 Brick Stitch Crochet Tutorial
-
 Crochet Basics: Wattle Stitch
- Crochet Ideas
-
 Crochet Snorlax Plushie Doll
-
 Crochet Beautiful Penguin Toy
-
 Crochet Tiny Snowman
- DIY
-
 DIY Santa Craft For Kids
-
 Paper Plate Angel Craft
-
 Upcycled Mason Jar Chicken Vase
- Knitting Ideas
-
 Knitted Bridger Cowl
-
 Knitted Keepsake Bag
-
 Knitted Cutie Cupcake Dolls