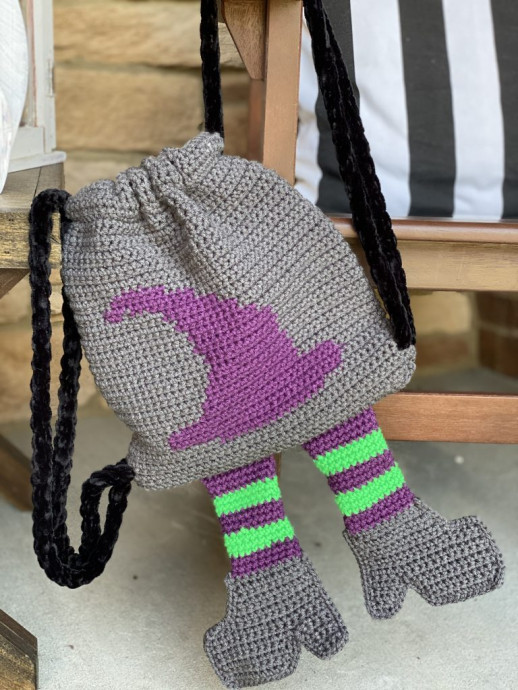
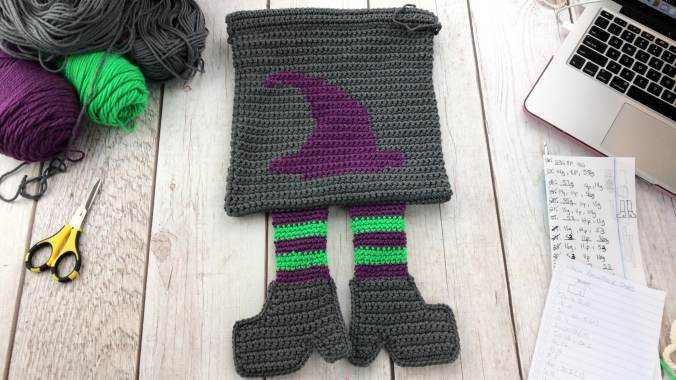
Crochet Witch Backpack Instructions


You’ll Need:
3-4oz worsted weight yarn for body and shoes, 1-2oz worsted weight hat yarn, 1oz worsted weight legs yarn.
Crochet hook 4.5 mm.
Scissors.
Stitch markers.
Strap material - This can be cord, rope, ribbon, etc.
Instructions
Witch Backpack Body
With your 4.5mm crochet hook and your backpack body color yarn (mine is gray) - G1
Make a slip knot and CH 41.
Row 1: Skip the back bump closest to your hook, SC 40 in each back bump. CH 1, turn. (40)
Rows 2-9: SC 40. CH 1, turn. (40)
Cut your yarn and set work aside.
Repeat all the steps a second time but DO NOT cut yarn.
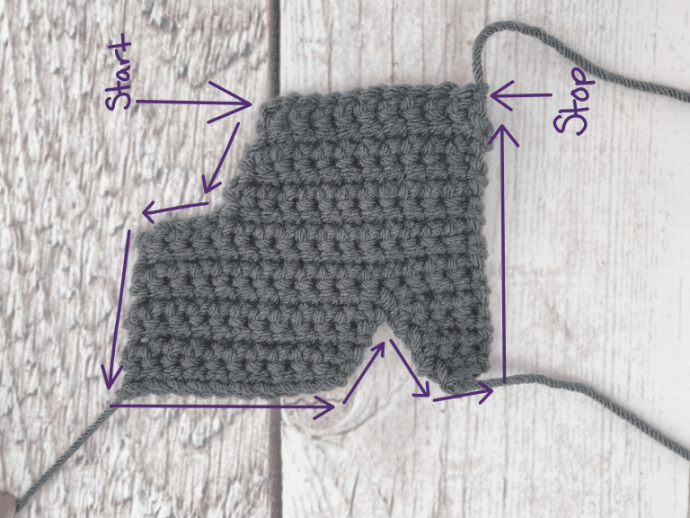
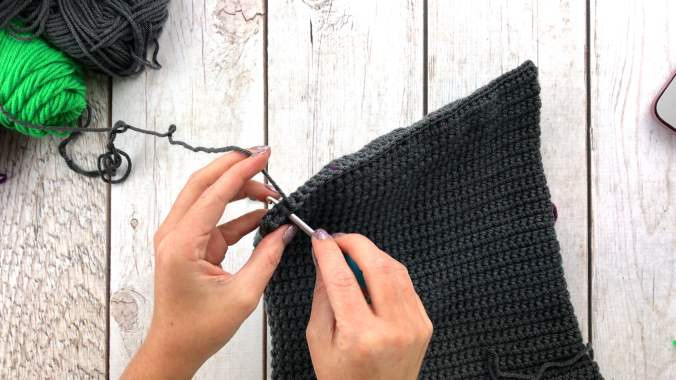
Fold the rectangle you just created in half, hot dog style. (This will be your second rectangle) Begin to crochet the first row and the 9th row together by lining up the stitches and putting a SC through the stitches of both rows at the same time. After you SC the first and last row of your rectangle, pick up your first rectangle you made. Fold it in half and continue to SC the first and last row of that rectangle together. After you crochet the first and last rows of both rectangles together you should now have a line of two rectangle tunnels. (80) Circle your work around, being careful not to get it twisted, and join your yarn into the top of your first SC (from the first rectangle) CH 1. You just completed row 1 of the body of your backpack.
Rows 2-10: SC into each stitch around. Join into the top of the first SC. CH 1. TURN (80) (G1)
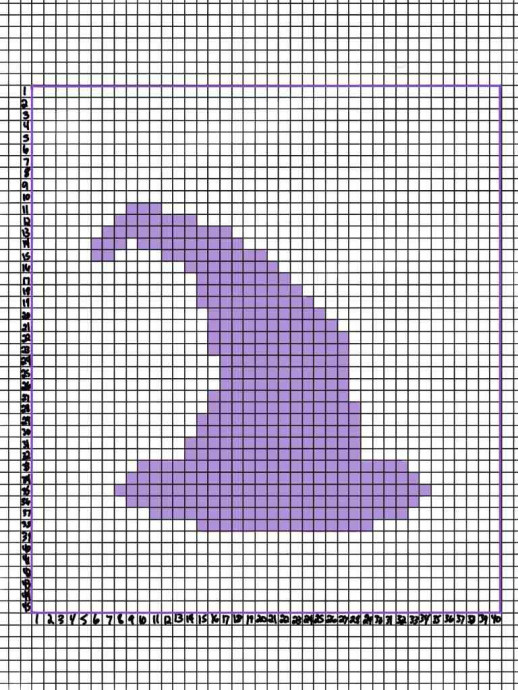
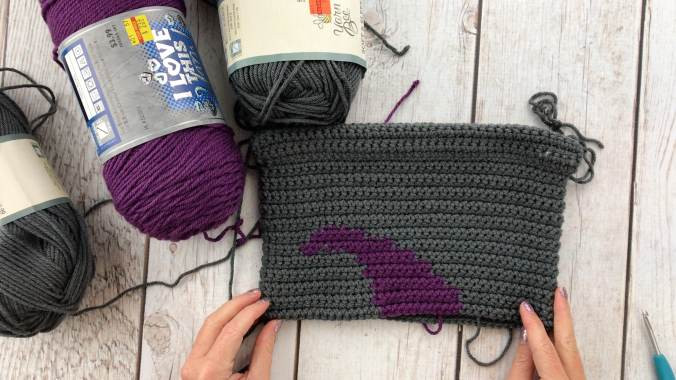
Row 11: SC 8 with Gray (G1), SC 3 with Purple, SC 69 with Gray (G2). Join into the top of the first SC. CH 1. TURN (80)
Row 12: SC 66 Gray (G2), SC 7 purple, SC 7 Gray (G1) Join into the top of the first SC. CH 1. TURN (80)
Row 13: SC 6 with Gray (G1), SC 11 with Purple, SC 63 with Gray (G2). Join into the top of the first SC. CH 1. TURN (80)
Row 14: SC 62 Gray (G2), SC 9 purple, SC 1 Gray (G1), SC 3 purple, SC 5 Gray (G1) Join into the top of the first SC. CH 1. TURN (80)
Row 15: SC 5 with Gray (G1), SC 2 with Purple, SC 4 with Gray (G1) SC 9 with Purple, SC 60 with Gray (G2). Join into the top of the first SC. CH 1. TURN (80)
Row 16: 59 Gray (G2), SC 8 purple, SC 13 Gray (G1) Join into the top of the first SC. CH 1. TURN (80)
Row 17: SC 14 with Gray (G1), SC 8 with Purple, SC 58 with Gray (G2). Join into the top of the first SC. CH 1. TURN (80)
Row 18: 57 Gray (G2), SC 9 purple, SC 14 Gray (G1) Join into the top of the first SC. CH 1. TURN (80)
Row 19: SC 14 with Gray (G1), SC 10 with Purple, SC 56 with Gray (G2). Join into the top of the first SC. CH 1. TURN (80)
Row 20: 55 Gray (G2), SC 10 purple, SC 15 Gray (G1) Join into the top of the first SC. CH 1. TURN (80)
Row 21: SC 15 with Gray (G1), SC 11 with Purple, SC 54 with Gray (G2). Join into the top of the first SC. CH 1. TURN (80)
Row 22: 53 Gray (G2), SC 12 purple, SC 15 Gray (G1) Join into the top of the first SC. CH 1. TURN (80)
Row 23: SC 15 with Gray (G1), SC 12 with Purple, SC 53 with Gray (G2). Join into the top of the first SC. CH 1. TURN (80)
Row 24: 53 Gray (G2), SC 11 purple, SC 16 Gray (G1) Join into the top of the first SC. CH 1. TURN (80)
Row 25: SC 16 with Gray (G1), SC 11 with Purple, SC 53 with Gray (G2). Join into the top of the first SC. CH 1. TURN (80)
Row 26: 52 Gray (G2), SC 11 purple, SC 16 Gray (G1) Join into the top of the first SC. CH 1. TURN (80)
Row 27: SC 15 with Gray (G1), SC 12 with Purple, SC 53 with Gray (G2). Join into the top of the first SC. CH 1. TURN (80)
Row 28: 52 Gray (G2), SC 13 purple, SC 15 Gray (G1) Join into the top of the first SC. CH 1. TURN (80)
Row 29: SC 14 with Gray (G1), SC 14 with Purple, SC 52 with Gray (G2). Join into the top of the first SC. CH 1. TURN (80)
Row 30: 52 Gray (G2), SC 15 purple, SC 13 Gray (G1) Join into the top of the first SC. CH 1. TURN (80)
Row 31: SC 13 with Gray (G1), SC 15 with Purple, SC 52 with Gray (G2). Join into the top of the first SC. CH 1. TURN (80)
Row 32: 52 Gray (G2), SC 15 purple, SC 13 Gray (G1) Join into the top of the first SC. CH 1. TURN (80)
Row 33: SC 9 with Gray (G1), SC 23 with Purple, SC 48 with Gray (G2). Join into the top of the first SC. CH 1. TURN (80)
Row 34: 47 Gray (G2), SC 25 purple, SC 8 Gray (G1) Join into the top of the first SC. CH 1. TURN (80)
Row 35: SC 7 with Gray (G1), SC 27 with Purple, SC 46 with Gray (G2). Join into the top of the first SC. CH 1. TURN (80)
Row 36: 47 Gray (G2), SC 25 purple, SC 8 Gray (G1) Join into the top of the first SC. CH 1. TURN (80)
Row 37: SC 10 with Gray (G1), SC 22 with Purple, SC 48 with Gray (G2). Join into the top of the first SC. CH 1. TURN (80)
Row 38: 51 Gray (G2), SC 15 purple, SC 14 Gray (G1) Join into the top of the first SC. CH 1. TURN (80)
Row 39-45: SC into each stitch around. Join into the top of the first SC. CH 1. TURN (80) (G1)
Do not cut yarn, just set your backpack body aside for now.
Witch Shoes
Make 4.
With your 4.5mm crochet hook and your backpack body color yarn (mine is gray).
Make a slip knot and CH 11.
Row 1: Skip the back bump closest to your hook, SC 10 in each back bump. CH 1, turn. (10)
Row 2: SC in each stitch. CH 1, turn. (10)
Row 3: INC, SC 9. CH 1, turn. (11)
Row 4: SC in each stitch. CH 1, turn. (11)
Row 5: INC, SC 10. CH 1, turn. (12)
Row 6: SC in each stitch. (12)
CH 5.
Row 7: Skip the CH closest to your hook, SC in each stitch. CH 1, turn. (16)
Row 8: SC in each stitch. CH 1, turn. (16)
Row 9: SC in each stitch. CH 1, turn. (16)
Now we’re starting on the heel portion of our witch shoe.
Row 10 Heel: SC 5. CH 1, turn. (5)
Row 11 Heel: DEC, SC 3. CH 1, turn (4)
Row 12 Heel: SC in each stitch. CH 1, turn. (4)
Row 13 Heel: DEC, SC 2. CH 1, turn. (3)
Row 14 Heel: SC in each stitch. Tie off (3)
Toe portion of the shoe
Join your yarn back into the same stitch as the 5th SC in Row 10 Heel.
Row 10 Toe: Starting in the same spot where you just joined, SC in each stitch. CH 1, turn (12)
Row 11 Toe: SC 10. DEC. CH 1, turn. (11)
Row 12 Toe: SC in each stitch. CH 1, turn. (11)
Row 13 Toe: SC 9. DEC. CH 1, turn. (10)
Row 14 Toe: SC in each stitch. Tie off (10)
Sew in all your shoe tails.
Assembly of Shoes
Lay one shoe on top of the other and line them up. SC around both panels of the shoes, lining up the stitches but leaving the leg hole open. I like to put 2 or 3 stitches in each outer corner space to round it out smoothly. Cut yarn and tie off.
Witch Stockings
You will not be turning after each row for the stockings.
Still using your 4.5mm crochet hook, pick your first stocking color (mine is purple) and join your yarn in the ankle stitch that’s in line with the heel of the shoe.
Rows 1: SC 20 purple. Join into the top of the first SC. CH 1.
There should be 10 SC across the front panel of the witch shoe and 10 SC across the back panel of the witch shoe.
Rows 2-3: SC 20 purple. Join into the top of the first SC. CH 1.
In the last stitch of row 3, switch to your second stocking color. Mine is neon green.
Rows 4-6: SC 20 green. Join into the top of the first SC. CH 1.
Rows 7-9: SC 20 purple. Join into the top of the first SC. CH 1.
Rows 10-12: SC 20 green. Join into the top of the first SC. CH 1.
Rows 13-15: SC 20 purple. Join into the top of the first SC. CH 1. Tie off and sew in any remaining tails.
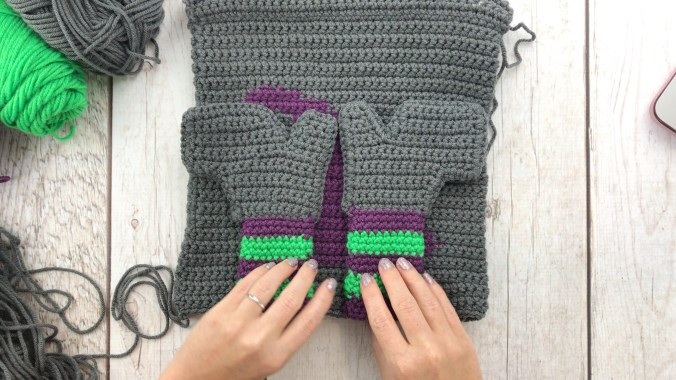
Attaching Witch Legs to Backpack
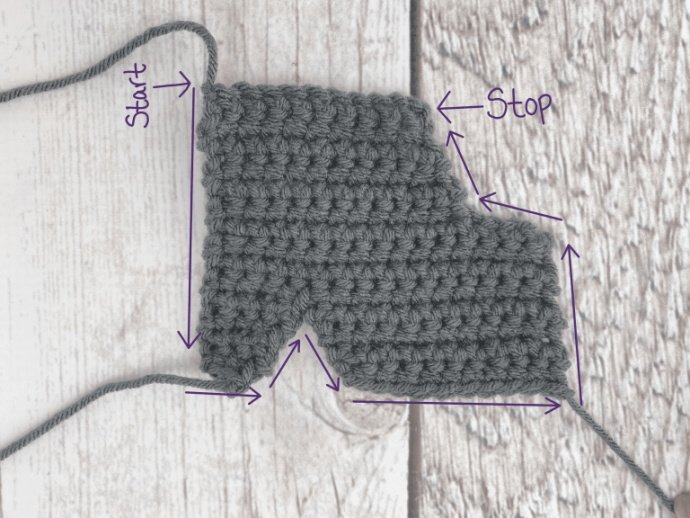
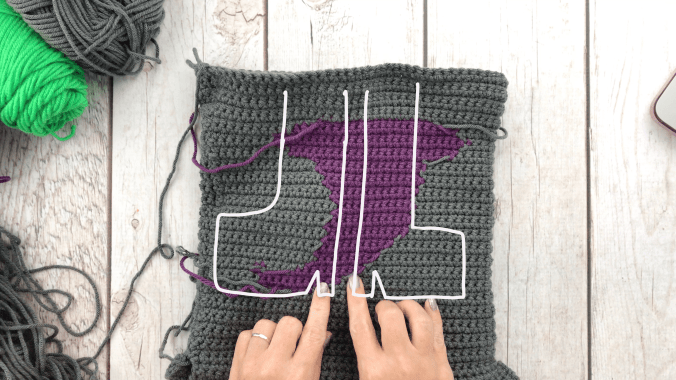
With the right side of your backpack facing up, lay your witch legs on top of the backpack, toes facing out, with the openings lined up to the bottom of the backpack. Keeping everything in place, flip your backpack inside out. Your backpack is still attached to your working yarn at this point, so flip it inside out in such a way where you can still use the working yarn. Now flip your backpack so it is back side facing up. Adjust your backpack so everything is lined up and centered. Insert your hook into your working yarn (still attached to the backpack). Line up the stitches (40 front with 40 back), and begin to single crochet them together. (8 SC- going through the backpack only). After 8 SC stitches, you will come up to your first witch leg. For the next 10 SC you will be going through two stitches on the backpack and 2 stitches on the witch leg. The next 4 SC stitches will be just backpack stitches (this is the space between the two witch legs). For the next 10 SC you will be going through two stitches on the backpack and 2 stitches on the witch leg. End by SC the last 8 stitches of the backpack closed. Tie off and sew in your tail.
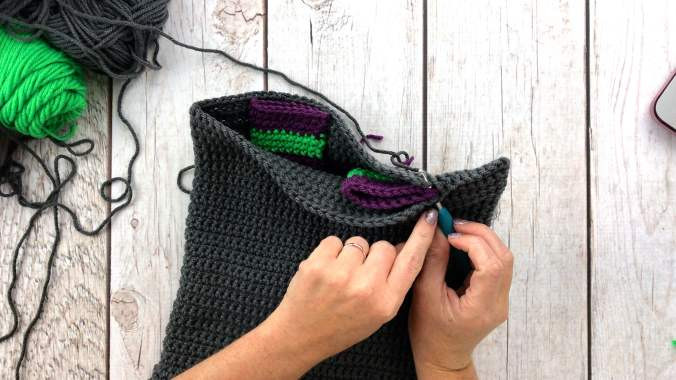
Flip your backpack inside out and now it’s time to add your straps. To make my backpack straps, I cut two pieces of black 60″ long velvet knitted cord. To add the drawstrings to your backpack, you will need a crochet hook (one without a rubber handle works best) to thread your straps through the tunnels we created when making the body pieces. Your first strap will go into the left side of the front tunnel and out the right side of the front tunnel. Then you will thread it through the back tunnel, going into the right side and out the left side. For the second strap, you do the complete opposite. Go in the front tunnel right side and out the left, then in the back tunnel left side and out the right. Using your crochet hook, pull the ends of the straps into the backpack at the bottom-side, and knot them together. The knot should be on the inside of the backpack.
After you knot both straps your backpack is complete!