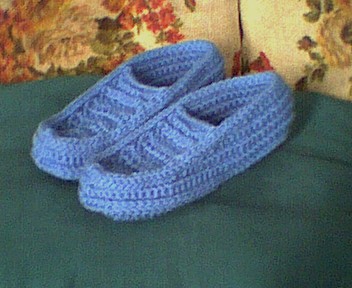
Crocheted Slippers Pattern Guide

Materials
2 - 50g balls of 4 ply knitting worsted.
Crochet Hook - 6.00 mm or J hook.
Note: These slippers will stretch after wearing. For a snug fit, use a smaller size hook, such as 5.5mm or 5.00mm. My notes, such as where to make adjustments for other sizes, are in blue.
Abbreviations Used
- st - stitch
- ch - chain
- ss - slip stitch
- sc - single crochet
- hdc - half double crochet
- dc - double crochet
- Rnd - round
- Beg - beginning
How To Make Slip Stitches (ss): Insert hook into stitch, yarn over hook, pull up a loop, and pull through the loop on your hook.
PLEASE NOTE: I have a much easier version of these slippers at Crocheted Moccasin Slippers.
If you find these slippers a little too big for a size 6, see below for tips from Steve. Plus, some new tips from Lisa with interesting modifications.
When you finish the slippers, for a variation, you can add a cuff to this slipper as done in the Baby Slipper pattern. To do this, pick up stitches with your knitting needles around the opening of the slipper (on the bottom loops of the slip stitches). Join yarn to the inside of the slipper.
RND 1: K1, P1, repeat to end of Round.
RNDS 2: Desired length - same as Round 1.
Knit off (not too tightly). Fold down cuff.
Bottom (or Sole of Slipper)
Ch 23 (Adjust here for different sizes; e.g., adding 2 chs will put you up to size 8/9, subtract to decrease size. You could also use a smaller hook, such as 4.00mm or 5.00mm if you wish to make your slipper a little smaller than size 6/7.)
RND 1: 3 dc in 4th ch from hook, 1 dc in next 18 chs, 3 dc in the last ch, pull the tail end of yarn up towards you then 3 dc in the same ch as the 3 dc you just made. (Now you are going to work up the backside of your starting chain) 1 dc in next 18 back of chs, 4 dc in last back of ch st., ss to join to the beginning of your work on this round.
RND 2: Ch 3, 1 dc at the bottom of ch 3, 2 dc in next 5 dc, 1 dc in next 8 dc, 1 hdc in next 1 dc, 1 sc in next 7 dc. (Adjust here for different sizes; you will have more dc & sc before and after the 1 hdc if increasing, or less if decreasing. The same holds true for the next round.) 2 sc in next 7 dc, 1 sc in next 7 dc, 1 hdc in next 1 dc, 1 dc in next 8 dc, 2 dc in next 5 dc, ss to join to the top of ch 3 at the beginning of this RND.
RND 3: Ch 3, 1 dc at the bottom of ch 3, 1 dc in next 18 dc, 1 hdc in the next stitch, 1 sc in next 12 sc, 2 sc in next 5 sc, 1 sc in next 12 sc, 1 hdc in the next stitch, 1 dc in next 18 dc, 2 dc at the bottom of the beginning ch 3, ss to join.
(For wider slippers, add another round of sc here. You will need to make 2 sc in some stitches at the toe and heel ends so it won't curl upwards.)
RND 4: Ch 1, ss through the front loop only of each dc and sc all around to the beginning (be sure not to make your slip stitches too tight), ss to join. (This forms a turning ridge for crocheting the sides) ch 1 and Turn.
Sides of Slipper
All stitches (ss & sc) are through the back loop only of each stitch unless otherwise indicated.
RND 1: 1 sc in each ss all around to the beginning, ss to join, ch 1, turn. (77 sc - I'll indicate how many sc at the end of each RND; however, if you are off by a sc or 2, don't worry about it. If you are making a larger or smaller slipper, ignore this count.)
RND 2: 1 sc in each sc of previous RND all around to the beginning, ss to join, ch 1, turn. (77 sc)
RND 3: 1 ss in next 8 sc (throughout the pattern, wherever it calls for slip stitches (ss), be sure you do not make them too tight). 1 sc in each sc to the last 8 sc of previous RND, 1 ss in next 8 sc, ss to join, ch 1, turn. (61 sc)
RND 4: 1 ss in next 12 sts, 1 sc in each sc to the last 6 sc of previous RND, ss in next 3 sc, ch 1, turn. (51 sc)
RND 5: Skip the next ss, 1 ss in next 2 ss, 1 ss in next 1 sc, 1 sc in each sc to the last 6 sc of previous RND, 1 ss in next 3 sc, ch 1, turn. (44 sc)
RND 6: Skip the next ss, 1 ss in next 2 ss, 1 ss in next 1 sc, 1 sc in each sc to the last 6 sc of previous RND, 1 ss in next 3 sc, ch 1, turn. (37 sc)
RND 7: Skip the next ss, 1 ss in next 2 ss, 1 ss in next 1 sc, 1 sc in each sc to the last 6 sc of previous RND, 1 ss in next 3 sc, ch 1, turn. (30 sc)
RND 8: Skip the next ss, 1 ss in next 2 ss, 1 ss in next 1 sc, 1 sc in each sc to the last 3 sc of previous RND, (26 sc) 1 ss in the next 3 sc. DO NOT TURN (you will now be working over all previous RNDS on this side of the slipper to the toe end) - proceed as follows: 1 ss in the 3 ss of previous RND, 1 ss in the turning ch 1 of the previous RND, 1 ss in the next 3 sc of the next RND below, 1 ss in the next 3 ss, 1 ss in the turning ch 1 of the next RND below, 1 ss in the next 3 sc of the next RND below, 1 ss in the next 8 ss, ss to join to the first ss at the beginning of RND 3. DO NOT TURN.
RND 9: (you will be working over all previous RNDS on this side of the slipper) Ch 1, 1 ss in the next 12 ss of RND 4, 1 ss in the next 3 sc of RND 4, 1 ss in the turning ch of RND 5, 1 ss in the next 3 ss of RND 6, 1 ss in the next 3 sc of RND 6, 1 ss in the turning ch 1 of RND 7, 1 ss in the next 3 ss of RND 8, 1 ss in each stitch to the beginning, ss to join.
RND 10: Ch 1, 1 ss in each st (through front loop of sts) all around to the beginning, fasten off. (This forms a ridge and will be called the Ridge RND in the rest of the pattern.)
Top of Slipper
ROW 1: Count back 4 sts from where you joined at the end of RND 10 (Ridge RND). Begin here by joining yarn with a ss through the front (inside) loop of this stitch. (All sts worked on the Ridge RND will be through the front loops which will be the bottom loop from the way you will be holding at your work.) Working towards the toe end, skip the next 2 ss on the Ridge RND, 1 sc in the next 4 ss, skip the next 2 ss, ss to join in the next ss, 1 ss in the next 2 ss on the Ridge RND, turn. (You now have 4 sc across the toe end.) You may have to adjust this row if it looks lopsided. Unravel and move your beginning ss to a more suitable place on the Ridge RND. (for larger slippers, adjust so that you have 5 or 6 sc across the toe end)
ROW 2: 1 dc in next 2 sc, 2 dc in next 1 sc, 1 dc in next 1 sc, skip 1 ss on the Ridge RND, ss to join in the next ss, 1 ss in the next 2 ss on Ridge RND, turn. (5 dc across - you will have more dc across each Row if you are making larger slippers)
ROW 3: 1 dc in next 2 dc, 2 dc in next 1 dc, 1 dc in next 2 dc, skip the next ss on Ridge RND, ss to join in the next ss, 1 ss in the next 2 ss, turn. (6 dc across.)
ROW 4: 1 dc in next 6 dc, skip the next ss on Ridge RND, ss to join in the next ss, 1 ss in the next 2 ss, turn. (6 dc across.)
ROW 5: 1 dc in next 3 dc, 2 dc in next 1 dc, 1 dc in next 2 dc, skip the next ss on Ridge RND, ss to join in the next ss, 1 ss in the next 2 ss, turn. (7 dc across.)
ROW 6: 1 dc in next 3 dc, 2 dc in next 1 dc, 1 dc in next 3 dc, skip the next ss on Ridge RND, ss to join in the next ss, 1 ss in the next 2 ss, turn. (8 dc across.)
ROW 7: 1 dc in next 8 dc, skip the next ss on Ridge RND, ss to join in the next ss, 1 ss in the next 2 ss, turn. (8 dc across.)
ROW 8: 1 dc in next 8 dc, skip the next ss on Ridge RND, ss to join in the next ss, 1 ss in the next 1 ss, turn. (8 dc across.)
ROW 9: You change to single crochet on this row. 1 sc in next 2 dc, 2 sc in next 1 dc, 1 sc in next 2 dc, 2 sc in next 1 dc, 1 sc in next 2 dc, skip the next ss on Ridge RND, ss to join in the next ss, 1 ss in the next 1 ss, turn. (10 sc across.)
ROW 10: 1 sc (through back loops only) in next 10 sc, ss to join in the next ss on Ridge RND, 1 ss in the next ss, turn. (10 sc across.)
ROWS 11, 12: Same as Row 10.
ROW 13: 1 ss in next 10 ss (through both loops), (remember, don't make your ss too tight), ss to join in the next ss on Ridge RND, fasten off.


