How to Crochet Cozy Slippers with a Heart Pattern


You’ll Need:
2 skeins of Red Heart Lisa yarn in Red (color A) and small amount of White (color B);
Crochet hook 4.5 mm;
Stitch markers;
Tapestry needle;
Scissors.
Size:
The slippers have a lot of stretch in length! Without stretching, the slippers measure 24.5 cm in length, and the circumference around the foot is 23 cm.
For larger sizes, work more rounds and rows.
For wider and longer slippers, you could try using thicker yarn and a larger hook size.
Stitches Control:
16 fpdc x 15 rounds = 10 x 10 cm.
How to Change Colors:
Work the last stitch before changing colors until half, having 2 loops on the hook. Pick the new color yarn and complete the stitch by pulling the new color yarn through the 2 loops on the hook.
Do not cut yarns when changing colors. You can either work around the yarn not in use or carry the unworked yarns across the back. Keep the tension of the strands not in use a little loose to maintain elasticity.
Instructions:
Work rounds 1-5 the same for both left and right slippers!
Start with a magic ring.
Round Instructions:
Round 1: ch1, work 11 hdc into ring, join with sl st to top of first hdc. (11 sts)
Round 2: ch2, (1 dc into top of next st, 1 fpdc around the same st as the dc just made), repeat around; join with sl st to top of first st. (22 sts)
Round 3: ch2, 1 fpdc around each of next 4 sts, (1 dc into top of next st, 1 fpdc around same st), 1 fpdc around next st, (1 dc into top of next st, 1 fpdc around same st), 1 fpdc around each of next 8 sts, (1 dc into top of next st, 1 fpdc around same st), 1 fpdc around next st, (1 dc into top of next st, 1 fpdc around same st), 1 fpdc around each of next 4 sts; join with sl st to top of first fpdc. (26 sts)
Round 4: ch2, 1 fpdc around each of next 5 sts, (1 dc into top of next st, 1 fpdc around same st), 1 fpdc around next st, (1 dc into top of next st, 1 fpdc around same st), 1 fpdc around each of next 10 sts, (1 dc into top of next st, 1 fpdc around same st), 1 fpdc around next st, (1 dc into top of next st, 1 fpdc around same st), 1 fpdc around each of next 5 sts; join with sl st to top of first fpdc. (30 sts)
Round 5: ch2, 1 fpdc around each of next 6 sts, (1 dc into top of next st, 1 fpdc around same st), 1 fpdc around next st, (1 dc into top of next st, 1 fpdc around same st), 1 fpdc around each of next 12 sts, (1 dc into top of next st, 1 fpdc around same st), 1 fpdc around next st, (1 dc into top of next st, 1 fpdc around same st), 1 fpdc around each of next 6 sts; join with sl st to top of first fpdc. (34 sts)
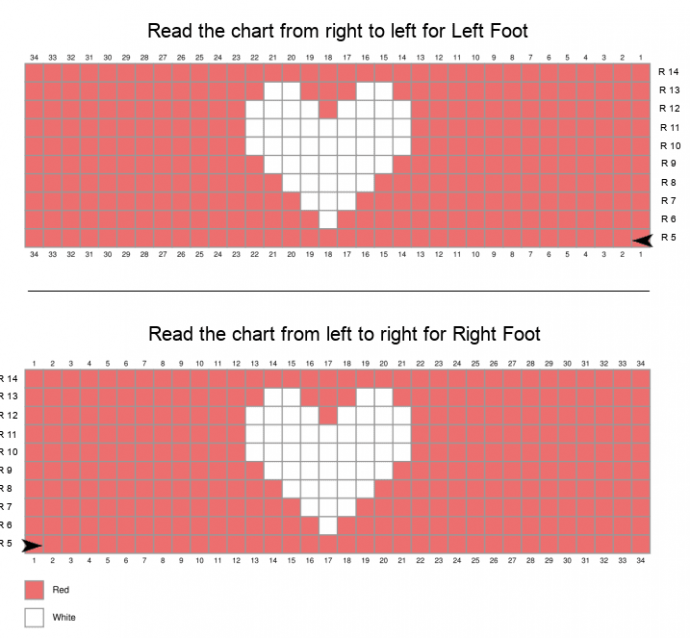
Heart Pattern:
Because the heart has an uneven number of stitches and the slippers have an even number of sts in a round, the heart is not quite centered. One stitch is off, meaning there is one stitch more in the main color on one side than on the other side of the heart.
Note: Work rounds 6 - 13 as written in the pattern for the Left Foot with changes in parentheses for the Right Foot.
Round 6:
ch2, with A 1 fpdc in each of next 16 (17) sts, changing to B at the last stitch, with B 1 fpdc around the next stitch changing to A when the stitch is made until half; continue with A and work 1 fpdc around each of next 17 (16) sts, sl st to top of first fpdc.
Round 7:
With A ch2, work 1 fpdc around each of next 15 (16) sts, changing to B at the last stitch; with B, 1 fpdc around each of next 3 sts changing to A at the last stitch, continue with A and work 1 fpdc around each of next 16 (15) sts, sl st to top of first fpdc.
Round 8:
With A ch2, work 1 fpdc around each of next 14 (15) sts, changing to B at the last stitch; with B, 1 fpdc around each of next 5 sts changing to A at the last stitch, continue with A and work 1 fpdc around each of next 15 (14) sts, sl st to top of first fpdc.
Round 9:
With A ch2, work 1 fpdc around each of next 13 (14) sts, changing to B at the last stitch; with B, 1 fpdc around each of next 7 sts changing to A at the last stitch, continue with A and work 1 fpdc around each of next 14 (13) sts, sl st to top of first fpdc.
Rounds 10-11:
With A ch2, work 1 fpdc around each of next 12 (13) sts, changing to B at the last stitch; with B, 1 fpdc around each of next 9 sts changing to A at the last stitch, continue with A and work 1 fpdc around each of next 13 (12) sts, sl st to top of first fpdc.
Round 12:
With A, work 1 fpdc around each of next 12 (13) sts, changing to B at the last stitch; with B, 1 fpdc around each of the next 4 sts changing to A at the last stitch, with A, work 1 fpdc until half, change to B and finish the stitch with B; continue with B, work 1 fpdc around each of the next 4 sts changing to A at the last stitch, with A work 1 fpdc around each of the next 13 (12) sts, sl st to top of first fpdc.
Round 13:
With A ch2, work 1 fpdc around each of the next 13 (14) sts, changing to B at the last stitch; with B, 1 fpdc around each of the next 2 sts changing to A at the last stitch, with A work 1 fpdc around each of the next 3 sts, change to B at the last stitch, with B, 1 fpdc around each of the next 2 sts changing to A at the last stitch, with A work 1 fpdc around each of the next 14 (13) sts, sl st to top of first fpdc. Cut yarn B.
Round 14:
With A work 34 fpdc around, sl st to top of first fpdc.
Rounds 15-18:
Repeat as round 14.
Note: It will be much easier to count the rounds/rows on the wrong side. Count the ridges on the wrong side and write down to make the same for the second slipper. At the end of round 18, you will have 17 ridges on the wrong side. For larger slippers, continue until the desired length.
Cut yarn. Fasten off.
Start working in rows!
Left Foot:
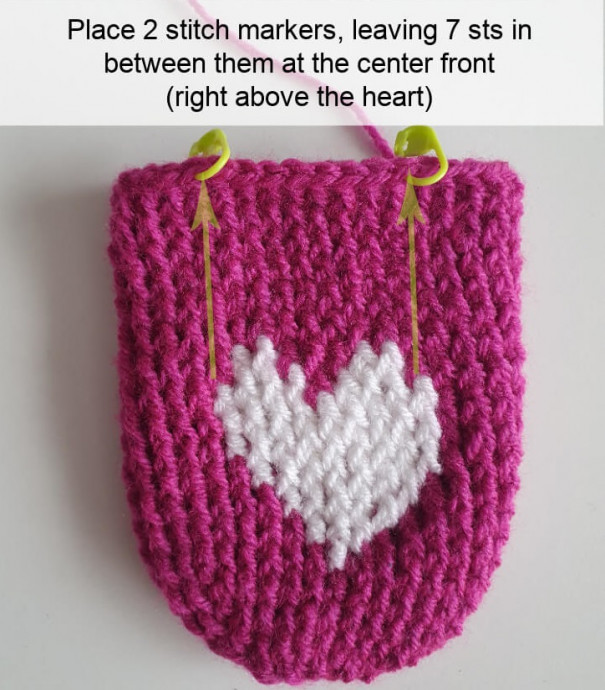
Holding the piece with the back seam facing you, count 14 sts from the back seam to the right, place a stitch marker into the 14th st and a second stitch marker into the 22nd st.
Right Foot:
Holding the piece with the back seam facing you, count 13 sts from the back seam to the right, place a stitch marker into the 13th st and a second stitch marker into the 21st st.
For both slippers, the stitch markers will be placed right above the heart.
Joining Yarn:
For both slippers: Join yarn with a standing hdc into the first marked st. Continue to work row 1 below.
Row Instructions:
Row 1 Left Foot (RS): work 1 fpdc around each of the next 13 sts, skip the joining seam below and work 1 fpdc around each of the next 12 sts, 1 hdc into the 2nd marked st, turn. (27 sts)
Row 1 Right Foot (RS): work 1 fpdc around each of the next 12 sts, skip the joining seam below and work 1 fpdc around each of the next 13 sts, 1 hdc into the 2nd marked st, turn. (27 sts)
From here, work the same for both slippers!
Row 2 (WS):
ch2, (count as hdc), 1 bpdc around each of the next 25 sts, 1 hdc in the top of standing hdc of the previous round, turn. (27 sts)
Row 3 (RS):
ch2, (count as hdc), 1 fpdc around each of the next 25 sts, 1 hdc in the top of ch2, turn. (27 sts)
Row 4 (WS):
ch2, (count as hdc), 1 bpdc around each of the next 25 sts, 1 hdc in the top of ch2, turn. (27 sts)
Rows 5-11:
Repeat as rows 3-4. (After finishing row 11 you will have 10 ridges, counted from where you began working in rows). For larger sizes, continue until you reach the desired length.
Row 12 (WS):
decrease row (you will decrease 2 sts): ch2, 1 bpdc around each of the next 10 sts, bpdc2tog inv, 1 bpdc around the next st, bpdc2tog inv, 1 bpdc around each of the next 10 sts, 1 hdc in the top of ch2. (25 sts)
Last Row:
ch2, 1 fpdc around each of the next 23 sts, 1 hdc in the top of ch2. (25 sts).
Joining the Sides at the Heel:
Turn piece on the wrong side.
ch1, join at the heel the sides together by slip stitching through both top loops of each side.
Don't fasten off! Slip stitch back to the top. ch1 and turn the piece on the right side again.
Continue to work the cuff around the foot opening.
Cuff:
Round 1: Work 34 or 36 hdc evenly spaced around the foot opening, sl st to top of first st.
For a larger opening, work more sts, but the total number should be a multiple of 2!
Round 2:
ch3, skip 1 st, *1 fpdc around the next st, ch1, skip 1 st*, repeat from * to *, sl st with B to the top of the first fpdc.
Round 3:
with B ch2, 1 fpdc around the first skipped hdc 2 rounds below, ch1, skip the next fpdc, *1 fpdc around the next skipped hdc 2 rounds below, ch1, skip the next fpdc*, repeat from * to * around, sl st with A to the top of the first fpdc.
Round 4:
with A ch2, 1 fpdc around the first skipped fpdc 2 rounds below, ch1, skip the next fpdc, *1 fpdc around the next skipped fpdc 2 rounds below, ch1, skip the next fpdc*, repeat from * to * around, at the last repeat don't ch1 anymore before slip stitching to the top of the first fpdc.
Cut yarn. Fasten off. Weave in the ends.