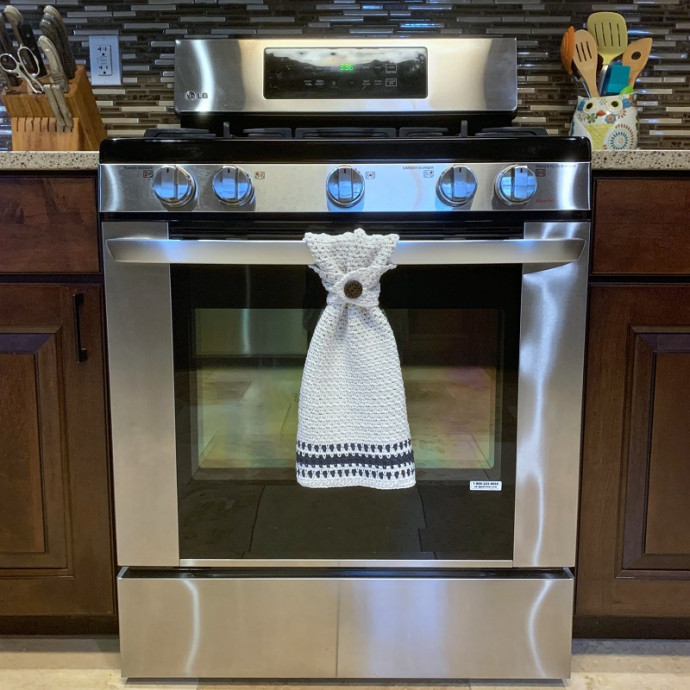
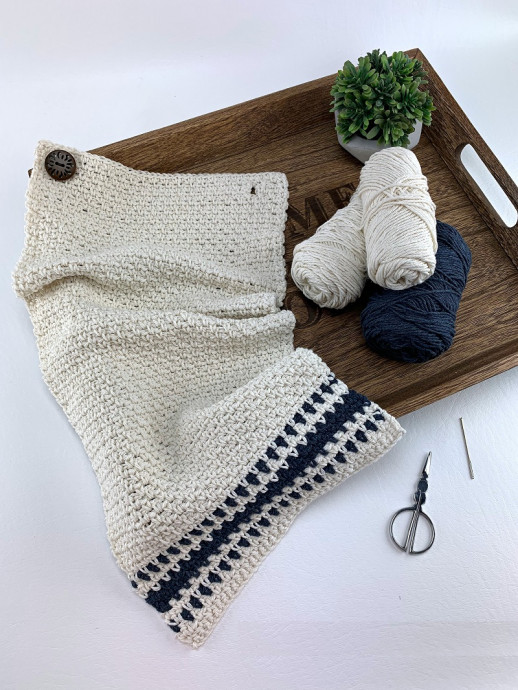
How to Crochet a Stylish Towel with Buttonhole

You’ll Need:
2 balls of Lion Brand’s Re-Up yarn in ecru color (main color);
1 ball of the same yarn, but in denim color;
Crochet hooks 5 and 5.5 mm;
Scissors;
Yarn needle.
Size:
9.25″ W x 20.5″ L.
Stitches Control:
13 sts x 13 rows = 3” x 3”.
Instructions:
Changing Colors:
For all color changes, you’ll change colors on the last pull through of the last stitch of the row.
Set-Up:
With a 5.50 mm hook & MC (ecru) yarn, ch 42. Turn.
Row Instructions:
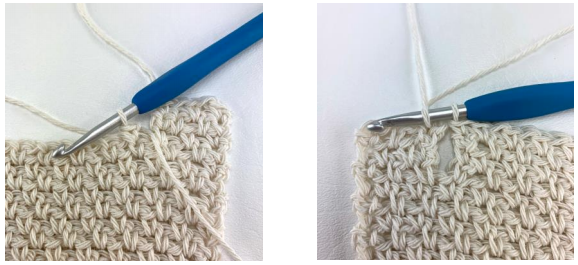
Row 1: Switch to a 5.00 mm crochet hook, working into the back hump of the foundation chain, sc in the 2nd ch from your hook and in each ch across. Turn. (41 sts)
Row 2 (RS): Ch 1, sc in the first st, (ch 1, skip the next st, sc in the next st or ch-1 sp), rep from ( to ) across. Turn.
Row 3: Ch 1, sc in the first st, sc in the next ch-1 sp, (ch 1, skip the next st, sc in the next ch-1 sp) rep from ( to ) across to the last st, sc in the last st. Turn. *Switch colors to CC. Fasten off MC.
Row 4: With CC, repeat Row 2. *Switch colors to MC. Fasten off CC.
Row 5: With MC, repeat Row 3.
Row 6: With MC, repeat Row 2. *Switch colors to CC. Fasten off MC.
Row 7: With CC, repeat Row 3.
Rows 8 – 9: With CC, repeat Rows 2 – 3. *Switch colors to MC at the end of Row 9. Fasten off CC.
Row 10: With MC, repeat Row 2.
Row 11: With MC, repeat Row 3. *Switch colors to CC. Fasten off MC.
Row 12: With CC, repeat Row 2. *Switch colors to MC. Fasten off CC.
Row 13: With MC, repeat Row 3.
With MC, repeat Rows 2 – 3, ending with a row 3 repeat, until your towel measures 19″.
Fasten off. Continue on to Creating the Buttonhole.
Button-Hole
Narrow Tab:
Row 1 (RS): Ch 1, sc in the first st, (ch 1, skip the next st, sc in the next ch-1 sp) twice. Turn. (5 sts) *Place a stitch marker in the next stitch to mark the beginning of the Wide Tab.
Row 2: Ch 1, sc in the first st, sc in the next ch-1 sp, ch 1, skip the next st, sc in the next ch-1 sp, sc in the last st. Turn.
Row 3: Ch 1, sc in the first st, ch 1, skip the next st, sc in the next ch-1 sp, ch 1, skip the next st, sc in the last st.
Fasten off. Weave in ends. Continue on to Wide Tab.
Wide Tab:
Row 1 (RS): Join MC with a standing sc in the st where you placed a stitch marker next to the narrow tab, sc in the next ch-1 sp, (ch 1, skip the next st, sc in the next ch-1 sp) rep from ( to ) across. Turn. (36 sts)
Rows 2 – 3: Ch 1, sc in the first st, sc in the next ch-1 sp, (ch 1, skip the next st, sc in the next ch-1 sp) rep from ( to ) across to the last 2 sts, ch 1, skip the next st, sc in the last st. Turn.
Do not fasten off. Continue on to Closing the Buttonhole.
Closing the Button-Hole
In this row, you’ll work all the way across the Wide Tab and then pick up stitches from the Narrow Tab and work across it.
Row 1: Ch 1, sc in the first st, sc in the next ch-1 sp, (ch 1, skip the next st, sc in the next ch-1 sp) rep from ( to ) across to the last 2 sts of the wide tab, ch 1, skip the next st, sc in the last st of the wide tab, sc in the next st of the narrow tab, sc in the next ch-1 sp, ch 1, skip the next st, sc in the next ch-1 sp, sc in the last st. Turn. (41 sts)
Row 2 (RS): Ch 1, sc in each st and ch-1 sp across.
Fasten off. Weave in ends. Continue on to Attaching the Button.
Attaching the Button
Notice that the buttonhole is on the right. Sew the button onto the towel as shown (side opposite the button-hole).