

Turn Yarn Into a Cute Bee Keychain — Easy Amigurumi Pattern (Approx. 12 cm)

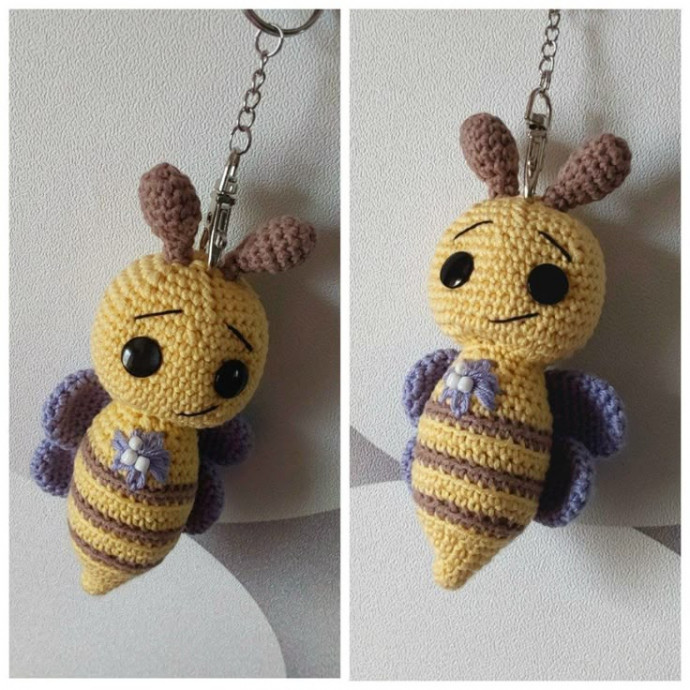
Create a sweet handmade accessory with this easy amigurumi pattern for a crochet bee keychain. Perfect for beginners, this small project uses basic stitches and simple shaping to craft a cheerful striped bee complete with antennae and wings. The finished bee measures about 12 cm, but you can easily scale it by changing yarn weight or hook size. Follow the step‑by‑step instructions below for materials, stitch abbreviations, body, head, antennae, wings and assembly.
Add a bit of handmade charm to your keys with this easy crochet bee keychain pattern. This small amigurumi project uses basic stitches and simple shaping to create a cheerful bee with striped body, tiny antennae and wings — perfect as a gift, accessory or quick practice piece for beginner crocheters. The finished bee measures about 12 cm but you can easily scale it by changing yarn or hook size.
Supplies Needed
To make your crochet bee keychain, you will need the following materials:
- Cotton yarn (e.g. Schachenmayr Catania 125m/50g) in three colors: yellow, brown, and lavender
- A bit of black yarn for the eyebrows
- 3 mm crochet hook
- Polyester fiberfill stuffing
- Scissors
- Little beads
- 2 black beads or safety eyes
- Yarn needle
Skill Level
Easy
Size
The ready amigurumi is approximately 12 cm but can be adjusted depending on the yarn and hook you use.
Skills Required
- Chain
- Single crochet
- Double crochet
- Half double crochet
- Slip stitch
- Increase
- Decrease
Abbreviations Used
- Ch = Chain
- St = Stitch
- Sc = Single crochet
- Sl st = Slip stitch
- Dec = Decrease stitch (two single crochets together)
- Inc = Increase stitch (two single crochets into one stitch)
- Dc = Double crochet
- Rnd = Round
Helpful Tips
- Do not join rounds; work in a continuous spiral.
- Use a stitch marker or a piece of yarn to mark the end or the beginning of a round.
- All stitches are worked into both loops unless stated otherwise in the pattern.
- Amigurumi can be made in any desired colors.
Seamless Way of Changing Color
To change color without seams when working in the round, pick up the new color at the end of the round: insert your hook into the stitch, yarn over the new color, and pull through the stitch and the loop on your hook to complete the stitch.
Shift Stitch
During the work of spiral amigurumi, you might need to keep the work symmetric. As the work tends to twist to the right, adjust the position of the marker periodically (beginning of the round).
The shift stitch is an extra stitch you work at the end of a round to make your work symmetrical. If you notice that the marker moves right, work one extra stitch at the end of the round and move the marker accordingly. This is the shift stitch.
The shift stitch is not included in the round description. To check if it’s time to work a shift stitch, fold your work in half and check if the marker still goes straight or use a yarn that marks a straight line. This does not increase or decrease the number of stitches; the stitch count remains the same.
Instructions for Body and Head
Use yellow color yarn or your preferred color, and begin with a magic ring.
Round 1: 6 sc into Magic Ring.
Round 2: sc in each of next 15 stitches.
Round 3: *sc in next stitch, inc* (9 stitches).
Round 4: *sc in each of next 2 stitches, inc* (12 stitches).
Round 5: *sc in each of next 3 stitches, inc* (15 stitches).
Round 6: *sc in each of next 4 stitches, inc* (18 stitches).
Round 7: *sc in each of next 2 stitches, inc* (24 stitches).
Change the yarn color to brown.
Round 8: (working into the back loop) sc in each of next 24 stitches.
Change the yarn color back to yellow.
Round 9: (working into the back loop) *sc in each of next 3 stitches, inc* (30 stitches).
Work 2 rounds in yellow yarn and one round in brown yarn as follows:
Rounds 10-15: sc in each of next 30 stitches.
Stuff the body firmly. Continue crocheting using the yellow color yarn.
Round 16: *dec, sc in each of next 3 stitches* (24 stitches).
Round 17: sc in each of next 24 stitches.
Round 18: *dec, sc in each of next 2 stitches* (18 stitches).
Round 19: *dec, sc in each of next 4 stitches* (15 stitches).
Round 20: sc in each of next 15 stitches. Stuff firmly.
Instructions for Head
Use only yellow color yarn.
Round 1: *sc in each of next 2 stitches, inc* (20 stitches).
Round 2: *sc in next stitch, inc* (30 stitches).
Round 3: *sc in each of next 4 stitches, inc* (36 stitches).
Round 4: *sc in each of next 5 stitches, inc* (42 stitches).
Rounds 5-10: sc in each of next 42 stitches.
Round 11: *dec, sc in each of next 5 stitches* (36 stitches).
Round 12: sc in each of next 36 stitches.
Round 13: *dec, sc in each of next 4 stitches* (30 stitches).
Round 14: *dec, sc in each of next 3 stitches* (24 stitches).
Stuff the head firmly.
Round 15: *dec, sc in each of next 2 stitches* (18 stitches).
Round 16: *dec, sc in the next stitch* (12 stitches).
Round 17: *dec*, repeat 6 times. Bind off.
Work the second antenna the same way.
Antenna (2x)
Start with brown color yarn and begin with a magic ring.
Round 1: 6 sc into Magic Ring.
Round 2: inc 6 times (12 stitches).
Rounds 3-5: sc in each of next 12 stitches. Stuff slightly.
Round 6: *dec*, repeat 6 times. Bind off.
Rounds 7-8: sc in each of next 12 stitches. Bind off, leaving a long tail for sewing. Work the second antenna the same way.
Wings (4x)
Use lavender or black color yarn and begin with a magic ring.
Round 1: 6 sc into Magic Ring.
Round 2: inc 6 times (12 stitches).
Round 3: *sc in next st, inc* (18 stitches).
Rounds 4-7: sc in each of next 18 stitches.
Round 8: *dec, sc in the next stitch* (12 stitches).
Rounds 9-11: sc in each of next 12 stitches. Bind off, leaving a long tail for sewing. Work all the other wings the same way.
Assembly Instructions
Now that all the elements of your bee are crocheted, it’s time to sew them together. Use a blunt sewing needle.
Attach the antennas to the head. Thread a needle onto one of the yarn tails left from the antenna, place the antennas in their correct position on the head, and sew them to the other side. Make sure they are even.
Attach the wings to the body. Thread a needle onto one of the yarn tails left from the wing, press the wing flat, place the wings in the correct position on the body, and sew them to the body of your bee. Ensure they are even.
Mark where you want the eyes placed with pins and sew them with a distance of 4-5 stitches from the head of the bee.
Embroider eyebrows with black yarn, create a mouth, and proceed to add a smile if desired. You can also add eyelashes for extra detail. Weave in all ends.
If you wish, embroider a little flower and add some lovely beads. Weave in all ends.