


How to Crochet a Cozy Faux Fur Bear Hat — Free Pattern (Baby to Adult)

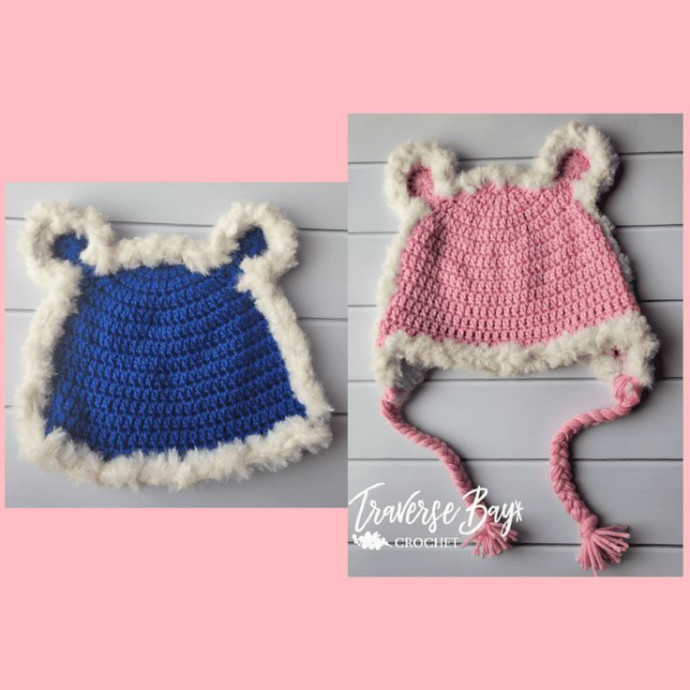
Make a whimsical, warm accessory with this Crochet Faux Fur Bear Hat pattern — a fun project for beginners and experienced crocheters alike. This pattern includes instructions for baby, toddler/child, and teen/adult sizes, plus optional earflaps, ears, faux fur trim and braided ties. Use a medium (size 4) yarn and a fuzzy faux fur yarn for the trim to give the hat its signature cuddly look.
Below are the full materials list, abbreviations, gauge, sizing rounds and finishing steps. Read through the entire pattern before beginning and check your gauge to ensure the best fit.
The Crochet Faux Fur Bear Hat
This is the cutest accessory for anyone looking to stay warm and stylish during the chilly seasons! This adorable hat features a fluffy faux fur trim to add a touch of whimsy to any outfit. Perfect for both kids and adults, this hat is sure to bring a smile to your face every time you wear it. Whether you're heading out for a fun day in the snow or just want to add a playful touch to your winter wardrobe, the Crochet Faux Fur Bear Hat is a must-have accessory that exudes charm and coziness!
Materials:
- Size H, 5.00 mm crochet hook
- Medium weight (size 4) yarn in white and fuzzy faux white yarn, I used Lion Brand’s Go For Faux
- Tapestry needle
Abbreviations:
- ch - chain
- st(s) - stitch(es)
- sc - single crochet
- dc - double crochet
- sl st - slip stitch
- sc2tog - single crochet two together
Gauge:
12 sts x 7 rows = 4″ square
Note:
The width is measured at the crown.
Hat Sizes:
Baby Size (5″ wide x 6.5″ tall):
Make a magic circle and ch 2.
Round 1: 10 dc in circle, pull to close, sl st to join (10).
Round 2: Ch 2, 2 dc in each st around, sl st to join (20).
Round 3: Ch 2, *2 dc, dc,* repeat from * around, sl st to join (30).
Round 4: Ch 2, *2 dc, dc next 2 sts,* repeat from * around, sl st to join (40).
Rounds 6-11: Ch 2, dc in each st around, sl st to join (40).
Fasten off, weave in end.
Optional: Continue with “side earflaps” section.
Toddler/Child Size (6″ wide x 7.5″ tall):
Make a magic circle and ch 2.
Round 1: 10 dc in circle, pull to close, sl st to join (10).
Round 2: Ch 2, 2 dc in each st around, sl st to join (20).
Round 3: Ch 2, *2 dc, dc,* repeat from * around, sl st to join (30).
Round 4: Ch 2, *2 dc, dc next 2 sts,* repeat from * around, sl st to join (40).
Round 5: Ch 2, *2 dc, dc next 3 sts,* repeat from * around, sl st to join (50).
Rounds 6-13: Ch 2, dc in each st around, sl st to join (50).
Fasten off, weave in end.
Optional: Continue with “side earflaps” section.
Teen/Adult Size (7″ wide x 8.5″ long):
Make a magic circle and ch 2.
Round 1: 10 dc in circle, pull to close, sl st to join (10).
Round 2: Ch 2, 2 dc in each st around, sl st to join (20).
Round 3: Ch 2, *2 dc, dc,* repeat from * around, sl st to join (30).
Round 4: Ch 2, *2 dc, dc next 2 sts,* repeat from * around, sl st to join (40).
Round 5: Ch 2, *2 dc, dc next 3 sts,* repeat from * around, sl st to join (50).
Round 6: Ch 2, *2 dc, dc next 4 sts,* repeat from * around, sl st to join (60).
Rounds 7-14: Ch 2, dc in each st around, sl st to join (60).
Fasten off, weave in end.
Optional: Continue with “earflap” section.
Side Earflaps:
Right Flap:
Row 1: Sc next 10 sts, turn (10)
Row 2: Ch 1, sc2tog, sc 6, sc2tog, turn (8).
Row 3: Ch 1, sc in each st across, turn (8).
Row 4: Ch 1, sc2tog, sc 4, sc2tog, turn (6).
Row 5: Ch 1, sc in each st across, turn (6).
Row 6: Ch 1, sc2tog, sc 2, sc2tog, turn (4).
Row 7: Ch 1, sc in each st across (4).
Fasten off, weave in ends.
Left Flap:
Lay the hat on its side with the left ear side facing you.
Line up the side with the earflap you just made with slightly more stitches in the front than in the back.
Ears (make 2):
Make a magic circle, ch 2.
Round 1: Dc 12 in circle, pull to close, sl st to join (12).
***Stop at round 1 for the baby size ears***
Round 2: Ch 2, 2 hdc in each st around, sl st to join (24).
Fasten off leaving a long tail.
Sew ears onto hat.
Fasten off, weave in all ends.
Faux Yarn Finish:
Pick up a st along the bottom and sc around the hat, sl st to join and fasten off, weave in ends.
Pick up a st along the bottom middle of the side/earflap and sc evenly up the side of the hat, around the ears and top and down the other side.
Fasten off and weave in ends.
Side Braids:
Cut 12 strands of 40″ long pieces of yarn.
Fold in half and pull the middle through the bottom of the earflap.
Yarn over and pull all strands through.
Braid strands and tie at the bottom.
Repeat on the other side, making sure they are even.
Trim ends.
Tips:
- Check gauge before starting to ensure correct sizing.
- Use the faux fur yarn for the trim only — most faux yarns are bulky, so they work best as an accent rather than for the entire hat.
- Sew ears on securely and weave in long tails on the inside for a neat finish.