Crochet Granny Square Bucket Hat

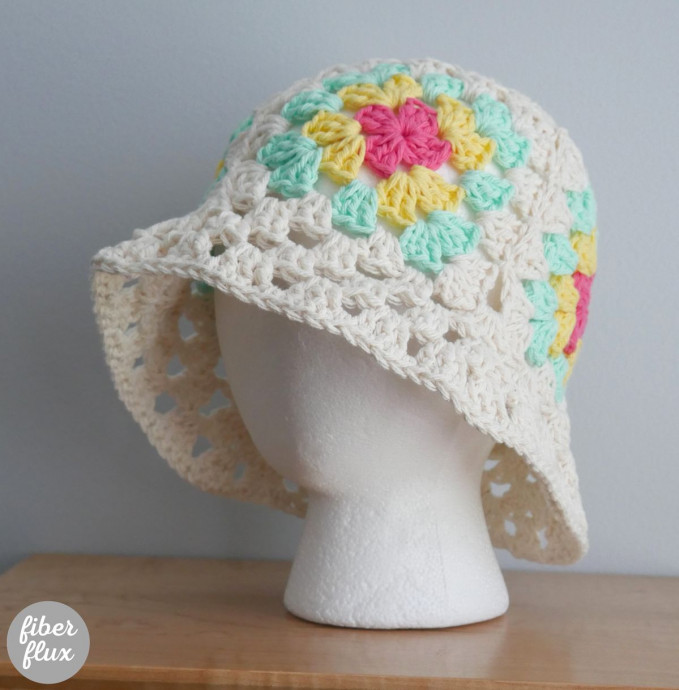
Crochet Granny Square Bucket Hats are not only super trendy but also a fun and creative project to work on! With their colorful designs and nostalgic charm, these hats are perfect for adding a touch of whimsy to any outfit. Whether you're a seasoned crocheter or just starting out, making your very own Granny Square Bucket Hat is a rewarding and enjoyable experience. Get your hooks ready, choose your favorite yarn colors, and let's crochet our way to a stylish and cozy accessory that's bound to turn heads and spread smiles wherever you go!
Materials
- J (6.0 mm) crochet hook
- 200 yards of medium weight/#4 weight cotton yarn (I used Peaches ‘n Creme by Spinrite in “Ecru”, “Mint”, “Red”, and “Sunshine”)
- Yarn/tapestry needle
- Scissors
- Measuring Tape
Sizing
- Hat total circumference is 23 inches.
- Hat is 9 inches tall from top to bottom.
- Each granny square is 5 inches wide and 5 inches tall.
Pattern Notes
Change the total size of the hat by working more or less rounds of each granny square. Brim will be worked the same no matter the size of the grannies. Just be sure each granny square is the same size.
Granny Square Bucket Hat Pattern
The First Granny Square (Top of the Hat)
This granny square for the hat top is done entirely in the ecru colorway. Instead of tying on a new color for each round, you slip stitch over to the corner space to begin the new round.
Chain 4, join into a ring into the chain furthest from the hook with a slip stitch to create a ring. If you prefer to use the magic ring technique, please feel free to do this instead.
Round 1
With the same yarn, slip stitch over to the next corner space. Chain 3 (counts as a dc), then work (2 dc into center of ring, chain 1). Next, work (3 dc, ch 1) into center of ring three times. Join to close the round with a slip stitch.
Round 2
With the same yarn, slip stitch over to the next corner space. To work the corner of round 2, first chain 3 (counts as a dc), then 2 dc in same space, then chain 1, then 3 dc in the same space, first corner done! Then chain 1, then work the next corner by working 3 dc in next space, chain 1, then 3 dc in same space, chain 1, repeat two more times to complete the round. Join to close the round with a slip stitch.
Round 3
With the same yarn, slip stitch over to the next corner space. *Work the corner in the same manner as the previous round: chain 3 (counts as a dc), 2 dc in same space, chain 1, 3 dc in same space, chain 1. To work the side, simply work 3 dc in the next space then chain 1. Repeat from * around. Join to close the round with a slip stitch.
Round 4
With the same yarn, slip stitch over to the next corner space. *Work the corner in the same manner as the previous round: chain 3 (counts as a dc), 2 dc in same space, chain 1, 3 dc in same space, chain 1. To work the sides (there will be two side spaces for this round), simply work 3 dc in the next space then chain 1. Repeat for the next side space. Repeat from * around. Join to close the round with a slip stitch.
The Side Granny Squares (Sides of Hat)
Make four of these multicolor squares, each three different color rounds (you’ll add the fourth round to each square in the “joining the squares” section below.
Chain 4, join into a ring into the chain furthest from the hook with a slip stitch to create a ring. If you prefer to use the magic ring technique, please feel free to do this instead.
Round 1 (Shown in Red)
Chain 3 (counts as a dc), then work (2 dc into center of ring, chain 1). Next, work (3 dc, ch 1) into center of ring three times. Join to close the round with a slip stitch. Fasten off and grab a new color.
Round 2 (Shown in Yellow)
Tie new yarn into any chain 1 space. To work the corner of round 2, first chain 3 (counts as a dc), then 2 dc in the same space, then chain 1, then 3 dc in the same space. Then chain 1, then work the next corner by working 3 dc in the next space, chain 1, then 3 dc in the same space, chain 1, repeat two more times to complete the round. Join to close the round with a slip stitch. Fasten off and grab a new color.
Round 3 (Shown in Mint)
Tie new yarn into any corner space. *Work the corner in the same manner as the previous round: chain 3 (counts as a dc), 2 dc in same space, chain 1, 3 dc in same space, chain 1. To work the side, simply work 3 dc in the next space then chain 1. Repeat from * around. Join to close the round with a slip stitch. Fasten off, grab the JAYGO color (“Ecru” colorway shown in the example) and move to the next section.
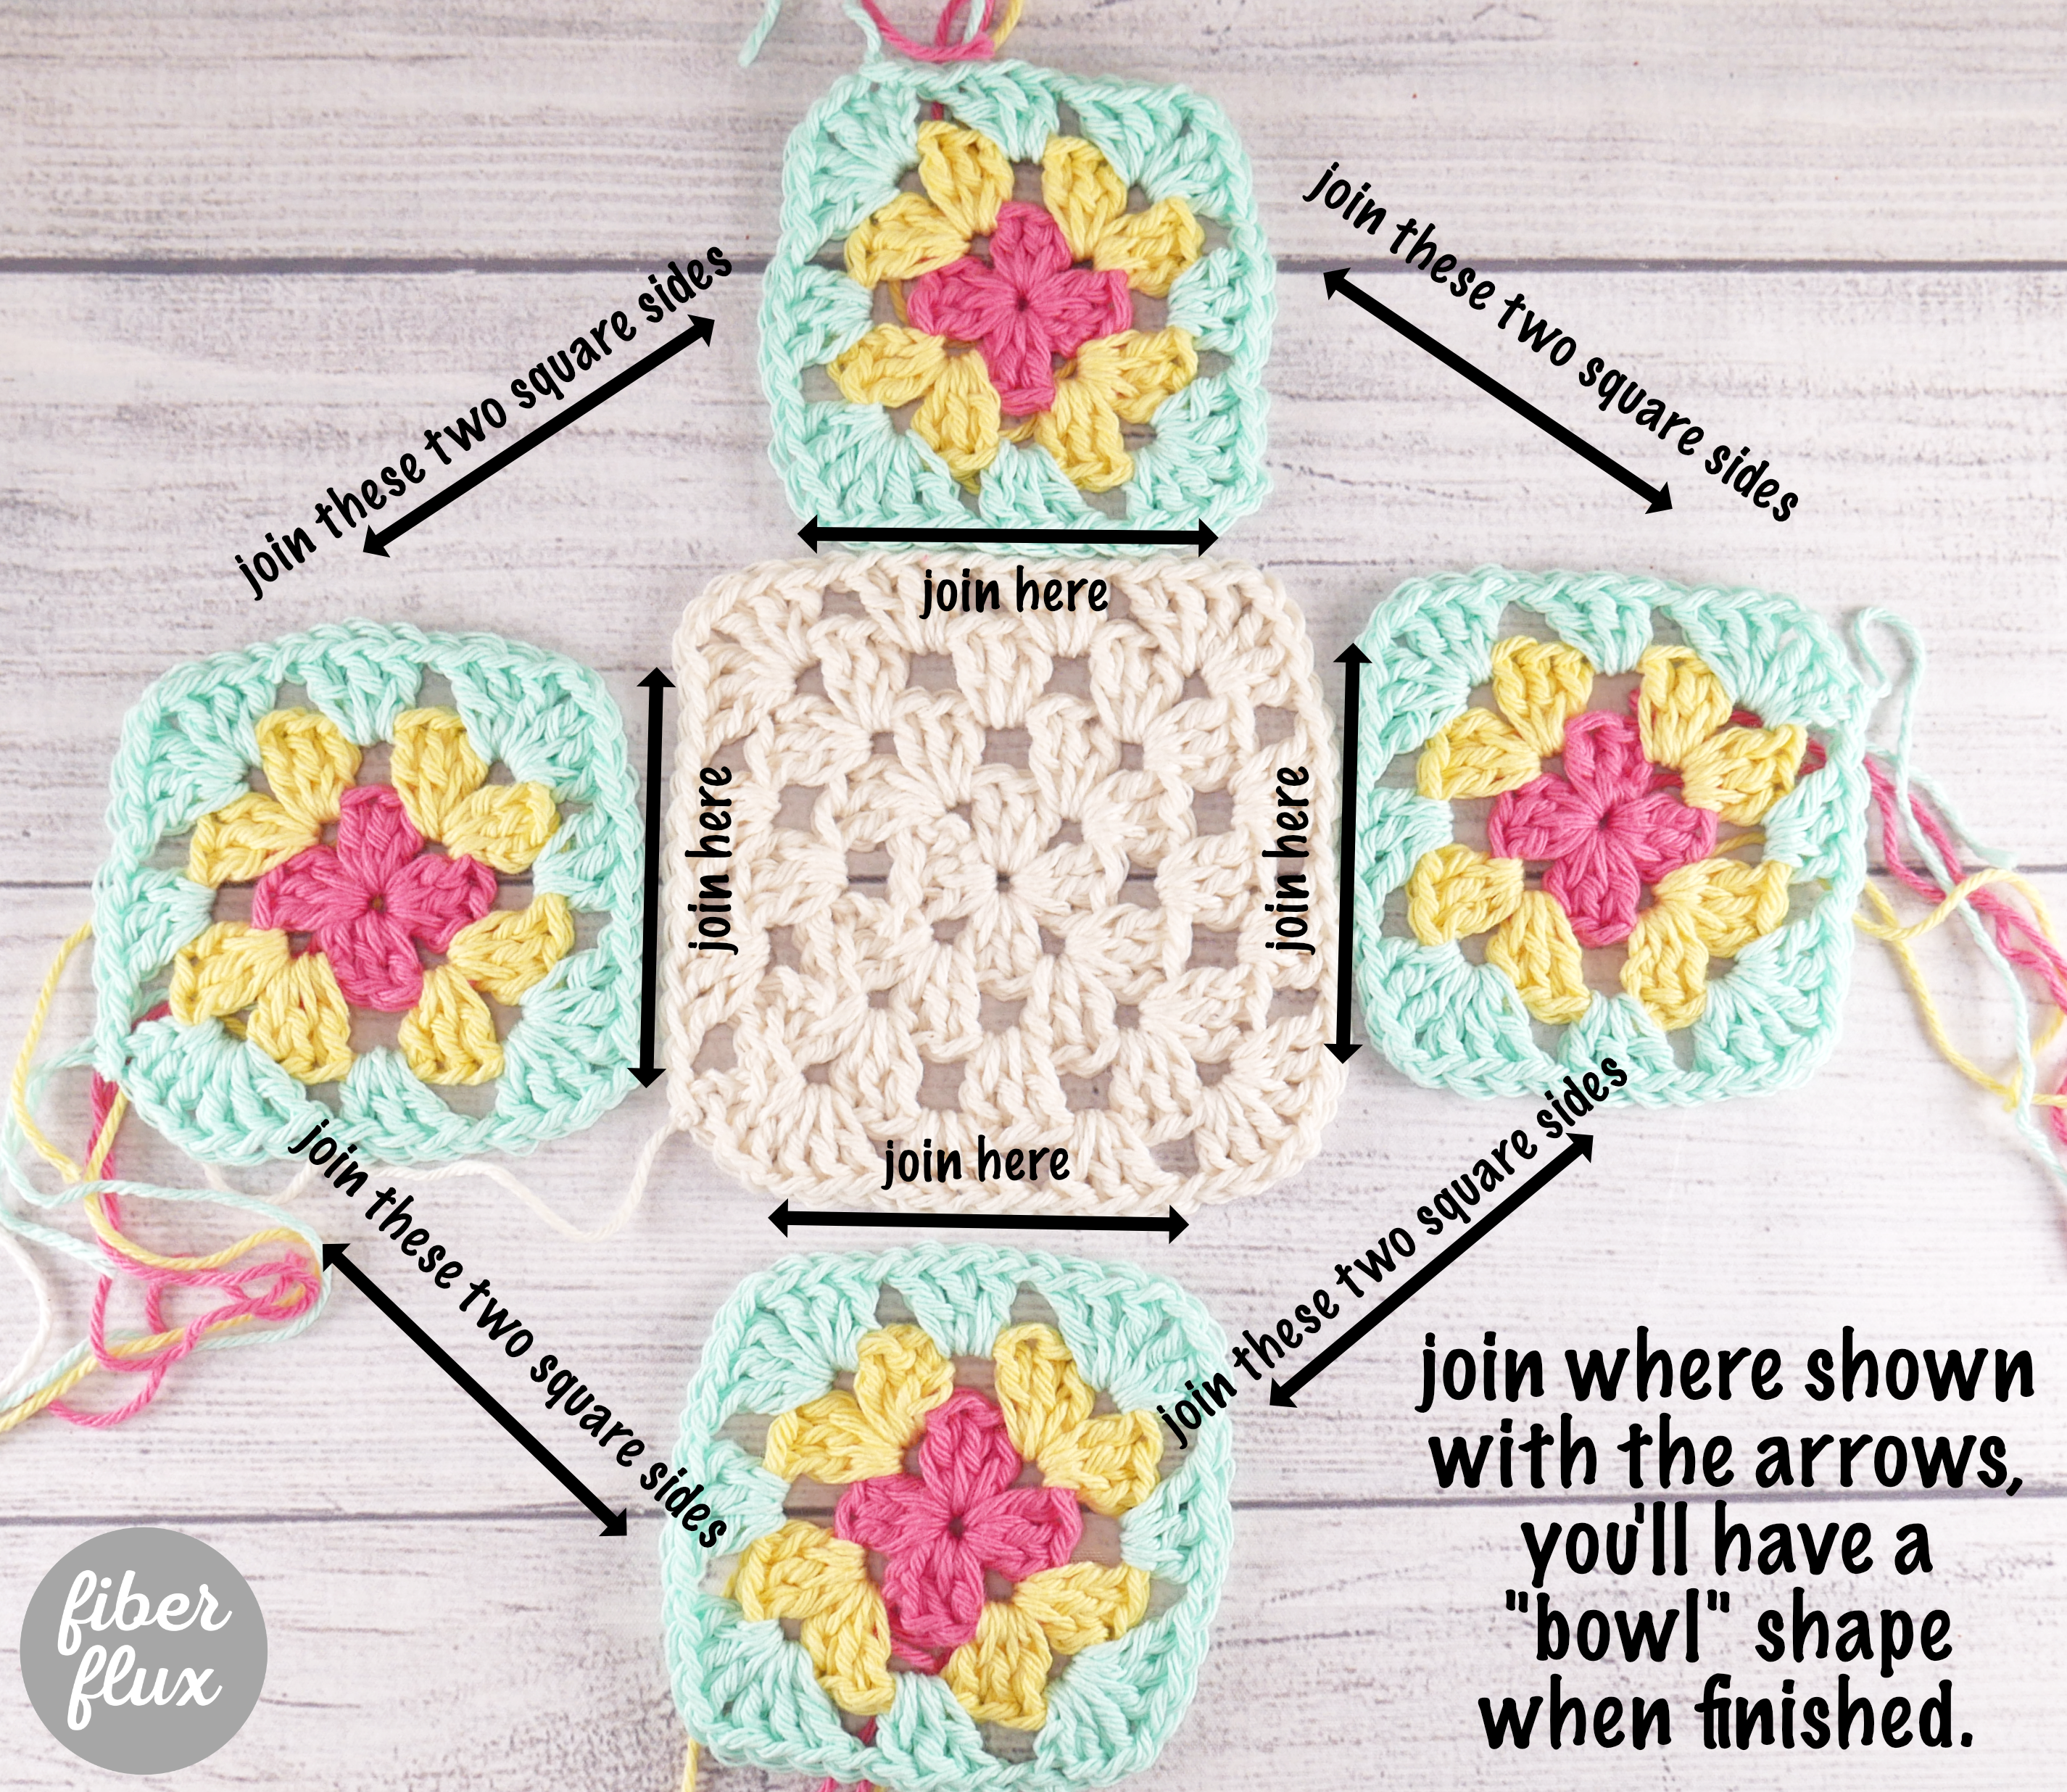
How To Join Squares Together (JAYGO/Join As You Go)
Note: It really helps to keep everything flat as you work, I like to lay mine on a table or lap as I go. Also, be sure the right side (side that faced up as you stitched up your squares) is facing upward/facing you for each square. Check out the photo below so you can see how to arrange the squares to form the hat shape.
Tie on your chosen round 4 color (for the hat shown it was the ecru to match the hat top and the brim) into any corner space and chain 3 (counts as a dc).
In the same space, work (2 dc, ch 1, 3 dc). In each side space work (3 dc, ch 1). You’ll have 2 side spaces if you made the same number of rounds as mine.
Repeat for each side space until you reach the next corner. This is where we’ll make our first join.
In the corner space work 3 dc. Instead of the ch 1, work a slip stitch into the other square’s corner space. Then work 3 dc back into the square.
As you continue down the side of the square, work a slip stitch into the other square instead of a ch 1, and 3 dc into the side spaces of the square.
When you get to the next corner, work 3 dc, slip stitch into the other square’s corner space, then 3 dc into the corner to finish the joining.
Work the rest of the square the way you normally would (3 dc, ch 1) in each of the side spaces. Then (3 dc, ch 1, 3 dc, ch 1) in the corner).
Join with a slip stitch to close round, fasten off yarn and you’re ready to join another square!
Using the image below continue joining squares together.
The general rule is that where you need to make a join, work the slip stitch join as you did before. Where there is no join needed, work a ch 1 instead.
Repeat this process, adding squares as shown below until you have a “bowl” shape for the hat.
Then continue down to the next section to create the hat brim.
The Hat Brim
Flip the hat upside down.
Round 1
Tie brim color yarn (ecru shown) into any side space to the left of a corner space and chain 3 (counts as a dc). In the same space, work 2 dc. Ch 1, then work (3 dc, ch 1) into the next space. Ch 1, then work (3 dc, ch 1) into the next space. *Next work (3 dc, ch 1, 3 dc, ch 1) into the next space where the two squares from the previous rounds come together. Then work (3 dc, ch 1) into each of the next three spaces. Repeat from * around then join to close the round with a slip stitch.
Round 2
With the same yarn, slip stitch over to the next corner space and chain 3 (counts as a dc). In the same space, work 2 dc. Next, repeat what you did for the previous round by working (3 dc, ch 1) in each side space and working (3 dc, ch 1, 3 dc, ch 1) into the “increase” space from the previous row (it will look kind of like the corner space from when you made the granny squares). Repeat around then join to close the round with a slip stitch.
Round 3
With the same yarn, slip stitch over to the next corner space and chain 3 (counts as a dc). In the same space, work 2 dc. Work (3 dc, ch 1) in each space around. Last, join to close the round with a slip stitch.
Round 4
With the same yarn, slip stitch over to the next corner space and chain 1. Next, work a sc into each stitch and space around. Join to close the round with a slip stitch.
Finishing & Assembly
Weave in any ends and your hat is ready to wear!