Crochet Chunky Bucket Hat Pattern and Instructions

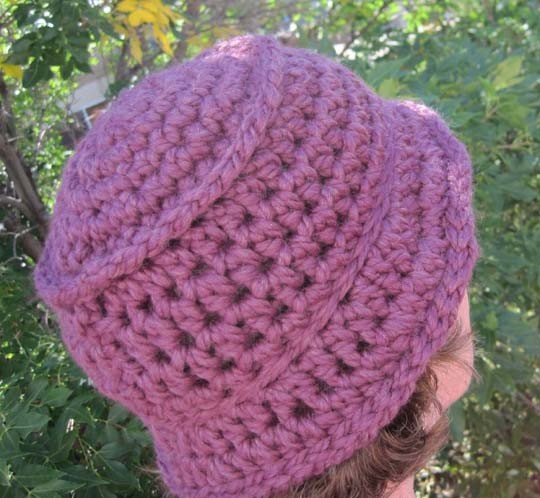
The Crochet Chunky Bucket Hat is a stylish and cozy accessory that's perfect for casual days out. Made with thick, chunky yarn, this hat features a loose, relaxed fit that's easy to slip on and off. The crochet stitches create a textured, dimensional look that adds visual interest to the hat, while the bucket shape provides a comfortable fit that stays snug on the head. This hat is perfect for pairing with scarves, hats, and other accessories for a chic, laid-back look.
Skill level: Easy
Materials
- 100 yds. super-bulky acrylic/wool blend yarn (samples shown in Plymouth Encore “Mega” (75% acrylic, 25% wool - 64 yds/100g ball) & Lion Brand “Wool-Ease Thick & Quick” (80% acrylic, 20% wool – 108 yds./170g ball)) – or – super-bulky yarn of choice that works to gauge
- Size N/15 (10.0 mm) crochet hook, or size needed to achieve gauge
- Tapestry needle
Gauge
With super-bulky yarn on size N/15 (10.0 mm) hook:
- 7 sts & 8 rows = 4” in single crochet
- 7 sts & 5 rows = 4” in half double crochet
Pattern Notes
The top of the hat is worked in continuous spiral rounds (i.e., do not join at the end of each round but continue around in the same direction throughout. Use a yarn marker to denote the beginning of each round.)
The remainder of the hat is worked with a slip stitch join at the end of each round and chain up to begin the next round.
The beginning ch-2 on hdc rounds counts as a stitch.
Terms/Abbreviations
- beg (beginning)
- BLO (back loop only)
- ch (chain)
- ea (each)
- hdc (half double crochet)
- inc (increase)
- rep (repeat)
- rnd (round)
- sc (single crochet)
- sl st (slip stitch)
- yo (yarn over)
Hat Crown Instructions
Worked in continuous spiral – see Pattern notes.
RND 1: Make beginning disappearing ring (wind yarn around finger once, insert hook into center of this ring, yo and pull loop through, ch 1), work 6 sc in ring (6 sc). Do not join, do not turn. Place yarn marker or removable stitch marker to note the beginning of the round, and move it up each round.
RND 2 (increase rnd): Work 2 sc in ea sc around (12 sc). Do not join, do not turn.
RND 3 (increase rnd): Work 2 sc in ea sc around (24 sc). Do not join, do not turn.
RND 4: Sc in ea sc around (24 sc). Do not join, do not turn.
RND 5 (increase rnd): Work 2 sc in 1st sc, 1 sc in next sc, *work 2 sc in next sc, 1 sc in next sc, rep from * around (36 sc). Do not join, do not turn.
RND 6: Sc in ea sc around, join with sl st, do not turn (36 sc).
Begin Hat Sides
Note: rounds will now end with a slip stitch join at the end of each round and chain up to begin the next round.
RND 7: Ch 2 (counts as first hdc), hdc in back loop only (BLO) of ea sc around, join with sl st to top of beg ch-2, do not turn (36 hdc).
RNDs 8-11: Ch 2 (counts as first hdc), working through both loops again as normal, hdc in ea hdc around, join with sl st to top of beg ch-2, do not turn (36 hdc).
Hat Brim Instructions
RND 12 (increase rnd): Ch 2 (counts as first hdc), hdc in next hdc, 2 hdc in next hdc, *hdc in next 2 hdc, 2 hdc in next hdc, rep from * around, join with sl st, do not turn (48 hdc).
RND 13 (increase rnd): Ch 2 (counts as first hdc), hdc in next 2 hdc, 2 hdc in next hdc, *hdc in next 3 hdc, 2 hdc in next hdc, rep from * around, join with sl st, do not turn (60 hdc).
Lower Edging
Sl st in ea hdc around, join with sl st and fasten off.
Crown Trim
Join yarn to any free (unused) loop on crown, then sl st in ea free loop around. Join with sl st and fasten off.
Finishing Touches
Holding strand of yarn inside the hat between Rnds 11 & 12, insert the crochet hook from the outside of the hat through to the inside, grab the strand of yarn with the hook and pull through to the outside of the hat. Working loosely, sl st around the entire hat, forming a line of decorative chain stitches between Rnds 11 & 12 (this helps give the hat stability when worn). Join with sl st and fasten off. Weave in all ends.