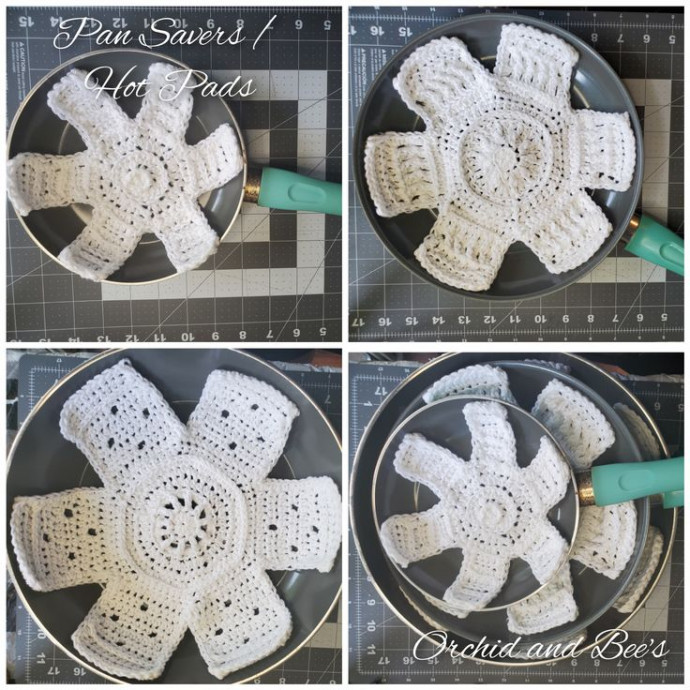
Crochet Pan Savers: Handmade Kitchen Accessories

Introduction to Crochet Pan Savers
Crochet pan savers, liners, and hot pads are not only practical but add a cozy touch to your kitchen! Handcrafted with love and attention to detail, these crocheted accessories provide a stylish way to protect your countertops from hot pots and pans. The intricate patterns and vibrant colors make them a charming addition to your kitchen decor, while their functionality ensures your surfaces remain scratch-free. Whether you're a seasoned crocheter or looking to purchase handmade items, these pan savers are a delightful way to infuse warmth and personality into your cooking space.
Materials
- 100% cotton
- I used “Lily Sugar 'n Cream”
- I used approximately one skein of 4 oz - 100% cotton - 200 yards to make a set that includes (1 Small Size, 1 Medium Size, 1 Large Size)
- Hook - H or 5mm
- Needle
- Scissors
Stitches
- MR - Magic Ring
- Ch - chain
- Sc - single crochet
- Sl st - slip stitch
- Dc - double crochet
- FPDC/SC - front post double/single crochet
- BPDC - back post double crochet
- Sp - space
- #st - complete # number of sts in same space
- St # - complete stitch in next # number of spaces
- ( ) - do all in the same stitch
- CS - Camel Stitch
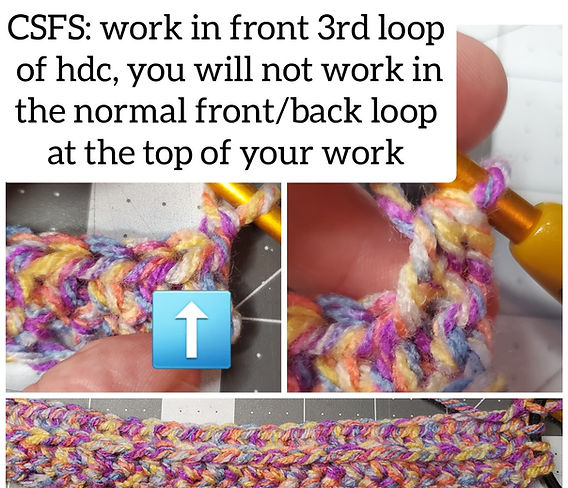
- CSFS - Camel stitch in the front side 3rd loop of the hdc st
- BLO - Back Loop Only
Skill Level
Comfortable Beginner/Intermediate.
Special Stitches
Camel Stitch Front Side - for this pattern, work a half double crochet stitch into the 3rd loop on the front side of your work. You will not be using the traditional front or back loop at the top of your work. Note: on the medium size you will use a DC stitch instead of hdc.
Pattern Info
The sizing & gauge are not critical. Each size is a different design!
- Small Size - Approx. 7 to 8 inches
- Medium Size - Approx. 9 to 10 inches
- Large Size - Approx. 11 to 12 inches
Pattern Instructions
Note: Beginning chains do not count as a st unless otherwise noted. Begin each st in the same space as the beginning chain for the entirety of the pattern.
Small Size:
Note: Odd rows are right side up.
Begin: MR, ch 1.
Round 1: 10 Hdc in MR, pull tight to close, sl st to join, ch 1. (10st)
Round 2: Turn, 2CSFS in each st around, sl st to join, ch 1. (20st)
Round 3: Turn, BLO *hdc, 2hdc*, repeat *to* around, sl st to join, ch 1. (30st) *center is made, switching to rows for the first spoke.
1st Spoke:
Row 4: Hdc 5, ch 1. (5st) *the rest of the stitches from round 3 will be unworked until you reach the section for spokes 2 - 6.
Row 5: Turn, CSFS across, ch 1. (5st)
Row 6: Turn, BLO hdc across, ch 1. (5st)
Row 7 & 8: Repeat rows 5 & 6 (5st)
Row 9: Repeat row 5, fasten off.
Spokes 2 - 6:
Begin: With the right side facing up, (the ribs from the camel stitches and BLO rows will be facing up), using new yarn join at the next unworked st of round 3 and ch 1.
Row 1: Hdc 5, ch 1. (5st)
Row 2: Turn, CSFS across, ch 1. (5st)
Row 3: Turn, BLO hdc across, ch 1. (5st)
Row 4 & 5: Repeat rows 2 & 3 (5st)
Row 6: Repeat row 2, fasten off. (5st)
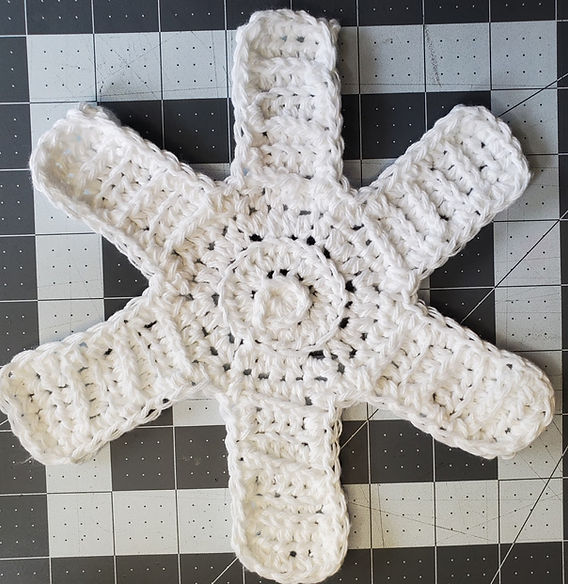
Finish: Sc a border completely around all six sides of spokes, fasten off. *you can use this to go over all your tails so you do not have to weave in ends as well!
You're finished small size liner will look like this:
Medium Size:
Note: Odd rows are right side up.
Begin: MR, ch 1.
Round 1: 10 Hdc in MR, pull tight to close, sl st to join, ch 2. (10st)
Round 2: BLO 2dc in each st around, sl st to join, ch 2. (20st)
Round 3: *FPDC, 2dc*, repeat *to* around, sl st to join, ch 1. (30st)
Round 4: BLO *Hdc 2, 2hdc*, repeat *to* around, sl st to join, ch 1. (40st)
Round 5: Turn, *CSFS 3, 2CSFS*, repeat *to* around, sl st to join, ch 1. (50st)
Round 6: Turn, *hdc 4, 2hdc*, repeat *to* around, sl st to join, ch 1. (60st) *center is made, switching to rows for the first spoke.
1st Spoke:
Row 7: Hdc 10, ch 2. (10st) *the rest of the stitches from round 6 will be unworked until you reach the section for spokes 2 - 6.
Note: in next row you will use the Dc stitch when making the camel stitch instead of the hdc stitch.
Row 8: Turn, Dc CSFS across, ch 2. (10st)
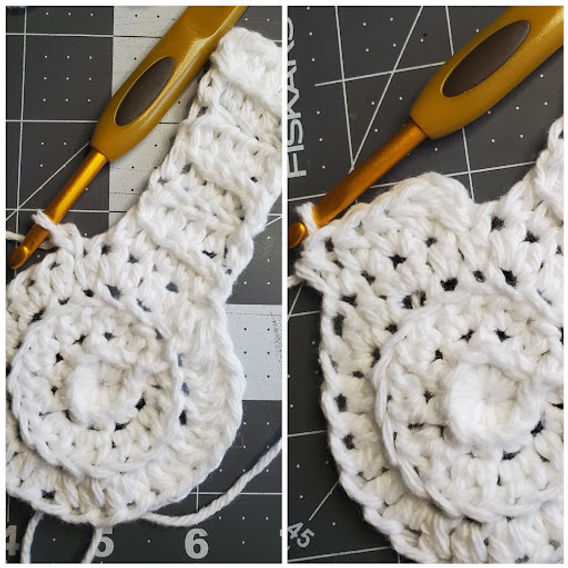
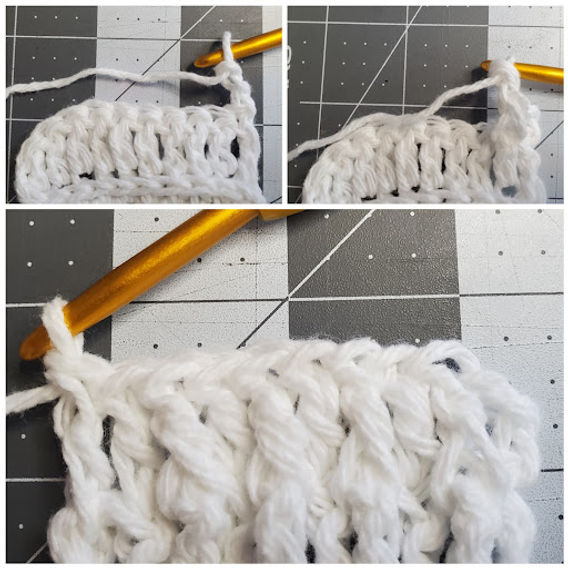
Note: in next 2 rows the ch 2 will count as a stitch, do the first FPDC in the next st.
Note: see next photo for visual aid on rows 9 and 10.
Row 9: Turn, *FPDC, Dc*, repeat *to* across, FPDC in last st, ch 2. (10st)
Row 10: Turn, *FPDC, Dc*, repeat *to*, FPDC around the turning ch from row 9 to finish, ch 1. (10st)
Row 11: Turn, BLO hdc across, fasten off. (10st)
Spokes 2 - 6:
Begin: With the right side facing up, (the ribs from the camel stitches and BLO rows will be facing up), using new yarn join at next unworked st of round 6 and ch 1.
Row 1: Hdc 10, ch 2. (10st)
Note: in next row you will use the Dc stitch when making the camel stitch instead of the hdc stitch.
Row 2: Turn, Dc CSFS across, ch 2. (10st)
Note: in next 2 rows the ch 2 will count as a stitch, do the first FPDC in the next st.
Row 3: Turn, *FPDC, Dc*, repeat *to* across, FPDC in the last st, ch 2. (10st)
Row 4: Repeat row 3, but ch 1 instead at end. (10st)
Row 5: Turn, BLO hdc across, fasten off. (10st)
Finish: Sc a border completely around all six sides of spokes, fasten off. *you can use this to go over all your tails so you do not have to weave in ends as well!
Large Size:
Note: Odd rows are right side up.
Begin: MR, ch 1.
Round 1: 10 Hdc in MR, pull tight to close, sl st to join, ch 2. (10st)
Round 2: *Dc, ch 1*, repeat *to* around, sl st to join, ch 1. (20st)
Round 3: *FPSC, 2sc in ch 1 sp*, repeat *to* around, sl st to join, ch 1. (30st)
Round 4: BLO *hdc 2, 2hdc*, repeat *to* around, sl st to join, ch 1. (40st)
Round 5: *Sc 3, 2sc*, repeat *to* around, sl st to join, ch 1. (50st)
Round 6: *Hdc 4, 2hdc*, repeat *to* around, sl st to join, ch 1. (60st)
Round 7: Turn, *CSFS 9, 2CSFS*, repeat *to* around, sl st to join, ch 1. (66st) *center is made, switching to rows for the first spoke.
1st Spoke:
Row 7: Turn, Hdc 11, ch 1. (11st) *the rest of the stitches from round 7 will be unworked until you reach the section for spokes 2 - 6.
Row 8: Turn, Hdc 5, ch 1, sk 1, hdc 5, ch 1. (11st)
Row 9: Turn, hdc 11, ch 1. (11st)
Row 10: Turn, hdc 2, ch 1, sk 1, hdc 5, ch 1, sk 1, hdc 2, ch 1. (11st)
Row 11: Turn, hdc 11, ch 1. (11st)
Row 12 & 13: Repeat row 8 & 9.
Row 14: Turn, CSFS 11, fasten off. (11st)
Spokes 2 - 6:
Begin: With the right side facing up, (the ribs from the camel stitches and BLO rows will be facing up), using new yarn join at next unworked st of round 7 and ch 1.
Row 1: Turn, Hdc 11, ch 1. (11st)
Row 2: Turn, Hdc 5, ch 1, sk 1, hdc 5, ch 1. (11st)
Row 3: Turn, hdc 11, ch 1. (11st)
Row 4: Turn, hdc 2, ch 1, sk 1, hdc 5, ch 1, sk 1, hdc 2, ch 1. (11st)
Row 5: Turn, hdc 11, ch 1. (11st)
Row 6 & 7: Repeat row 2 & 3.
Row 8: Turn, CSFS 11, fasten off. (11st)
Finish: Sc a border completely around all six sides of spokes, fasten off. *you can use this to go over all your tails so you do not have to weave in ends as well!