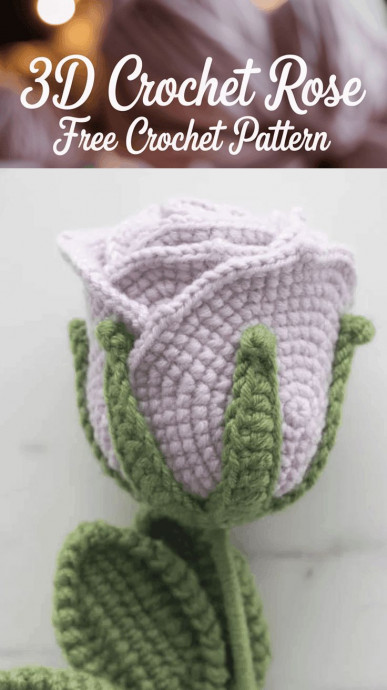
How to Crochet Adorable Roses

Crocheting adorable roses is such a delightful and heartwarming activity! The process of unraveling vibrant yarn and creating beautiful blooming flowers brings so much joy and creativity. Whether you're a beginner or an experienced crocheter, crafting these sweet rose pieces can be a fun way to add a touch of charm and whimsy to any project. With each stitch, you can infuse love and personality into your creations, making them truly special and unique. So, why not pick up your crochet hook and embark on a colorful journey of crafting these lovely roses today? Happy crocheting!
Materials You’ll Need
- Yarn: Light purple and green (two colors)
- Hook: 2/2.5 mm
- Flower Rod: 40 cm long x 2 mm diameter (approximately 16 x 0.87 inches)
- Iron Wire: 15 cm long x 0.4 mm diameter (approximately 6 x 0.02 inches)
- Hot melt adhesive
- Double-sided tape
- Stitch markers
- Scissors
Note: To incorporate the wire, insert your hook under the wire and crochet over it.
Crochet Abbreviations
- sc: single crochet
- hdc: half double crochet
- dc: double crochet
- tr: treble stitch
- ss: slip stitch
- ch: chain
- st: stitch
3D Rose Pattern Instructions
This pattern is rated as middle difficulty for crochet bouquets and flowers.
Big Rose Petals (Make 3)
- Make a magic ring.
- R1: 6 sc into the magic ring, 1 ss, 1 ch. [6]
- R2: (2 sc in next st) * 6 times, 1 ss, 1 ch. [12]
- R3: (1 sc, 2 sc in the next st) * 6 times, 1 ss, 1 ch. [18]
- R4: (1 sc, 2 sc in the next st, 1 sc) * 6 times, 1 ss, 1 ch. [24]
- R5: (3 sc, 2 sc in next st) * 6 times, 1 ss, 1 ch. [30]
- R6: (2 sc, 2 sc in next st, 2 sc) * 6 times, 1 ss, 1 ch. [36]
- R7: sc 10, 2 sc in next st; (4 sc, 2 sc in next st) * 3 times; 10 sc. 1 ss, 1 ch. [40]
- R8: sc 10, 2 sc in next st; (sc 5, 2 sc in next st) * 3 times; 11 sc. 1 ss, 1 ch. [44]
- R9: sc 11, 2 sc in next st, (sc 6, 2 sc in next st) * 3 times, 11 sc, 1 ss, 1 ch. [48]
- R10: sc 11, 2 sc in next st, (3 sc, 2 sc in next st) * 6 times, 12 sc, 1 ss, 1 ch. [55]
- R11: sc 12, 2 sc in next st, sc 4; (in the same st: 1 sc, 1 ch, 1 sc); sc 4, 2 sc in next st, sc 4, (in the same st: 1 sc, 2 ch, 1 sc); sc 4, 2 sc in next st, sc 4; (in the same st: 1 sc, 1 ch, 1 sc); sc 4, 2 sc in next st, sc 12. 1 ss.
Complete two more big petals for a total of three.
Medium Rose Petals (Make 3)
- Make a magic ring.
- R1: 6 sc into the magic ring, 1 ss, 1 ch. [6]
- R2: (2 sc in next st) * 6 times, 1 ss, 1 ch. [12]
- R3: (1 sc, 2 sc in the next st) * 6 times, 1 ss, 1 ch. [18]
- R4: (1 sc, 2 sc in the next st, 1 sc) * 6 times, 1 ss, 1 ch. [24]
- R5: (3 sc, 2 sc in next st) * 6 times, 1 ss, 1 ch. [30]
- R6: (2 sc, 2 sc in next st, 2 sc) * 6 times, 1 ss, 1 ch. [36]
- R7: sc 10, 2 sc in next st; (4 sc, 2 sc in next st) * 3 times; 10 sc. 1 ss, 1 ch. [40]
- R8: sc 10, 2 sc in next st; (sc 5, 2 sc in next st) * 3 times; 11 sc. 1 ss, 1 ch. [44]
- R9: sc 11, 2 sc in next st, (sc 6, 2 sc in next st) * 3 times, 11 sc, 1 ss, 1 ch. [48]
- R10: sc 11, 2 sc in next st, 3 sc; (in the same st: 1 sc, 1 ch, 1 sc); sc 3, 2 sc in next st, sc 3; (in the same st: 1 sc, 2 ch, 1 sc); sc 3, 2 sc in next st, sc 3; (in the same st: 1 sc, 1 ch, 1 sc); sc 3, 2 sc in next st, sc 12. 1 ss, cut and leave a tail.
Complete two more medium petals for a total of three.
Small Rose Petals (Make 3)
- Make a magic ring.
- R1: 6 sc into the magic ring, 1 ss, 1 ch. [6]
- R2: (2 sc in next st) * 6 times, 1 ss, 1 ch. [12]
- R3: (1 sc, 2 sc in the next st) * 6 times, 1 ss, 1 ch. [18]
- R4: (1 sc, 2 sc in the next st, 1 sc) * 6 times, 1 ss, 1 ch. [24]
- R5: (3 sc, 2 sc in next st) * 6 times, 1 ss, 1 ch. [30]
- R6: (2 sc, 2 sc in next st, 2 sc) * 6 times, 1 ss, 1 ch. [36]
- R7: sc 10, 2 sc in next st; (4 sc, 2 sc in next st) * 3 times; 10 sc. 1 ss, 1 ch. [40]
- R8: sc 10, 2 sc in next st; (sc 5, 2 sc in next st) * 3 times; 11 sc. 1 ss, 1 ch. [44]
- R9: sc 11, 2 sc in next st, (sc 6, 2 sc in next st) * 3 times, 11 sc, 1 ss, 1 ch. [48]
Complete two more small petals for a total of three.
Rose Sepal (Make 1)
- Start with a magic ring.
- R1: sc 6 in magic ring. 1 ss, 1 ch. [6]
- R2: (2 sc in next st) * 6 times, 1 ss, 1 ch. [12]
- R3: (1 sc, 2 sc in next st) * 6 times, 1 ss, 1 ch. [18]
- R4: Work sc 18 in the round, 1 ss. [18]
- R5: (ch 13, start the 2nd st from hook: 1 ss, sc 2, hdc 2, dc 3, tr 4, skip 2 sts, 1 ss in the 4th st) * 6 times.
Rose Leaves (Make 3)
- Start with a foundation chain: Ch 13.
- R1: sc in 2nd st from hook, sc 10, 3 sc in last chain, (working on the other side of ch) sc 10, sc 2 in next st, ss, ch 1.
- R2: Add wire, sc, hdc, dc, tr 6, dc, hdc, sc, 3 sc in last ch (working on the other side of ch) sc, hdc, dc, tr 6, dc, hdc, sc 2, ss, 1 ch.
- R3: From the last st of hook, sc in all the sts, 1 ss, cut and leave tail for wrapping.
Complete two more leaves for a total of three.
How to Assemble Your Crochet Rose
Now, let’s bring all the pieces together to create your beautiful 3D crochet rose.
Assembling the Rose Leaves
- Wrap the tail of a leaf around an iron wire and tie it securely.
- Repeat for the other two leaves.
- Wrap all three leaves together around an iron wire using yarn.
Assembling the Rose Flower and Leaf
- Insert the flower rod (stem) into the middle of the small petals and bend the end of the stem to secure it.
- Apply hot melt adhesive to the small petals and wrap them around the stem.
- Continue by adding the medium petals, then the large petals, securing each layer with hot melt adhesive and trimming any excess yarn tails.
- Insert the stem into the middle of the rose sepals. Apply hot melt adhesive to the sepals and firmly attach them to the base of the flower.
- Take green yarn and begin wrapping it tightly around the entire flower stem.
- As you wrap, incorporate the assembled leaf section, continuing to wrap the green yarn all the way to the end of the stem.
- Cut the long tail of the green yarn and secure it with hot melt adhesive.