Crochet Owl Granny Square Lovey Blanket

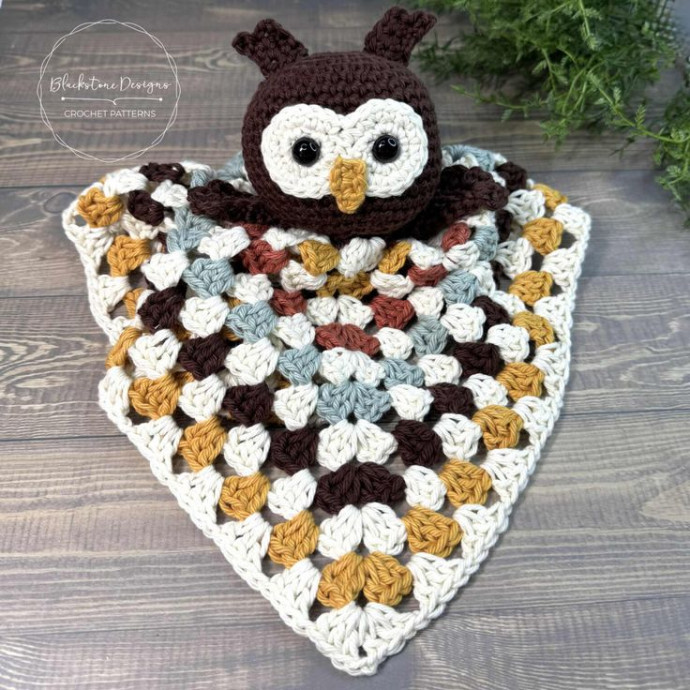
The Crochet Owl Granny Square Lovey Blanket is an adorable and cozy creation that combines the timeless charm of granny squares with the whimsical cuteness of owls. This delightful blanket not only adds a touch of handmade warmth to any nursery but also serves as a comforting companion for little ones. The intricate details of the crochet work bring a sense of love and care into each stitch, making it a perfect gift for a new baby or a cherished keepsake for a growing child. With its soft textures and sweet owl motifs, this lovey blanket is sure to become a treasured favorite for both kids and parents alike.
Materials
- Worsted Weight Yarn (#4)
- Beige (MC) – 2.5oz (129yds)
- Brown (A) - 1.5oz (78yds)
- Gold (B) – .75oz (39yds)
- Terracotta (C) – .5oz (26yds)
- Sage (D) – .5oz (26yds)
- H/8/5.00mm Crochet Hook
- 12mm Safety Eyes
- Fiberfill Stuffing
- Yarn Needle
- Scissors
Gauge
3.5 CL + 3 ch-1 x 8 rows = 4” (Not critical for this project).
Finished Measurements
- Blanket: 13” x 13”
- With Owl: 12.5” L (Tufts to Blanket Edge)
Stitch Guide
- arnd = around
- ch = chain
- CL = Cluster stitch
- dc = double crochet
- sc = single crochet
- sl st(s) = slip stitch(es)
Skill Level
Easy
Pattern Written in U.S. Terms
Notes
- Beginning chain 2 counts as the first stitch.
- Blanket works from the center-out.
- Where asterisks appear, repeat the instructions between them.
- Where parenthesis appear within the instruction, work those stitches into the same space.
Optional: Add a fabric backing!
Special Stitches
Cluster (CL) – Place three double crochet in the same space.
Instructions
Blanket
With Color A,
R1. Ch 3, join to form a ring: In ring, ch 2, 2 dc, ch 2, *3 dc, ch 2* 3X, sl st to top of beginning ch 2; Fasten if changing colors.
With Main Color,
R2. Attach yarn to ch-2 space, (ch 2, 2 dc, ch 2, 3 dc) in same space as join, ch 1, *(3 dc, ch 2, 3 dc) in next ch-2 space, ch 1* 3X, sl st to top of beginning ch 2; Fasten if changing colors.
With Color B,
R3. Attach yarn to ch-2 space, (ch 2, 2 dc, ch 2, 3 dc) in same space as join, ch 1, 3 dc between CLs, ch 1, *(3 dc, ch 2, 3 dc) in ch-2 space, ch 1, 3 dc between CLs, ch 1* 3X, sl st to top of beginning ch 2; Fasten if changing colors.
With Main Color,
R4. Attach yarn to ch-2 space, (ch 2, 2 dc, ch 2, 3 dc) in same space as join, ch 1, (3 dc, ch 1) between CLs, *(3 dc, ch 2, 3 dc) in ch-2 space, ch 1, (3 dc, ch 1) between CLs* 3X, sl st to top of beginning ch 2; Fasten if changing colors.
R5-12. Repeat R4, alternating colors as desired. Blanket shown was repeated for 12 rows with a color change pattern of *A, MC, B, MC, C, MC, D, MC* ending with MC.
Border
With Main Color,
Ch 1, 1 sc in each st and ch space around, sl st to join in 1st sc; Fasten. (196)
If a decorative border is desired: find a border with a stitch multiple of 2, 4, 7, 14, or 28.
Owl Head
With Any Color,
R1. Make magic ring, ch 1, 6 sc in ring
R2. 2 sc arnd (12)
R3. *2 sc, sc* arnd (18)
R4. *2 sc, sc x 2* arnd (24)
R5. *2 sc, sc x 3* arnd (30)
R6. *2 sc, sc x 4* arnd (36)
R7-17. sc arnd (36)
R18. *dec, sc x 4* (30)
R19. *dec, sc x 4* (24)
R20. *dec, sc x 4* (18)
R21. *dec, sc x 4* (12)
Stuff Head
R22. dec arnd, weave tail through remaining stitch and pull tight to close; Fasten.
Eye Patches (Make 2)
With Any Color,
R1. Make magic ring, ch 1, 6 sc in ring
R2. 2 sc arnd (12); Fasten 1st eye patch; keep a working loop for the 2nd eye patch & continue
R3. *2 sc, sc x 3* 5X, leave remaining sts unworked; Without breaking yarn, pick up other eye patch and *2 sc, sc x 3* 5X, sl st to join in 1st sc of other eye patch; Fasten and use left over tail to sew two worked stitches from each eye patch together.
Beak
With Gold,
R1. Ch 3, sc in 2nd chain from hook and across, turn (2)
R2. Ch 1, sc across (2)
R3. Ch 1, dec; Fasten. (1)
Feather Tufts (Make 2)
With Any Color,
R1. Ch 5, sc in 2nd ch from hook and across, turn (4)
R2. Ch 1, sc x 3, turn; leave remaining st unworked (3)
R3. Ch 1, sc across; Fasten. (3)
Wings (Make 2)
With Brown,
R1. Make magic ring, ch 1, 6 sc in ring (6)
R2. 2 sc arnd (12)
R3. *2 sc, sc* arnd (18)
R4. *2 sc, sc x 2* arnd (24)
R5. Fold wing in half and working through both layers: sc x 8, *(2 dc, ch 1), sl st in next st* 3X; Fasten.
Finishing
Blanket
Block as desired (helps make it perfectly square and flat).
Secure and Hide All Strings.
Optional fabric backing (I suggest minkie or standard fleece): Lay blanket flat, wrong side up, and measure inside the border, cut fabric to same measurement and attach. You can attach it via sewing machine, hand sewing (fleece is very easy to push a needle through!), or if you’re using cotton yarn, you can attach a backing with heat bond tape. Heat bond tape can be used for other yarns, but be careful not to overheat the iron and melt or shrink the yarn.
Owl
Insert safety eyes into center of R1 of each patch.
Attach eye patch to front of owl head over R8-14.
Attach beak to front center of eye patch so ⅔ of the beak is on the eye patch and ⅓ of the beak hangs off.
Attach tufts to top of the owl head, over R3-5, and lined up center with R1.
Attach top tip of wings to bottom of head over R18-20. Have longer “feather” on bottom top facing forward.
Attach head to blanket so R20-22 of head is attached to R1-2 of blanket.