Crochet Lime Handbag: A Colorful Accessory Guide

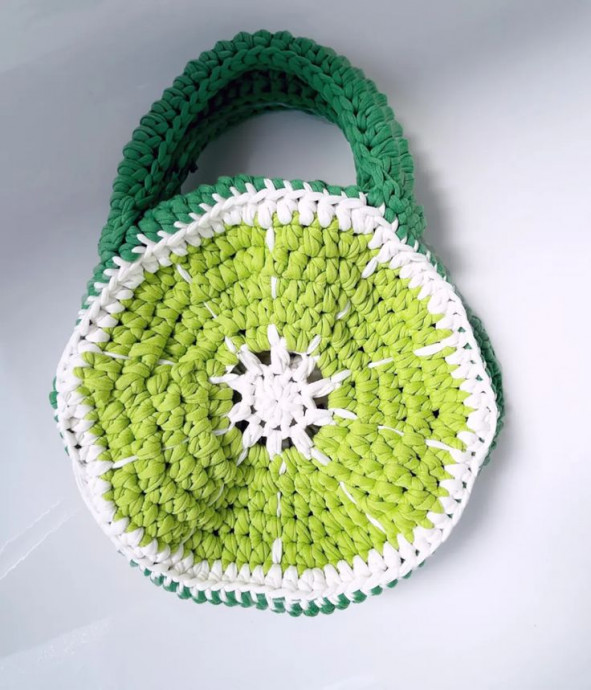
Oh, the crochet lime handbag is a delightful accessory that adds a pop of color to any outfit! The vibrant lime hue brings a refreshing and zesty touch to your look, perfect for brightening up your day. Handcrafted with intricate crochet details, this charming bag is not only stylish but also unique. Whether you're heading out for a casual day or a fun gathering with friends, this handbag is sure to catch eyes and spread some cheerful vibes. Carry your essentials in style with this lovely crochet lime handbag and show off your fun and fabulous fashion sense!
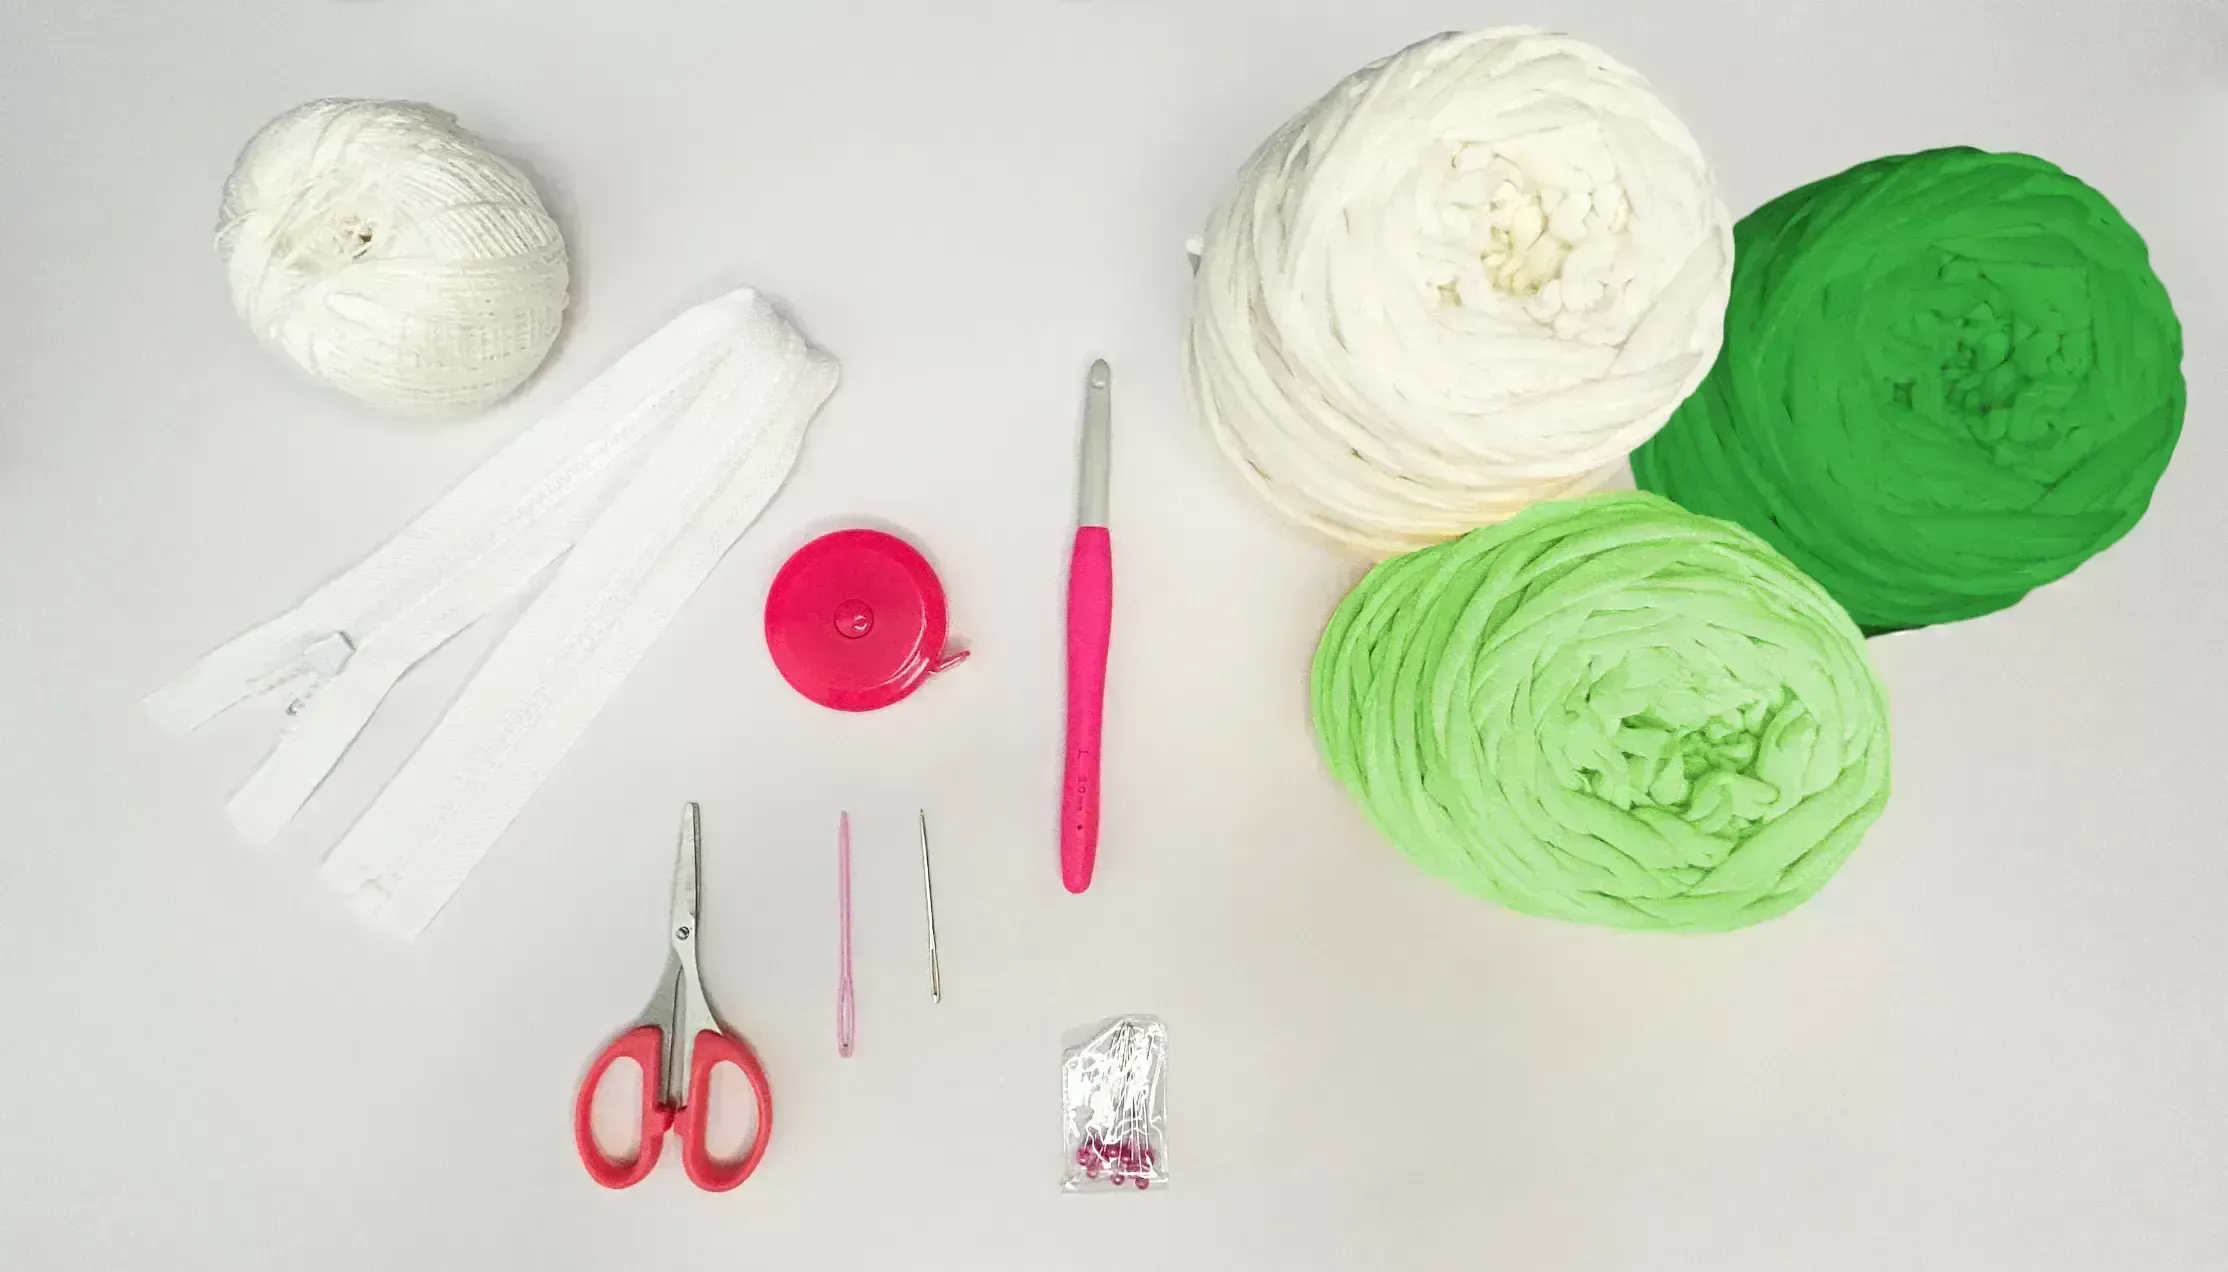
Materials
Yarn weight: Category 5
Brand: Fabric Yarn Find a Yarn Substitute here
Color: Lime Green, Dark Green and White
Hook: 8.0 mm
Pattern Gauge: 8 Hdc Sts x 5.7 Rows = 4 x 4 in/ 10 x 10 cm
No. of yarns (skeins): 1 skein for each color
Total Yardage (approx.): 75 yds Lime Green, 77 yds Dark Green & 30 yds White
Tools: Blunt tapestry needle, Stitch Markers, measuring tape, Scissors, Sewing Needle, Mercerized Thread, sewing pins, 16” Molded Plastic zipper
Skill: Easy – Intermediate
Things to Note
- Yarn A represents the White and Yarn B for the Lime Green, Yarn C represents Dark Green.
- Prepare a pattern gauge to get the same size. You may need to adjust your tension or change the hook size to achieve the same gauge.
- Pattern consists of basic Chains, Slip Stitch, Half Double Crochet, Double Crochet stitches.
Abbreviations available in English US format
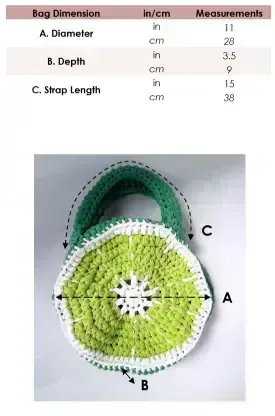
Pattern consists of 1 size.
Measurements above are based on the yarn size
Length can easily be adjusted to your liking
Crochet Abbreviations (US Terms)
- BLO – Back loop
- Ch – Chain Stitch
- Ch Sp – Chain Space
- RS – Right Side
- inc – Increase
- MR – Magic Ring
- Sl St – Slip Stitch
- Sc – Single Crochet
- SM – Stitch Marker
- Hdc – Half Double Crochet
- Dc – Double Crochet
Instructions
Part 1: Bag Panel
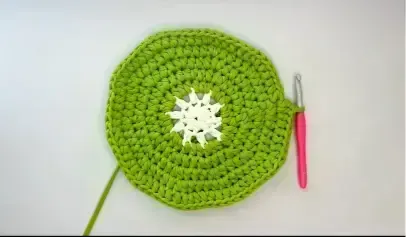
Magic Ring: With Yarn A, work a MR, Ch 1 to secure and work 10 Hdc in the MG, Ch 1 turn – Learn how to do the Magic Ring here
Row 1: Into the 1st St, *(Hdc, Ch 1), Rep (*) 9 more times, Switch to Yarn B on the last St, Slst into the first St to join. – Learn how to switch yarn colors here
Row 2: Hdc in the 1st St, *(2 Hdc in Ch Sp, Hdc), Rep (*) in the round, Slst to join.
Row 3: Hdc in the 1st and 2nd St, 2 Hdc increase, *(Hdc 2, 2 Hdc increase), Rep (*) in the round, Slst to join.
Row 4: *(Hdc 3, 2 Hdc increase), Rep (*) in the round, Slst to join.
Row 5: *(Hdc 4, 2 Hdc increase), Rep (*) in the round, Slst to join.
Row 6: *(Hdc 5, 2 Hdc increase), Rep (*) in the round, Switch to Yarn B on the last St, Slst into the first St to join.
Row 7: *(Hdc 6, 2 Hdc increase), Rep (*) in the round, Switch to Yarn C on the last St, Slst into the first BLO St to join.
Row 10: BLO Dc into the 1st St evenly in the round, Slst to join
Row 12: Work Dc Sts evenly across in the round.
Bind off.
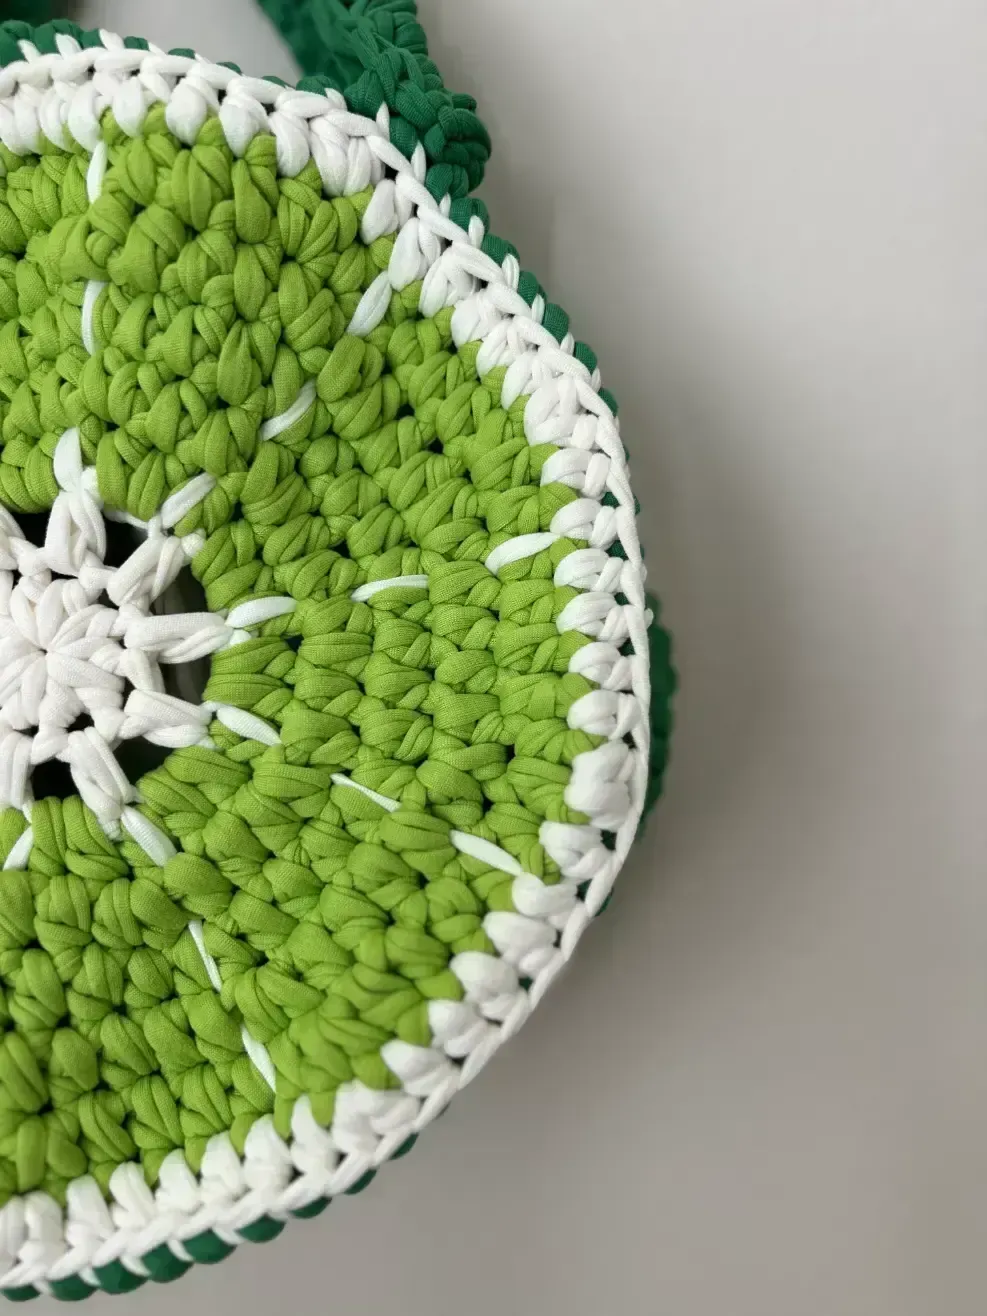
Part 1a: Lime Lines
With your blunt tapestry needle, thread 2 arms length of Yarn A.
Insert needle through the top St from the back on Row 2, weave up and under each 5 rows in a straight line.
From the back, weave the needle through 7 white Sts.
Insert needle under the 7th St, and weave up and under each 5 rows down in a straight line towards the next St on Row 2.
Weave the needle through 2 green Sts and back out through the next white St.
Rep Steps 3 – 5 evenly across.
Bind off and rep Part 1 to make a second piece - Do not bind off the 2nd piece.
Part 2: Joining Panels
Measure the length of your zipper and place a SM on each end.
Place both panel together RS out and insert your hook through the back loop in the 1st St on the other panel and pull through the loop.
Next insert your hook through the Right BLO and into the Left BLO, Yo and PT all loops.
Continue to Slst through the BLO of each St through both panels all the way across until the second SM. Ch 1 to secure and bind off.
Part 3: Zipper
Secure your zipper along the side of the bag opening with sewing pins ensuring the sides are aligned on each end.
With a sharp tapestry needle, thread a thick thread and sew between the loops, going in and back out the same loop moving across the row. - Make sure to pull tight, this will make the thread hide behind the fabric yarn.
At the end of the row, move the needle to the other side and sew along the opposite side.
Secure the ends with a few knots and snip off.
Part 4: Straps
Foundation Row: Chain 30 + 1, turn – Feel free to adjust the length to your liking.
Row 1: Hdc each Ch across through the bump side, Ch 1 turn.
Row 2: Hdc across and leave a long tail for sewing, bind off and thread through a blunt tapestry needle.
Weave your needle approx 3 Sts up along the side of the strap.
Place a SM on the 10th St from the end of the zipper on both sides.
Place the bottom end along the side of the bag. Sew along all 3 sides. Weave up 3 Sts along the side of the strap.
Next, fold the strap in half, and sew through the Ch and “V” St. Work in a zig-zag motion by going into the next St diagonally across the other side until the last 4th.
Attach the other end of the strap to the 2nd SM and sew all 3 sides like before. - Make sure the straps are not twisted.
Secure the loop with a few knots and snip off.
Make a second strap and attach it to the other side the same way.
Weave in all loose ends.
END