Crochet Your Own Ms. Pac-Man

Crocheting Ms. Pac-Man is a delightful way to bring a classic character to life in a new and creative form. The intricate details of her iconic shape and vibrant colors can be a fun challenge to recreate with yarn and a hook. By carefully following a pattern or letting your own imagination guide you, you can craft a charming Ms. Pac-Man that captures the nostalgia and charm of the beloved video game character. Whether you're an experienced crocheter or just starting out, creating your very own crocheted Ms. Pac-Man can be a rewarding and enjoyable project that adds a touch of retro whimsy to your crafting repertoire.
Ingredients
Here's what you'll need:
Materials
- Worsted weight yarn (yellow, red, and black)
- Black felt
- Polyester fiberfill
Tools
- Size E crochet hook (or your favorite size)
- Yarn needle
- Embroidery needle
- Craft glue
Key
- ch: chains
- sc: single crochet
- sl st: slip stitch
RND 1: With E hook and yellow yarn, make an adjustable ring. Ch 1, and sc 6 into the ring. Pull the ring closed.
RND 2: Work 2 sc into each st around (12)
RND 3: (2 Sc into next st, sc into next st) * rep to end of the round (18)
RND 4: (2 Sc into next st, sc into next 2 st) * rep to end of round (24)
RND 5: (2 Sc into next st, sc into next 3 st) * rep to end of round (30)
Creating the Body
RND 6: (2 Sc into next st, sc into next 4 st) * rep to end of round (36)
RND 7-8: Sc into each st around (36)
RND 9: Sc into next 18 st, sl st into remaining 18 st (36)
RND 10: Repeat R9
RND 11: Ch 18, skip next 18 st, sc into next 18 st (18)
RND 12: Sc into next 18 ch, sc into next 18 st (36)
RND 13: Sc into each st (36)
RND 14: (Sc2tog, sc into next 4 st) * rep to end of round (30)
RND 15: (Sc2tog, sc into next 3 st) * rep to end of round (24)
RND 16: (Sc2tog, sc into next 2 st) * rep to end of round (18)
RND 17: (Sc2tog, sc into next st) * rep to end of round (12)
RND 18: Sc2tog around (6)
Fasten off yarn with a slip stitch. Cut yarn tail and weave into the last row of stitches, pulling tightly. Set the body aside.
Creating the Mouth
(Make 2)
RND 1: With black yarn, make an adjustable ring, ch 1, sc 3 into the ring, and pull closed (3)
RND 2: Ch 1, turn. 2 Sc into each st (6)
RND 3: Ch 1, turn. (2 Sc into next st, sc into next st) * rep across row (9)
RND 4: Ch 1, turn. (2 Sc into next st, sc into next 2 st) * rep across row (12)
RND 5: Ch 1, turn. (2 Sc into next st, sc into next 3 st) * rep across row (15)
RND 6: Ch 1, turn. (2 Sc into next st, sc into next 4 st) * rep across row (18)
After making the two mouth pieces, you will have two semicircles. Seam them together to make one larger circle. Sew the seamed black mouth insert into the opening of the body. Stuff as you close up the last few stitches.
Adding Features
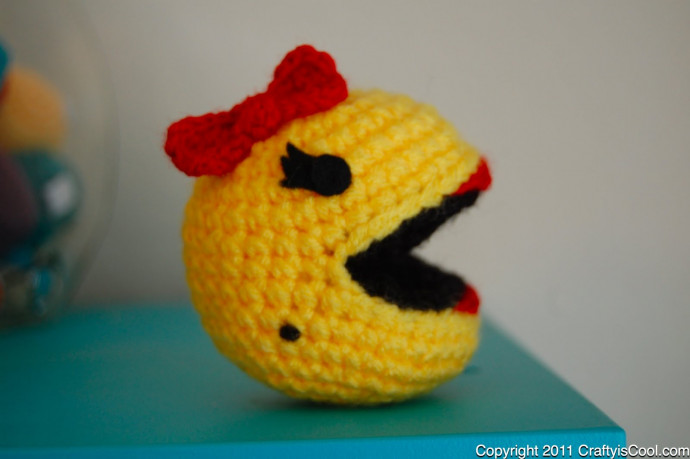
Cut two small circles (about the size of a pencil eraser) from black felt. Cut two eyelash pieces from black felt. They should be shaped as shown in the photo. Glue the eyelash pieces to the back of each eye, then glue the assembled eye to each side of the body.
Embroider lips onto the body. Starting in the middle of the mouth opening, make several long stitches going to the left and the right. Repeat for the bottom lip.
Use black yarn to embroider a beauty mark on one side of the body. A French knot will make quick work of this.
Creating the Red Bow Tie
With red yarn, ch 4.
RND 1: Sc into 2nd ch from hook and each ch across, ch 1, turn (3)
RND 2: Sc2tog, sc into next st, ch 1, turn (2)
RND 3: Sc into each st, ch 1, turn (2)
RND 4: Sc2tog, ch 1, turn (1)
RND 5: 2 Sc into next st, ch 1, turn (2)
RND 6: 2 Sc into next st, sc into next st, ch 1, turn (3)
RND 7: Sc into each st, fasten off, leaving a long tail (3)
Weave long tail through to the middle of the bowtie. Wrap the center of the bowtie with yarn tail and then weave tail back into the bowtie. Use the yarn tail to sew the bowtie to the body. Weave the starting tail through the bowtie and hide within the body.