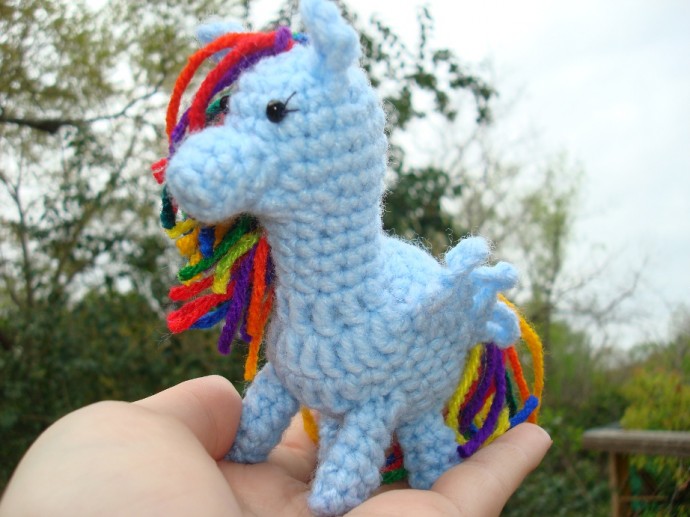
Crochet Petite Pegasus Pony: Your Guide to Creating a Magical Amigurumi

The Crochet Petite Pegasus Pony is a delightful addition to any amigurumi collection, with its whimsical design and charming details. This adorable little pony is perfect for crochet enthusiasts looking to create a magical creature with their own hands. Its petite size makes it a fun and quick project to work on, making it ideal for those looking for a satisfying and rewarding crochet experience. Whether you're a beginner or an experienced crafter, the Crochet Petite Pegasus Pony offers a creative and enjoyable way to bring a touch of enchantment into your crochet creations. So grab your yarn and hook, and let your imagination take flight with this lovable crochet companion!
What You Need
- Worsted weight acrylic yarn (I used Red Heart Super Saver) in body and hair colors
- Size F5 (3.75 mm) hook
- Polyester fiber fill
- Yarn needle
- Hand sewing needle
- Dark sewing thread
- 2 small beads
- Clip to keep place
- Scissors
Pattern Instructions
Head/Body
Work in continuous rounds
- Chain 2
- Round 1: Work 6 sc in first chain
- Round 2: Work 2 sc in each sc around - 12 st
- Round 3: *2 sc in next st, sc in next st, rep from * around - 18 st
- Round 4-8: sc in each sc around
- Round 9: *Sc2tog, sc in each of next 4 sts, rep from * around - 15 st
- Round 10: *Sc2tog, sc in each of next 3 sts, rep from * around - 12 st
- Rounds 11-15: sc in each sc around
- Round 16: sc 3, dc 6, sc 3
- Round 17: 2 sc in each of 3 sts, 2 dc in each of 6 sts, 2 sc in each of 3 sts - 24 st
- Round 18: sc 9, dc 6, sc 9
- Round 19-23: sc in each sc around
- Round 24: *Sc2tog, sc in each of next 2 sts, rep from * around - 18 st
- Round 25: *Sc2tog, sc in next st, rep from * around - 12 st
- Stuff firmly
- Round 26: Sc2tog around - 6 st
- Sew up end and weave in end
Nose
Work in continuous rounds
- Chain 2
- Round 1: Work 6 sc in first chain
- Round 2: *2 sc in next st, sc in next st, rep from * around - 9 st
- Round 3-4: sc
- Leave yarn tail for sewing up later
Legs
Work in continuous rounds. Make 4.
- Chain 2
- Round 1: Work 6 sc in first chain
- Round 2-6: sc
- Leave yarn tail for sewing up later
Ears
Make 2
- Chain 4, sc 1, dc 1, sc 1
- Leave yarn for sewing up later
Wings
Make 2
- Chain 8, *sc 1, ch 6, sc 1 (back to first chain)
- Repeat from * till you have 3 bumps
Assembly
Sew nose to face; it is optional to stuff it. Next, add on the ears. Using the sewing thread and needle, sew on the little beads (eyes) and stitch a couple of eyelashes. Position and sew on the legs. The wings can be sewn to sides as is, or you could gather them (this would leave more room on the hind end if you want to embroider a cutie mark) before sewing.
Mane and Tail
Wrap the color yarn you want for your hair around your palm. When it looks like you have enough, cut one edge; you will be left with many strands of even length yarn ready to use for your mane and tail. If you run out, you can always cut more.
For the tail, I used about 12 pieces of yarn, tied them in the middle, then sewed it to the bottom of my pony.
For the mane, I chained 12 sts from the pony's body color, leaving a tail on each end for sewing. Then, using the mane yarn, I latch hooked the pieces through each loop on the chain, 2 pieces of yarn per chain. Using the tail ends of the chain, I sewed the mane to the neck.