Make Your Own Adorable Crochet Lamb Hat

Introduction
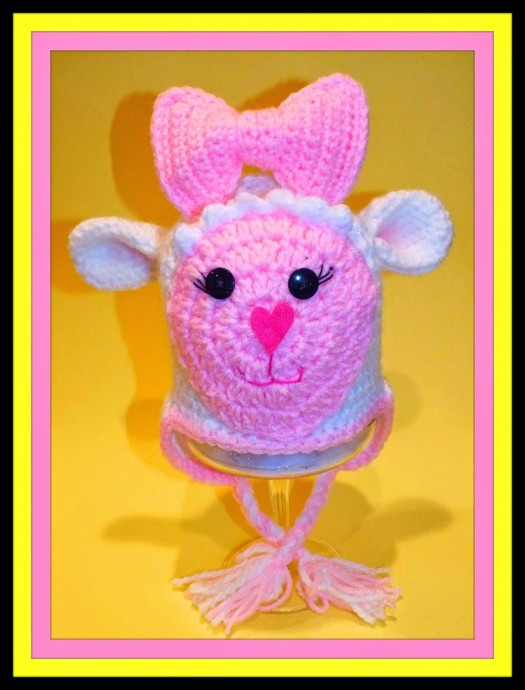
The Crochet Adorable Lamb Hat is not just any hat - it's a cozy and charming creation that will delight both the wearer and those around them. With its fluffy earflaps and cute little lamb ears, it's a perfect accessory for adding a touch of whimsy to any outfit. Whether you're making it for a baby, child, or even yourself, this hat is sure to bring smiles and warmth. Plus, the satisfaction of creating something so adorable with your own hands is truly unbeatable. So gather your yarn, hook, and a sprinkle of creativity, and get ready to craft a hat that's as sweet as it is stylish.
Materials Needed
Size: 3 to 6 months
Catgory: Here is my basic Hat Pattern: with White Yarn & J Hook
Hat Pattern
Basic Construction
Ch3
Row 1: wk 9dc in the 3rd st from the hook.
Row 2: 2dc in each st - 18sts.
Row 3: 1dc, 2dc in the next st - 27sts.
Row 4: 1dc in 2, 2dc in the next st - 36sts.
Row 5: 1dc in 3, 2dc in the next st - 45sts.
Row 6: 1dc in each st - 45sts.
Continue working 1dc in each st until the height of the hat measures almost 6 1/2".
wk 3 or 4 sc sts just to make the transition from dc to sc.
Ear Flaps
1st Ear Flap:
Row 1: wk 1sc in 10sts, ch1 & turn.
Row 2: dec 1sc, 1sc in 6sts, dec 1sc, ch1 & turn - 8sts.
Row 3: 1sc in 8sts, ch1 & turn.
Row 4: dec 1sc, 1sc in 4sts, dec 1sc, ch1 & turn - 6sts.
Row 5: 1sc in 6sts, ch1 & turn.
Row 6: dec 1sc, 1sc in 2sts, dec 1sc, ch1 & turn - 4sts.
Row 7: 1sc in 4sts, ch1 & turn.
Row 8: dec 1sc, dec 1sc, ch1 & turn - 2sts.
Row 9: dec 1sc and FO.
To make the 2nd Ear Flap: with the inside of the hat facing you count out 7sts from the 1st ear. Attach yarn into that 7th st, ch1 and wk your 1st sc in that st. Repeat rows 1-9 of the 1st ear.
Optional: (I like to reattach my yarn and wk 1sc in each st around only the ear flaps with whatever color my hat is, I use a smaller hook like a G).
When both ear flaps are done, wk 1sc around the hat with Petal Pink & FO.
Creating the Lamb Face
To make the Face for the Lamb Hat: with Petal Pink & H Hook.
Ch3 (For this part join each row at the end and ch3)
Row 1: wk 11dc in the 3rd st from the hook, join & 3.
Row 2: 2dc in each st.
Row 3: 1dc, 2dc in the next st.
Row 4: 1dc in 2, 2dc in the next st and FO.
Sew the pink face to the front of the hat after you've done the eyes, nose, and mouth. This way any threads will be hidden behind the face part of the hat.
Making the Ears
To make the Ears on the outside of the hat: with White & G Hook.
Ch2
Row 1: wk 6sc in the 2nd st from the hook.
Row 2: 2sc in each st - 12sts.
Row 3: 1sc, 2sc in the next st - 18sts.
Row 4: 1sc in each st - 18sts.
Rows 5-10: repeat row 4.
Row 11: dec sts to 12 - 12sts.
Row 12: 1sc in 12sts.
Row 13: dec sts until closed and FO.
Sew ears to each side of the hat.
Adding Details to the Face
To make the little balls on the face that are on the hat: with White & H Hook.
Attach yarn with a sl st on the right side in about the 15th st from where you FO. Make these balls the same way you did for the little Lamb on the blanket.
Use 2 small black buttons for the eyes and pink embroidery floss for the mouth, black embroidery floss for the lashes. For the nose, I cut out a small piece of pink felt shaped like a heart and you can sew or glue onto the pink face.
Creating the Big Bow
To make the Big Bow: with Petal Pink & G Hook (make 2).
Ch13
Row 1: 1sc in 12sts, ch1 & turn.
Row 2: dec 1sc, 1sc in 8, dec 1sc, ch1 & turn.
Row 3: 1sc in 10sts, ch1 & turn.
Row 4: dec 1sc, 1sc in 6, dec 1sc, ch1 & turn.
Row 5: 1sc in 8, ch1 & turn.
Row 6: dec 1sc, 1sc in 4, dec 1sc, ch1 & turn.
Row 7: 1sc in 6sts, ch1 & turn.
Row 8: dec 1sc, 1sc in 2, dec 1sc, ch1 & turn.
Row 9: 1sc in 4sts, ch1 & turn.
Row 10: 2sc, 1sc in 2, 2sc, ch1 & turn.
Row 11: 1sc in 6sts, ch1 & turn.
Row 12: 2sc, 1sc in 4sts, 2sc, ch1 & turn.
Row 13: 1sc in 8sts, ch1 & turn.
Row 14: 2sc, 1sc in 6, 2sc, ch1 & turn.
Row 15: 1sc in 10sts, ch1 & turn.
Row 16: 2sc, 1sc in 8sts, 2sc, ch1 & turn.
Row 17: 1sc in 12sts, ch1 & wk 1sc around the bow (ch1 when going around the corners) and FO the 1st bow.
Finishing Touches
Put both bows together and wk 1sl st through both.
To make the Center of the Bow: pieces and FO.
Ch10
Row 1: 1sc in 9sts, ch1 & turn.
Rows 2-4: repeat row 1 and FO.
Sew around the center of the bow, and sew bow to the top of the hat.