How to Crochet an Adorable Ghost for Halloween

Introduction
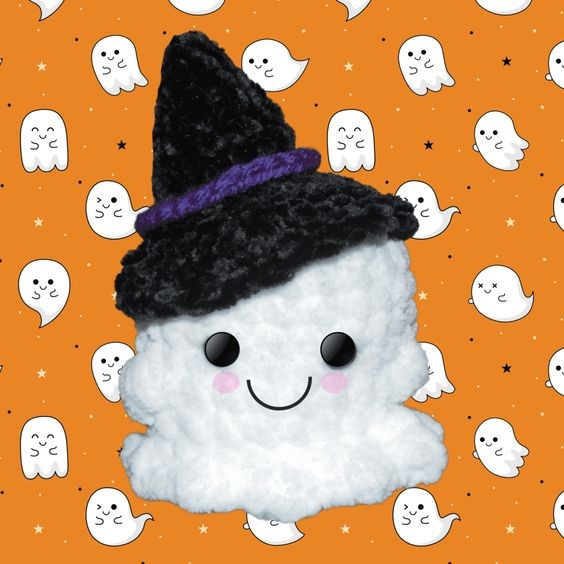
Crocheting an adorable ghost is not only a fun and creative project but also a wonderful way to add a touch of charm to your Halloween decorations. With its whimsical design and cute appeal, this little ghost can bring a smile to anyone's face. Whether you are an experienced crocheter or just starting out, this project is perfect for all skill levels. You can customize your ghost with different yarn colors and embellishments to make it truly unique. So grab your crochet hook and yarn, and get ready to create a spook-tacular addition to your seasonal decor!
Abbreviations
Here are some common crochet abbreviations you will encounter:
- ch = chain
- sc = single crochet
- dc = double crochet
- sl st = slip stitch
- 2sctog = 2 single crochet together decrease
Supplies Needed
I used Size 6 White Chunky Yarn and Velvet Black Yarn.
Additionally, you will need:
- G hook
- Yarn needle
- Eyes
Materials
For creating the crocheted ghost plushie, you’ll follow a basic amigurumi pattern with simple stitches and techniques. Here’s a brief outline of the steps:
- White yarn (worsted weight or chunky for a larger plushie)
- Safety eyes (6mm or 8mm, depending on the size of your plushie)
- Stuffing (polyester fiberfill)
- Tapestry needle
Step-by-Step Instructions
Rounds for the Body
Rnd 1: In the Magic Circle, work 6 sc, sl st (use a stitch marker to keep track of your rounds).
Rnd 2: 2 sc in each stitch around, work in continual rounds – 12 sc.
Rnd 3: *sc, 2 sc,* Repeat around – 18 sc.
Rnd 4: *sc in the next two stitches, 2 sc,* Repeat around – 24 sc.
Rnds 5–7: *sc in each sc around,* Repeat for 3 times total.
Adding the Eyes
Eyes: Insert your eyes about an inch apart, the row above the arms.
Continue with the Body
Rnd 8: Bobble Stitch for the arm, *yarn over, insert your hook, yarn over and draw up your loop,* Repeat 4 more times, yarn over and pull through. sc in the next 8 sc, create a bobble stitch for the next arm, sc around to the stitch marker.
Rnds 9–10: sc in each stitch around twice, then sl st.
Rnd 11: In the back loop, sc in each stitch around, sl st.
Rnd 12: *sc in the next two stitches, 2 sctog decrease,* Repeat around, sl st.
Rnd 13: *sc, 2sctog decrease,* Repeat around.
Rnd 14: *2sctog decrease,* Repeat around, sl st, Fasten off.
Go back to Rnd 11, sl st into the back loop, *sc, hdc, sc in one stitch, sl st into the next stitch,* Repeat around, sl st Fasten off. Weave in your ends.
Optional: Adding a Witch Hat
To create an optional witch hat, you will need:
- Black Velvet Yarn
- G hook
Rnd 1: Work 6 sc in the Magic Circle, sl st – 6 sc.
Rnd 2: *sc in the next 2 sc, 2sc,* Repeat around, work in continual rounds no sl st – 8 sc.
Rnd 3: *sc in each sc around,* Repeat around – 8 sc.
Rnd 4: *sc in the next 3 sc, 2sc,* Repeat around – 10 sc.
Rnd 5: *sc in each sc around,* Repeat around – 10 sc.
Rnd 6: *sc in the next 4 sc, 2sc,* Repeat around – 12 sc.
Rnd 7: *sc in each sc around,* Repeat around – 12 sc.
Rnd 8: *sc in the next 5 sc, 2sc,* Repeat around – 14 sc.
Rnd 9: *sc in each sc around,* Repeat around, sl st – 14 sc.
Rnd 10: In the Back Loop, *sc in the next 3 sc, 2sc,* Repeat around, sl st.
Rnd 11: *sc in the next 2 sc, 2sc,* Repeat around.
Rnd 12: *sc, 2sc,* Repeat around, sl st Fasten off.
Add a purple accent around the hat, with an F hook, ch 25, sl st. Place it around the base of the hat. Sew it in or hot glue gun it around the base. You can hot glue gun the hat to the ghost or sew it on.