Crochet Lighted Daisy Ornaments

Introduction
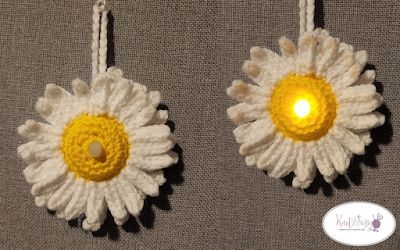
Crochet lighted daisy ornaments are a delightful addition to your home decor or a thoughtful handmade gift for a special occasion. These charming ornaments combine the intricate art of crochet with the gentle glow of tiny LED lights, creating a whimsical and enchanting ambiance. The soft yarn petals of the daisy are carefully crafted to give a lifelike appearance, while the warm twinkle of the lights adds a cozy touch to any room. Whether hung on a Christmas tree, placed in a vase, or given as a present, these lighted daisy ornaments are sure to bring joy and cheer to anyone who sees them. Add a touch of handmade charm and a sprinkle of magic to your space with these unique and lovely creations.
Materials Required
Yarn
Scrap amounts of any worsted weight #4 yarn.
- Yellow (A)
- White (B)
Hooks & Tools
- G/4.0 mm hook
- Stitch Markers
- Scissors
- Yarn Needle
Skill Level
Easy
Sizes / Finished Measurements
5 ½” diameter
Gauge
4 sc and 4 rows = 1”
Adjust hook size if necessary to obtain gauge.
Stitch Abbreviations
ch = chain
sc = single crochet
hdc = half double crochet
FLO = front loop only
BLO = back loop only
Notes
- Similar weight yarns can be substituted; please check gauge.
- Tea light cover is worked in continuous rounds.
Instructions
Tea Light Cover
Round 1: With A, make magic ring, ch 1, 10 sc in ring (do NOT tighten), place marker in 1st, move up as worked, do NOT join—10 sc.
Round 2: Working in continuous rounds here and throughout, 2 sc in each around—20 sc.
Round 3: Sc in each around.
Round 4: Repeat Round 3.
Round 5: Working in FLO, sc in each around, join. Place marker in first.
Round 6: Ch 1, working in unused BLO of Round 4, sc in each around, place marker in last.
Rounds 7-8: Repeat Round 3.
Round 9 (optional): Repeat Round 3 if needed to fit your tealight.
Fasten off, leaving long tail for sewing.
Petals
Round 1: Working in front loop only, attach B to front loop in any st of round 5. *Ch 7, work a sc in 3rd ch from hook, work hdc in next 3 ch, work sc in last ch, sl st in next FLO, repeat from * around (20 petals)
Round 2: Ch 1, this round you will be working in back loops only of round 5, sl st in blo of row 5, *ch 9, sc in 3rd ch from hook, hdc in next 5 ch, sc in last ch, sl st in next BLO, repeat from * around to last, sl st into last BLO, ch 26, sl st to same as join to form loop for hanging, finish off (19 petals, 1 - 26 ch loop)
Assembly
Insert tea light in center of magic ring. Using the beginning yarn tail, pull tail to fit snugly around the tea light flame. Using the last round yarn tail, weave tail around the last round, tightening to fit snugly around the base of the tea light. Ensure the on/off button is still operational.
Finishing
Weave in all ends.