Create a Stunning Reversible Butterfly Design with Crochet


Create a beautiful reversible butterfly design using the art of crocheting. With this project, you can showcase your skills and creativity by making a delicate and intricate butterfly that can be admired from both sides. Choose your favorite yarn colors to bring this butterfly to life, adding a touch of whimsy and elegance to any room or outfit. You can also customize the size of the butterfly by adjusting the hook size and yarn weight, making it a versatile project for crocheters of all levels. Whether you're a beginner looking to practice new skills or an experienced crocheter wanting to try something new, this reversible butterfly pattern is sure to inspire and delight.
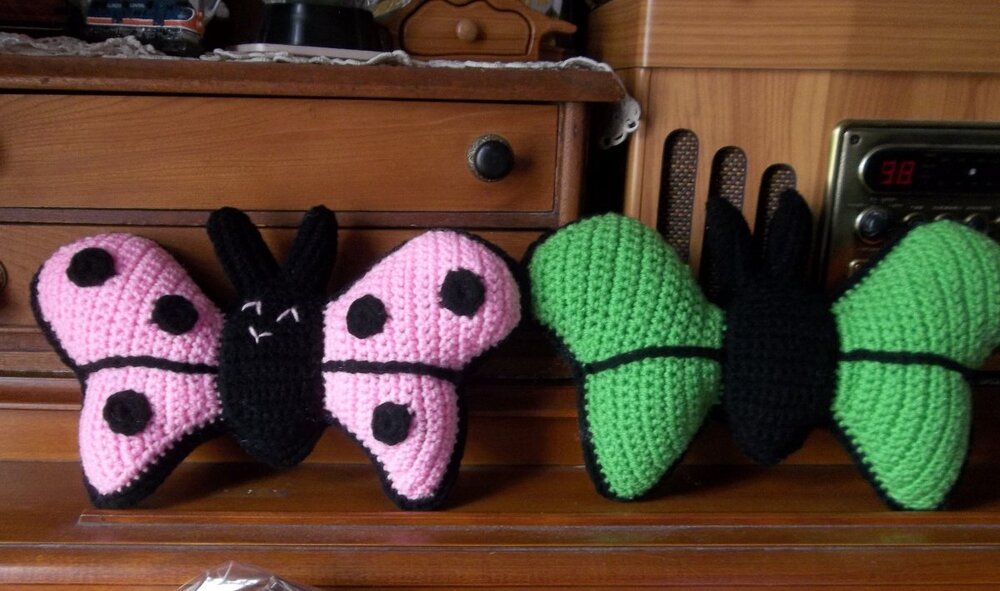
Reverse Side
Materials:
Worsted Weight yarn (like Red Heart Super Saver Yarn) in 3 colors: Color A (CA), Color B (CB), Color C (CC).
Size E hook (3.50mm)
Poly-fil
Yarn needle
Scissors
Finish Size:
13 inches at its widest and 7 inches high, about 2 1/2 to 3 inches thick depending on how much you stuff it.
Notes:
When working into chains, work in back bump of chain only. (Optional)
Directions:
Body: (Make 2)
Row 1: With Color A (CA) ch4, 1 sc in 2nd chain from hook, 1 sc in each of the next 2 chains, ch1 and turn. (3sc)
Row 2: 2 sc in first st, 1 sc in next st, 2 sc in last st, ch1 and turn. (5sc)
Row 3: 2 sc in first st, 1 sc in each of the next 3 sts, 2 sc in last st, ch1 and turn. (7sc)
Row 4: 2 sc in first st, 1 sc in each of the next 5 sts, 2 sc in last st, ch1 and turn. (9sc)
Row 5: 1 sc in each st across, ch1 and turn. (9sc)
Rows 6-14: Repeat Row 5 for Rows 6 thru 14. (9sc)
Row 15: Sc decrease first 2 sts together, 1 sc in each of the next 5 sts, sc decrease last 2 sts together, ch1 and turn. (7sc)
Row 16: Sc decrease first 2 sts together, 1 sc in each of the next 3 sts, sc decrease last 2 sts together, ch1 and turn. (5sc)
Row 17: Sc decrease next 2 sts together, 1 sc in next st, sc decrease last 2 sts together, ch1 and turn. (3sc)
Now you're working around the body.
Rnd 1: Ch1, starting with Row end work 1 sc in each of the next 17 row ends, work 2 sc in first free loop from starting chain, 3 sc in next chain loop, 2 sc in next chain loop, 1 sc in each of the next 17 row ends, 1 sc in next st, ch10, 1 sc in 2nd chain from hook, 1 sc in each of the next 8 chains, 1 sc in same st on body, 1 sc in next st, 1 sc in next st, ch10, 1 sc in 2nd chain from hook, 1 sc in each of the next 8 chains, 1 sc in same st on body, join with slst to first sc.
Finish off, secure and weave in ends.
Repeat Directions for Body for 2nd side.
Wing 1: (Make 1 in Color B and Make 1 in Color C)
Row 1: Ch11, 1 sc in 2nd chain from hook, 1 sc in each of the next 9 sts, ch1 and turn. (10sc)
Row 2: 2 sc in first st, 1 sc in each of the next 8 sts, 2 sc in last st, ch1 and turn. (12sc)
Row 3: 2 sc in first st, 1 sc in each of the next 10 sts, 2 sc in last st, ch1 and turn. (14sc)
Row 4: 2 sc in first st, 1 sc in each of the next 12 sts, 2 sc in last st, ch1 and turn. (16sc)
Row 5: 2 sc in first st, 1 sc in each of the next 14 sts, 2 sc in last st, ch1 and turn. (18sc)
Row 6: 2 sc in first st, 1 sc in each of the next 16 sts, 2 sc in last st, ch1 and turn. (20sc)
Row 7: 2 sc in first st, 1 sc in each of the next 18 sts, 2 sc in last st, ch1 and turn. (22sc)
Row 8: 2 sc in first st, 1 sc in each of the next 20 sts, 2 sc in last st, ch1 and turn. (24sc)
Row 9: 2 sc in first st, 1 sc in each of the next 22 sts, 2 sc in last st, ch1 and turn. (26sc)
Row 10: 2 sc in first st, 1 sc in each of the next 24 sts, 2 sc in last st, ch1 and turn. (28sc)
Row 11: 1 sc in each st across, ch1 and turn. (28sc)
Row 12: 1 sc in each st across, ch1 and turn. (28sc)
Row 13: 1 sc in each of the next 16 sts, ch1 and turn. (16sc)
Row 14: Sc decrease first 2 sts together, 1 sc in each of the next 12 sts, sc decrease last 2 sts together, ch1 and turn. (14sc)
Row 15: Sc decrease first 2 sts together, 1 sc in each of the next 10 sts, sc decrease last 2 sts together, ch1 and turn. (12sc)
Row 16: Sc decrease first 2 sts together, 1 sc in each of the next 8 sts, sc decrease last 2 sts together, ch1 and turn. (10sc)
Row 17: Sc decrease first 2 sts together, 1 sc in each of the next 6 sts, sc decrease last 2 sts together, ch1 and turn. (8sc)
Row 18: Sc decrease first 2 sts together, 1 sc in each of the next 4 sts, sc decrease last 2 sts together, ch1 and turn. (6sc)
Row 19: Sc decrease first 2 sts together, 1 sc in each of the next 2 sts, sc decrease last 2 sts together. (4sc)
Wing 1 Edging:
Rnd 1: Ch1, 1 sc in each of the next 7 row ends, 1 sc in each of the next 11 sts, 3 sc in next st, 1 sc in each of the next 11 row ends, 2 sc in next chain loop, 1 sc in each of the next 8 chain loops, 2 sc in next chain loop, 1 sc in each of the next 18 row ends, 2 sc in next st, 1 sc in each of the next 2 sts, 2 sc in next st, join with slst to first sc. (mark this side as front of wing)
Finish off, secure and weave in ends.
Repeat directions in Color C.
Wing 2: (Make 1 in Color B and Make 1 in Color C)
Rows 1-19: Repeat Rows 1 thru 19 of Wing 1 for Wing 2, and when done with Row 19 ch1 and turn.
Wing 2 Edging:
Rnd 1: 2 sc in first st, 1 sc in each of the next 2 sts, 2 sc in next st, 1 sc in each of the next 18 row ends, 2 sc in next chain loop, 1 sc in each of the next 8 chain loops, 2 sc in next chain loop, 1 sc in each of the next 11 row ends, 3 sc in next st, 1 sc in each of the next 11 sts, 1 sc in each of the next 7 row ends, join with slst to first sc. (this will be the other front of wing)
Finish off, secure and weave in ends.
Repeat directions in Color C.
Connecting Wings to Body:
Butterfly/Body Side 1:
With Color A and with wrong side out and right sides (fronts) facing together; slip stitch together 12 sts of side of body and flat side of wing (the sc worked in chain loops on wings together). (The slip stitch seam will show on the wrong side of your work, and when putting butterfly together, it will be on the inside.)
Repeat for other wing on side 1 of butterfly/body and repeat the whole process over for attaching wings side 2 of butterfly/body.
Middle Line on Wings: (Optional)
With Color A, start with slipknot on hook surface crochet by slip stitching (starting from where wing meets body) a horizontal line (like pictured) across wings separating the top and bottom half of wings, then ch1 and slip stitch back into slip stitch to make line darker. Repeat for other 3 wings.
Border:
Butterfly Side 1:
With Color A join yarn with slip stitch to body under the wing, 1 sc in each of the sts around, putting 3 sc in body point, when you get to antenna tips put 2 sc in each of the 2 sc on the very top of antenna, then work 1 sc in each of the sts on antenna until you reach last sc on first antenna. Sc decrease st on antenna and st on head together, 1 sc on st on head, sc decrease st on head and st on second antenna together, 1 sc in each of the sc on 2nd antenna until you reach the 2 sc at the tips, 2 sc in each of those sts, 1 sc in each of the rest of the sts around, join with slst to first sc.
Fasten off, secure, weave in ends.
Repeat Directions for Butterfly Side 2.
Note: Now would be a good time to add any embellishments, faces, dots, or anything extra you wanted to the butterfly and its wings. (Optional)
Joining:
With Color A and with wrong sides together and front/right sides out, slip stitch butterfly side 1 and 2 together; joining the two pieces together. Stuff as you go. (Make sure to stuff antennas some too.) When you get to the end, join with slip stitch and finish off, secure and weave in ends.