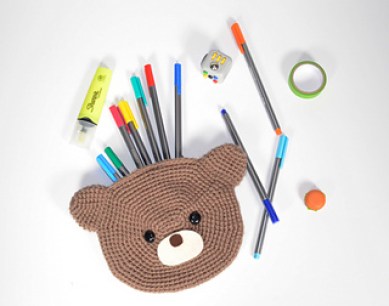
How to Crochet a Charming Bag with Buttons and Felt Details


Materials
3.25mm crochet hook
brown worsted weight yarn (I used Red Heart Super Saver yarn in the color mushroom)
a pair of 18mm shank buttons (I bought 2 pairs for $4 but you can get a pack of 100 for less than $12 here.)
dark brown and beige felt
a spool of brown thread (I used this extra strong thread for my bag.)
tapestry needle
7 inch all purpose zipper (You can get the one I used here.)
a half yard of cotton fabric (I used fabric similar to this.)
sewing needles
pins
Pattern Notes
Join with a slip stitch at the end of each round, chain one at the beginning of each round.
Worked in an oval.
Abbreviations
- ch – chain
- sc – single crochet
- inc – single crochet increase
- sl st – slip stitch
- BLO – back loops only
- mc – magic circle
- * to* – repeat the stitches between the asterisks a specified amount of times
For example: * inc, sc* 2 times means increase, single crochet, increase, single crochet.
Oval (Make 2)
ch 6
Row 1: skip first ch, 5 sc in BLO, rotate, inc in other side of st, 3 sc, inc (12)
Row 2: inc, 3 sc, 3 inc, 3 sc, 2 inc (18)
Row 3: *inc, 5 sc, inc, 2 sc* 2 times (22)
Row 4: *inc, 7 sc, inc, 2 sc,* 2 times (26)
Row 5: sc, inc, 7 sc, inc, 4 sc, inc, 7 sc, inc, 3 sc (30)
Row 6: 2 sc, inc, 7 sc, inc, 3 sc, inc, 2 sc, inc, 7 sc, inc, 2 sc, inc, sc (36)
Row 7: 2 sc, inc, 9 sc, inc, 3 sc, inc, 3 sc, inc, 9 sc, inc, 3 sc, inc, sc (41)
Row 8: 3 sc, inc, 9 sc, inc, 5 sc, inc, 4 sc, inc, 9 sc, inc, 4 sc, inc, 2 sc (48)
Row 9: 3 sc, inc, 11 sc, inc, 5 sc, inc, 5 sc, inc, 11 sc, inc, 5 sc, inc, 2 sc (54)
Row 10: 4 sc, inc, 11 sc, inc, 7 sc, inc, 6 sc, inc, 11 sc, inc, 6 sc, inc, 3 sc (58)
Row 11: 4 sc, inc, 13 sc, inc, 7 sc, inc, 7 sc, inc, 13 sc, inc, 7 sc, inc, 3 sc (66)
Row 12: 4 sc, inc, 15 sc, inc, 8 sc, inc, 7 sc, inc, 15 sc, inc, 7 sc, inc, 4 sc (72)
Row 13: 4 sc, inc, 17 sc, inc, 4 sc, inc, 8 sc, inc, 3 sc, inc, 17 sc, inc, 3 sc, inc, 8 sc, inc (80)
Row 14: 4 sc, inc, 19 sc, inc, 5 sc, inc, 8 sc, inc, 4 sc, inc, 19 sc, inc, 4 sc, inc, 8 sc, inc, sc (88)
Row 15: 15 sc, inc, 16 sc, inc, 10 sc, inc, 15 sc, inc, 15 sc, inc, 10 sc, inc, sc (94)
Row 16: 12 sc, inc, 6 sc, inc, 14 sc, inc, 10 sc, inc, 13 sc, inc, 6 sc, inc, 13 sc, inc, 10 sc, inc, 2 sc (102)
Finish off with a sl st.
Ears (Make 2)
Row 1: 6 sc in mc (6)
Row 2: inc 6 times (12)
Row 3: *5 sc, inc* 2 times (14)
Row 4: *6 sc, inc* 2 times (16)
Row 5: *7 sc, inc* 2 times (18)
Row 6: *8 sc, inc* 2 times (20)
Row 7: *9 sc, inc* 2 times (22)
Row 8: *10 sc, inc* 2 times (24)
Finish off with a sl st.
Assembling
- Attach the ears:
Lay both ovals on top of one another with the right sides facing out.
Flatten an ear so that 6 stitches are on either side of the slip stitch ‘seam’. Line it up with the slip stitches on the oval.
Stitch the first 6 stitches of the ear to the first oval then flip your work and attach the other 12 stitches to the second oval. Flip your work again and connect the last 6 stitches to the first oval.
Cut your thread and weave it in.
Do this again on the other side of the oval (the ears on my bear are 24 stitches apart).
- Stitch up the bottom:
- Stitch up the sides:
Sew the bottom of the two ovals together with a long strand of yarn. Do not stitch across the top 24 stitches between the two ears. That will be the opening of the bag.
- Add the face:
Sew the buttons onto the face leaving enough room between them to attach the nose and mouth. I followed this tutorial to sew on shank buttons.
Cut the nose and mouth from felt and either sew or glue them onto the bag.
- Make the fabric and zipper lining:


