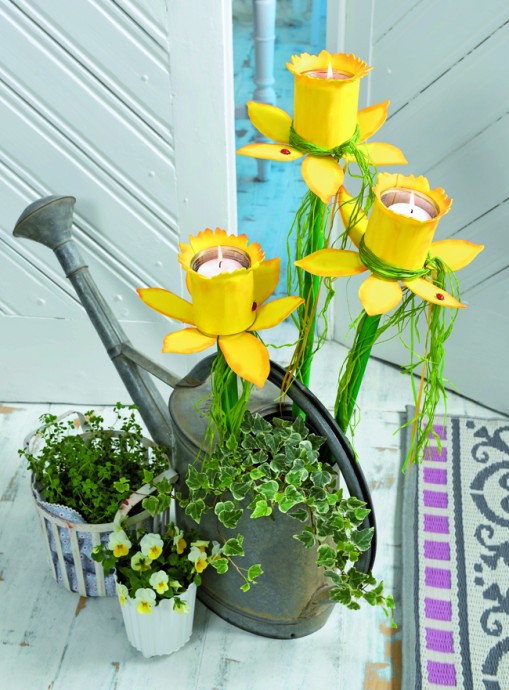
DIY Flower Cup Project Using Cans and Foam Rubber


Materials Required
You'll need:
- Cans with 7.5 cm diameter and 8 cm height;
- Yellow foam-rubber 2 mm wide, A3 sheet for each flower;
- Mat acrylic paints (orange and green colors);
- Round wooden bar with 15 mm diameter and 1 m length;
- Glasses for candles and candles;
- Small wood screw;
- Green natural stem fibre;
- Small plastic ladybugs;
- Scissors;
- Drill;
- Drill tools with 1 and 5 mm diameter;
- Flat brush;
- Hairdryer;
- Invisible glue;
- Screwdriver.
Instructions
Follow these simple steps to create your flower cups:
- According to the diameter and height of the cans, cut petals and strips from the yellow foam rubber for flower cups.
- Using a sponge, apply a little orange acrylic paint to shade the edges of the strips.
- Place the petals of the flower in the center of the selected can and heat them with a hairdryer to shape the petals as desired.
- Adhere the strips of foam rubber around the cans using glue and allow them to dry completely.
- Heat the edge of the flower corolla using the hairdryer and slightly bend it.
- Carefully drill 5-6 small holes with a diameter of 5 mm (to allow candlelight to shine through) and a middle hole with a diameter of 1 mm. Paint the edges of the holes and petals with orange acrylic paint.
- Finally, glue the flower to the base of the can from underneath.
- Drill a hole in the middle of the wooden bar, then paint the bar with green acrylic paint and allow it to dry.
- Attach the bar with a wood screw to the bottom from inside of the can. Additionally, wrap the flower cup with green bast fiber, tie it with a bow, and attach small ladybugs to the flowers.
No comments
Write a comment
