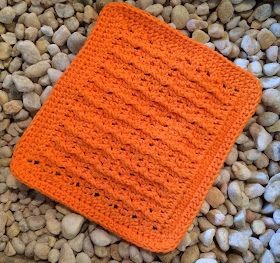
Crochet Ripple Ridges Dishcloth Tutorial

Introduction
The Crochet Ripple Ridges Dishcloth is a charming and practical addition to any kitchen! This delightful pattern combines soothing ripple stitches with textured ridges, creating a unique and eye-catching design. Perfect for adding a touch of handmade charm to your daily dishwashing routine, this dishcloth is not only functional but also a joy to crochet.
Whether you're a seasoned crocheter or just starting out, this project is a fun and rewarding way to showcase your creative skills while creating something useful for your home. So grab your yarn and hook, and let's crochet some ripple ridges that will make washing dishes a little more enjoyable!Yarn: Peaches and Cream worsted cotton, 2 oz. ball
Materials
Hook: G6/4mm
Gauge: 16 sts, 8 rows = 4”
Finished Size: 9 ½” across, 8” tall
Special Stitches
Back Post Double Crochet (bpdc)
A stitch made around the back of the post of the dc instead of into the “v” on top of the dc. Yo, insert hook from back to front, then back again around the post of the dc indicated, draw up a loop, yo pull through 2 loops on hook, yo pull through last 2 loops on hook. Bpdc made.
Front Post Double Crochet (fpdc)
A stitch made around the front of the post of the dc instead of into the “v” on top of the dc. Yo, insert hook through the front to the back, then in front again around the post of the dc indicated, draw up a loop, yo pull through 2 loops on hook, yo pull through last 2 loops on hook. Fpdc made.
Notes for Post Stitches: After completing a post stitch, the “v” of the stitch in the row below will remain empty, as you made a dc in front of, or behind it instead of on top of it. Be sure not to mistakenly stitch in that “v” when making your next regular dc. If you do, your ridges will not be parallel!
Finishing Notes
“Hdc evenly along edge” means to make approximately 2 stitches into the side of every dc along the edge until you reach the corner. There are many tutorials online which further explain the specific techniques and rules of thumb for edge stitching.
“Invisible join” is a technique of joining rounds by sewing a faux stitch into a project’s final stitches with a yarn needle in order to avoid the noticeable knot made when finishing with a slip-stitch. There are many helpful tutorials online to assist with this finishing technique, if desired.
Dishcloth Pattern
Chain 30.
Row 1: hdc into each chain across. Ch 1, turn. (29 hdc)
Row 2: dc into each stitch across. Ch 2, turn. (29 dc)
Row 3: dc in each of the first 2 stitches, *bpdc in the next stitch, dc in each of the next 2 stitches*, *repeat across. Ch 2, turn.
Row 4: dc in each of the first 2 stitches, *fpdc in the next stitch, dc in each of the next 2 stitches*, *repeat across. Ch 2, turn.
Rows 5-13: repeat rows 3 and 4 five more times. On row 13 at end, ch 1. Do not break yarn.
Finishing Instructions
Round 1: hdc into each stitch across, make 3 hdc into the last stitch to form the corner. Pivot work, hdc evenly along the edge of the cloth, make 3 hdc into the bottom corner. Slst into each hdc along the bottom edge, make 3 hdc into the corner. Hdc evenly along the edge of the cloth, make 3 hdc into the top corner, join with a slst to first hdc of round, ch 1, do not turn.
Round 2: *hdc into each stitch across to corner, at the corner, make 3 hdc into the center stitch of the 3 hdc group of the previous round*, *repeat for each edge around. Join with a slst or an invisible join to the first hdc of round. Fo, securely weave in ends.
