Create Your Own Crochet Girl Gnome

Meet the adorable Crochet Girl Gnome! This charming little creature is handcrafted with love and attention to detail. Made entirely out of soft, colorful yarn, she is the perfect addition to any gnome lover's collection. With her rosy cheeks, button nose, and mischievous smile, this crochet gnome is sure to bring a smile to your face. The Crochet Girl Gnome is not only a delightful decoration but also a symbol of creativity and craftsmanship. The intricate details of her outfit, from the delicate lace trim on her dress to the tiny buttons on her shoes, showcase the skill and dedication of the artisan who brought her to life. This crochet gnome is a testament to the beauty that can be created with a simple hook and some colorful yarn.
Level
Intermediate
Materials
- Crochet Hook, Size E/4 (3.5 mm) (I use mostly Clover Amour Hooks)
- Stitch Marker(s)
- Scissors
- Stuffing
- Pins
- Tapestry Needle
- Two, 9 mm round buttons OR one, 12 mm heart button (optional)
- Sewing Thread and Needle for stitching buttons and bows (optional)
- Needle Pullers (optional)
- Chopstick, dowel, or something similar to help with stuffing small parts
- Yarnspirations Caron Simply Soft (worsted 4-Medium, 100% acrylic, 315 yds/288 m, 6 oz/170 g), Colors: Bone, Fuchsia, Grape, Orchid, Plum Perfect, Soft Pink, Sunshine, Taupe – amounts used are noted below for each specific Crochet Girl Gnome variation
- Yarnspirations Caron Simply Soft Heathers (worsted 4-Medium, 100% acrylic, 250 yds/228 m, 5 oz/141 g), Colors: Charcoal Heather, Grey Heather – amounts used are noted below for each specific Crochet Girl Gnome variation
Variations of the Crochet Girl Gnome
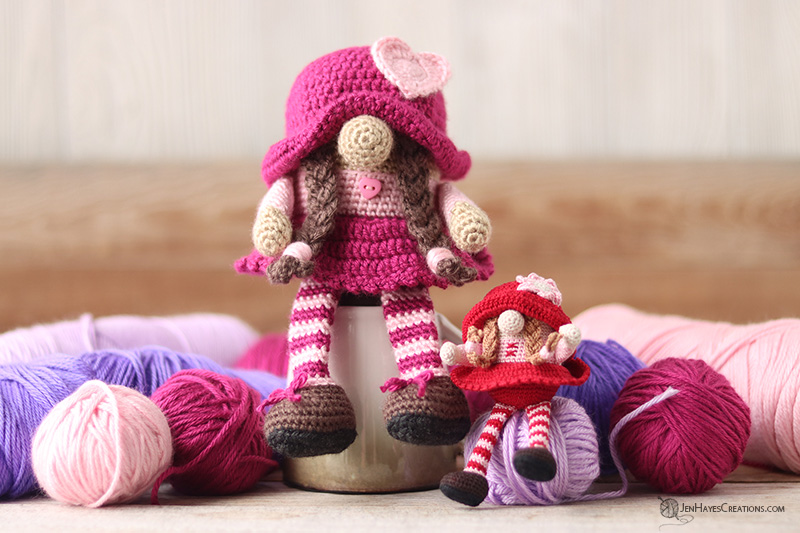
Variation 1 – In Pinks With the Heart on the Hat
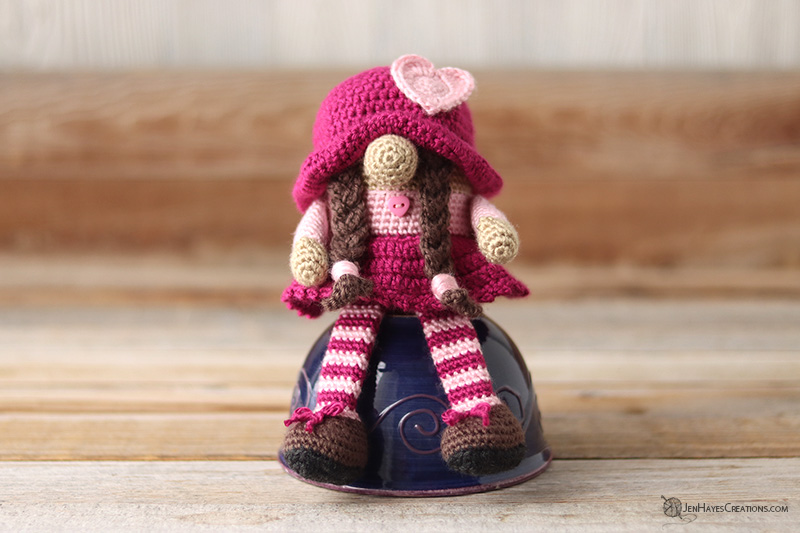
Color (A) Bone, used approx. 52 yds/47.5 m; Color (B) Fuchsia, used approx. 110 yds/100.5 m; Color (C) Soft Pink, used approx. 48 yds/44 m; Color (D) Charcoal Heather, used approx. 15 yds/14 m; Color (E) Taupe, used approx. 35 yds/32 m
Variation 2 – In Purples With the Flower on the Hat
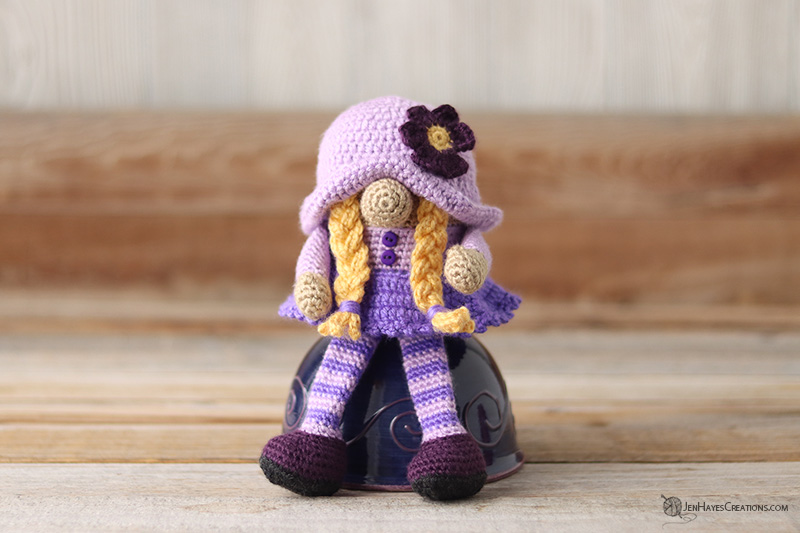
Color (A) Bone, used approx. 52 yds/47.5 m; Color (B) Grape, used approx. 67 yds/61 m; Color (C) Orchid, used approx. 84 yds/77 m; Color (D) Charcoal Heather, used approx. 15 yds/14 m; Color (E) Sunshine, used approx. 22 yds/20 m; Color (F) Plum Perfect, used approx. 20 yds/18 m
Gauge
Using hook size E/4 (3.5 mm) the first 6 rounds of the body measure approximately 2 inches (5 cm) in diameter.
Finished Measurements
Using hook size E/4 (3.5 mm) and worsted yarn the Crochet Girl Gnome measures approximately 9.5 inches (24 cm) from the bottom of the foot to the top of the hat.
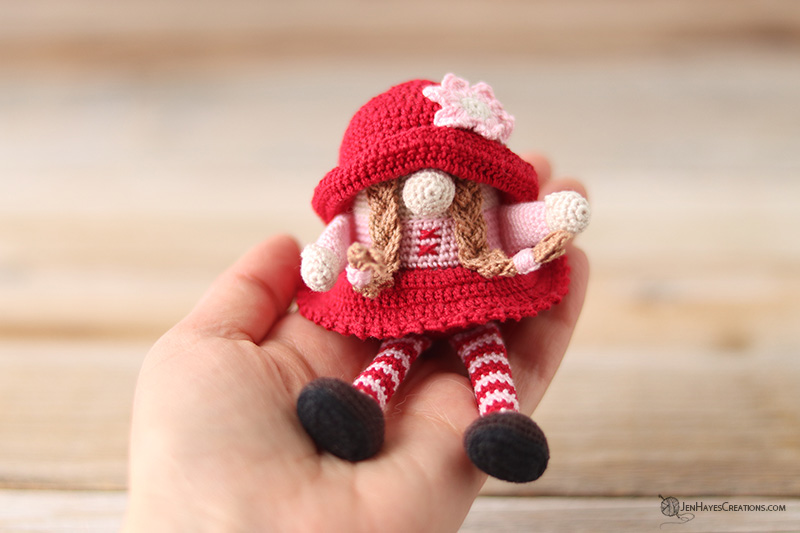
Note: The miniature Crochet Girl Gnome in the images was made using the same pattern with a 1.50 mm hook and size 10 crochet thread. It measures approximately 5 inches (13 cm) from the bottom of the foot to the top of the hat.
Design Notes
- The pattern is written in English using US crochet terminology.
- The pattern is written primarily in continuous rounds, it will be helpful to place a stitch marker at the beginning stitch of the round and move it up at the start of each additional round.
- At the end of each round/row, the number of stitches for completion is noted in parentheses.
- Further design notes, tips, and options will be provided throughout the pattern to help aid in construction.
- Color changes in the pattern should be made during the last step of the stitch prior to the noted color change throughout the pattern.
Abbreviations/Stitches Used
- back bar of the ch/back ridge – horizontal bar on the backside of a ch
- BLO – work in the back loops only
- bo – bobble (described below under special stitches)
- ch – chain
- dc – double crochet
- FLO – work in the front loop only
- hdc – half double crochet
- invisible finish
- MR – magic ring (aka. magic circle, adjustable ring)
- rep – repeat
- Rnd(s) – round(s)
- Row(s) – row(s)
- sc – single crochet
- sc2tog – single crochet 2 stitches together (invisible decrease)
- sl st – slip stitch
- standing sc
- st(s) – stitch(es)
- tr – treble crochet
- [ ] / ( ) – work instructions between brackets/parenthesis as many times as directed
- * – repeat the instructions following the single asterisk as directed
Special Stitches
Bobble (bo): A 3dcbo (three double crochet bobble) is used in the pattern.
To create a 3dcbo
With the working loop on the hook:
- Yarn over, insert hook into the next stitch,
- Yarn over and pull up a loop (three loops on the hook),
- Yarn over and pull through two loops (one leg made, two loops on the hook),
- Yarn over, insert hook into the same stitch,
- Yarn over and pull up a loop (four loops on the hook)
- Yarn over and pull through two loops (two legs made, three loops on the hook),
- Yarn over, insert hook into the same stitch,
- Yarn over and pull up a loop (five loops on the hook)
- Yarn over and pull through two loops (three legs made, four loops on the hook),
- Yarn over and pull through all four loops. (3dcbo completed)
Let’s Make Our Crochet Girl Gnome!
Nose
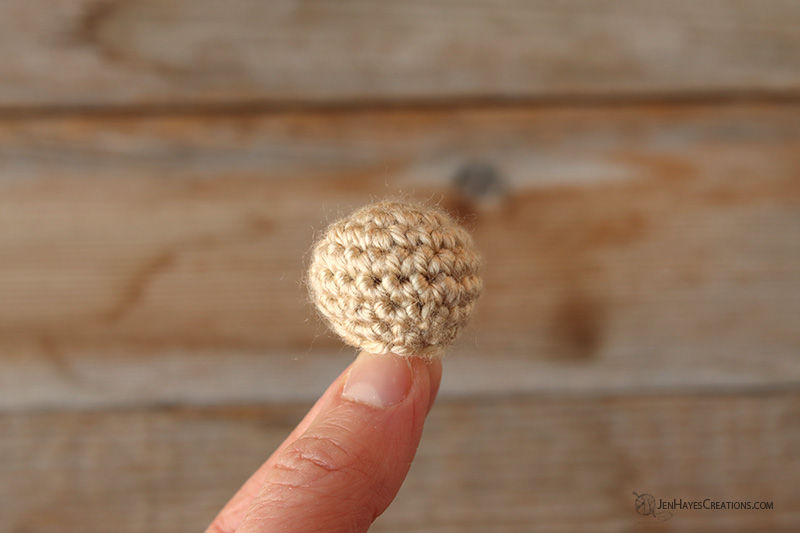
Make 1
Using Color (A) for all variations
- Rnd 1: 6sc in MR. (6sts)
- Rnd 1 alternative: If preferred, ch 2 and then 6sc in 2nd chain from hook. (6sts)
- Rnd 2: 2sc in each st around. (12sts)
- Rnd 3: [Sc in the next st, 2sc in next st] 6 times. (18sts)
- Rnds 4-5: Sc in each st around. (18sts for 2 Rnds)
- Rnd 6: [Sc in the next st, sc2tog] 6 times. (12sts)
- Rnd 7: [Sc in the next st, sc2tog] 4 times. (8sts)
- Fasten off.
- Firmly stuff and shape the nose. Set aside for later.
Body
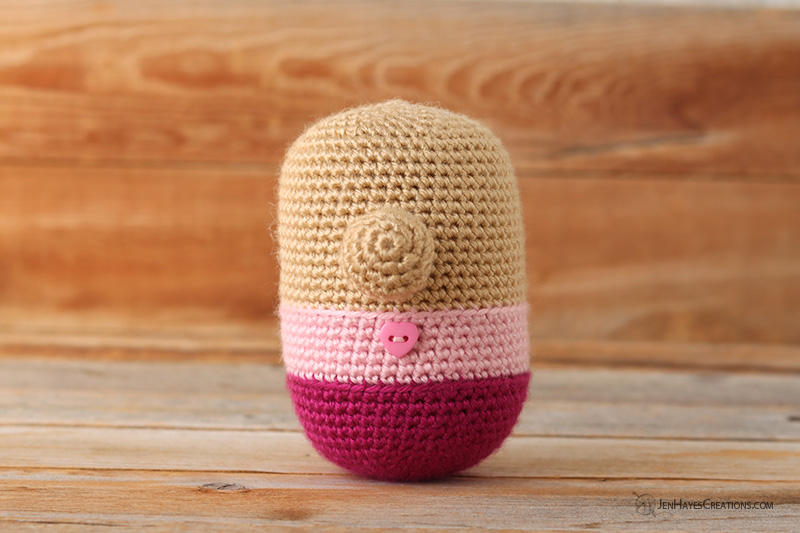
Design Note: The body is made from the bottom up, seamlessly joining the nose as the pattern progresses.
Make 1
Using Color (B) for all variations
- Rnd 1: 6sc in MR. (6sts)
- Rnd 1 alternative: If preferred, ch 2 and then 6sc in 2nd chain from hook. (6sts)
- Rnd 2: 2sc in each st around. (12sts)
- Rnd 3: [Sc in the next st, 2sc in next st] 6 times. (18sts)
- Rnd 4: [Sc in the next 2sts, 2sc in next st] 6 times. (24sts)
- Rnd 5: [Sc in the next 3sts, 2sc in next st] 6 times. (30sts)
- Rnd 6: [Sc in the next 4sts, 2sc in next st] 6 times. (36sts)
- Rnd 7: [Sc in the next 5sts, 2sc in next st] 6 times. (42sts)
- Rnd 8: [Sc in the next 6sts, 2sc in next st] 6 times. (48sts)
- Rnds 9-13: Sc in each st around. (48sts for 5 Rnds)
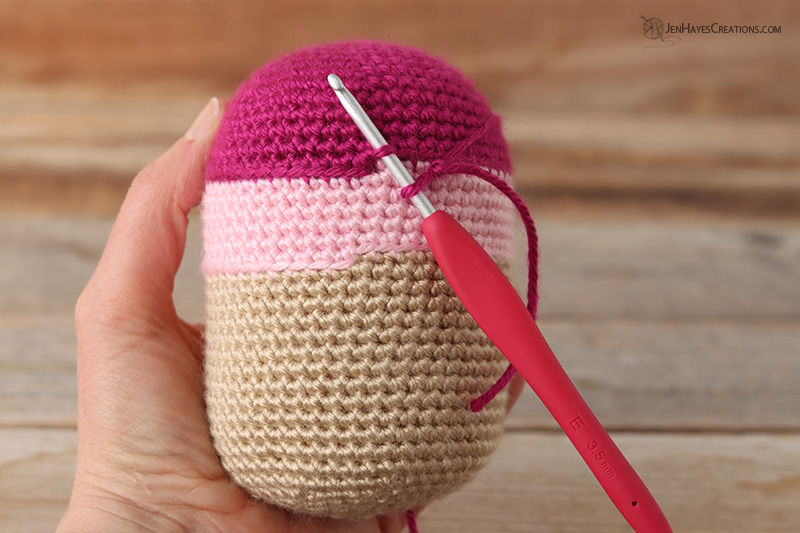
Switch to Color (C) for all variations
- Rnd 14: In BLO: Sc in each st around. With an additional stitch marker, mark the front loop of the 1st stitch of Rnd 13 to be returned to later when making the skirt. (48sts)
- Rnds 15-19: Sc in each st around. (48sts for 5 Rnds)
Switch to Color (A) for all variations
- Rnd 20: In BLO: Sc in each st around. (48sts)
- Rnds 21-22: Sc in each st around. (48sts for 2 Rnds)
In the next two Rnds, the nose is added seamlessly to the body.
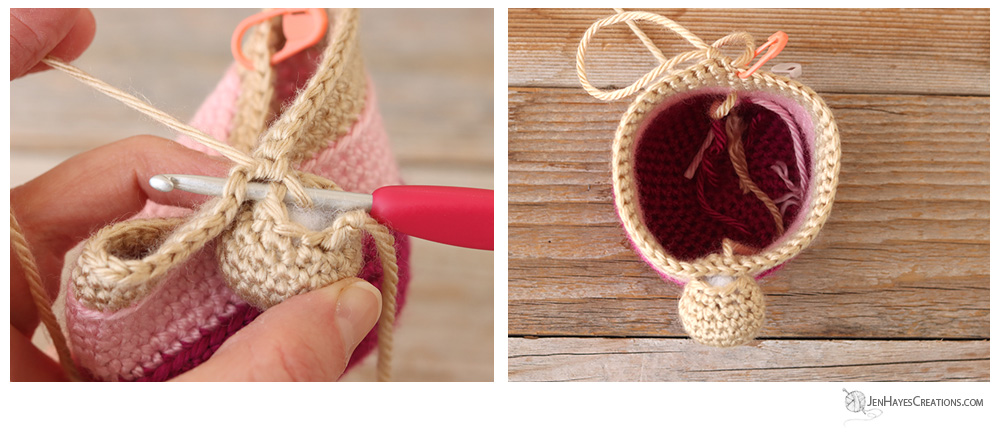
- Rnd 23: Sc in the next 22sts, now join the bottom of the nose to the body: With the working loop still on the hook, insert the hook into any st on the nose from the wrong side to the right side of the piece, then insert the hook into the next st of the body from the right side to the wrong side of the piece, yo, pull loop through the body and the nose, yo, pull through both loops, continue to join the nose and body sts together for the next 3sts, on the body: sc in the next 22sts. (48sts)

- Rnd 24: Sc in the next 22sts, now join the top of the nose to the body: With the working loop still on the hook, insert the hook into the next st on the nose closest to the hook from the right side to the wrong side of the piece, then insert the hook into the next st of the body from the right side to the wrong side of the piece, yo, pull loop through the body and the nose, yo, pull through both loops, continue to join the nose and body sts together for the next 3sts, on the body: sc in the next 22sts. (48sts)

Design Option, Adding Buttons: If using buttons on the blouse/dress it is easier to stitch them on before stuffing the body. Stitch them on, centered under the nose, over Rnds 14-19 making sure not to cover the front loops left from Rnd 13. Variation 1 uses one, 12 mm heart button, and variation 2 uses two, 9 mm round buttons. Alternatively, Xs or dashes can also be hand embroidered to replace the button(s), or it can also be left plain. (The miniature version has hand-embroidered Xs.)
- Rnds 25-33: Sc in each st around. (48sts for 9 Rnds)
Firmly stuff and shape the body and continue to do so as the pattern progresses.
- Rnd 34: [Sc in the next 4sts, sc2tog] 8 times. (40sts)
- Rnd 35: [Sc in the next 3sts, sc2tog] 8 times. (32sts)
- Rnd 36: [Sc in the next 2sts, sc2tog] 8 times. (24sts)
- Rnd 37: [Sc in the next st, sc2tog] 8 times. (16sts)
- Rnd 38: [Sc in the next 2sts, sc2tog] 4 times. (12sts)
- Rnd 39: [Sc in the next st, sc2tog] 4 times. (8sts)
- Fasten off leaving a long tail to close up the hole. Close the hole with a tapestry needle stitching only through the front loops until the hole pulls nicely closed, secure, and weave in the tail
Skirt
Using Color (B) for all variations
Design Note: The skirt is worked in joined rounds. The chain at the beginning of the Rnd and the sl st to join at the end do not count as a stitch. The first stitch of the next Rnd is always worked in the same st as the sl st.
- Rnd 1: With the bottom of the body facing up, insert the hook into the first loop of Rnd 13 of the body (previously marked with a st marker). [Sc in the next 3sts, 2sc in the next st] 12 times, sl st to the first st to join. (60sts)
- Rnd 2: Ch 2, [dc in the next 4sts, 2dc in the next st] 12 times, sl st to the first st to join. (72sts)
- Rnd 3: Ch 2, dc in each st around, sl st to the first st to join. (72sts)
- Rnd 4: Ch 2, [dc in the next 5sts, 2dc in the next st] 12 times, sl st to the first st to join. (84sts)
- Rnd 5: Ch 1, [(sc, ch2, sc) in the next st, skip the next st] 42 times, sl st to the first st to join. (42 clusters & 42 skipped sts)
- Fasten off and weave in the ends.
Hand and Arm
Make 2
Using Color (A) for all variations
- Rnd 1: 6sc in MR. (6sts)
- Rnd 1 alternative: If preferred, ch 2 and then 6sc in 2nd chain from hook. (6sts)
- Rnd 2: 2sc in each st around. (12sts)
- Rnd 3: [Sc in the next 3sts, 2sc in next st] 3 times. (15sts)
- Rnd 4: [Sc in the next 3sts, sc2tog] 3 times. (12sts)
- Rnd 5: Sc in the next 6sts, 3dcbo, sc in the next 5sts. (12sts)
- Rnd 6: Sc in the next 4sts, [sc2tog] 2 times, sc in the next 4sts. (10sts).
- Rnd 7: Sc in each st around. (10sts)
Firmly stuff and shape the hand.
Switch to Color (C) for all variations
- Rnd 8: In the FLO: [Sc in the next 4sts, 2sc in the next st] 2 times. (12sts)
- Rnds 9-17: Sc in each st around. (12sts for 9 Rnds)
- Rnd 18: Sc in the next 3sts, leave the remaining sts unworked. (2sts)
Lightly stuff the arm, leaving the last couple of Rnds unstuffed.
- Press the tube flat so the top edges line up parallel with the thumb. The 3sts worked in Rnd 18 should leave the working loop on the edge when the tube is pressed together. If needed, add or remove sts so this is the case and sc the two edges together across the top. (6sts)
- Fasten off, leaving a long tail for stitching the arm to the body and set aside for later.
Shoe and Leg
Make 2
Design Note: The shoe begins by working on both sides of the foundation ch.
Using Color (D) for all variations
- Ch 9
- Rnd 1: Working in the back bar of the ch: Sc in the 2nd ch from the hook (mark this as the starting st), sc in the next 6sts, 3sc in the last st (corner rounded and the first st on the other side of the ch worked), working down the other side of the ch: sc in the next 6sts, 2sc in the next st. (18sts)
- Rnd 2: [2sc in the next st, sc in the next 2sts] 6 times. (24sts)
- Rnd 3: [Sc in the next 3sts, 2sc in the next st] 2 times, 2sc in the next st, sc in the next 3sts, 2sc in the next 2sts, [sc in the next 3sts, 2sc in the next st] 2 times, sc2tog. (30sts)
Switch to Color (E) for variation 1 and Color (F) for variation 2
- Rnd 4: In BLO: Sl st in the next st (counts as a st), sc in the next 29sts. (30sts)
- Rnds 5-6: Sc in each st around. (30sts for 2 Rnds)
- Rnd 7: Sc in the next 7sts, sc2tog, sc in the next st, [sc2tog] 2 times, sc in the next st, [sc2tog] 2 times, sc in the next st, sc2tog, sc in the next 8sts. (24sts)
- Rnd 8: Sc in the next 7sts, [sc2tog] 2 times, sc in the next st, [sc2tog] 2 times, sc in the next 8sts. (20sts)
- Rnd 9: Sc2tog, sc in the next 5sts, sc2tog, sc in the next st, sc2tog, sc in the next 6sts, sc2tog. (16sts)
Design Note: In the next Rnd, the legs will begin. The legs are worked in stripes. To minimize jogging a sl st will be used for the first st when a color change is made. A regular sc can be replaced if desired. There is no need to cut the yarn at the end of each Rnd. Drop and pick up colors as needed to make the color changes.
Firmly stuff and shape the shoe but leave the leg unstuffed.
Switch to Color (C) for all variations
- Rnd 10: In BLO: Sc in each st around. (16sts)
- Rnd 11: [Sc in the next 2sts, sc2tog] 4 times. (12sts)
Switch to Color (B) for all variations
- Rnd 12: Sl st in the next st, sc in the next 11sts. (12sts)
- Rnd 13: Sc in each st around. (12sts)
Switch to Color (C) for all variations
- Rnd 14: Sl st in the next st, sc in the next 11sts. (12sts)
- Rnd 15: Sc in each st around. (12sts)
Switch to Color (B) for all variations
- Rnd 16: Sl st in the next st, sc in the next 11sts. (12sts)
- Rnd 17: Sc in each st around. (12sts)
Switch to Color (C) for all variations
- Rnd 18: Sl st in the next st, sc in the next 11sts. (12sts)
- Rnd 19: Sc in each st around. (12sts)
Switch to Color (B) for all variations
- Rnd 20: Sl st in the next st, sc in the next 11sts. (12sts)
- Rnd 21: Sc in each st around. (12sts)
Switch to Color (C) for all variations
- Rnd 22: Sl st in the next st, sc in the next 11sts. (12sts)
- Rnd 23: Sc in each st around. (12sts)
Switch to Color (B) for all variations
- Rnd 24: Sl st in the next st, sc in the next 11sts. (12sts)
- Rnd 25: Sc in each st around. (12sts)
Switch to Color (C) for all variations
- Rnd 26: Sl st in the next st, sc in the next 11sts. (12sts)
- Rnd 27: Sc in each st around. (12sts)
Switch to Color (B) for all variations
- Rnd 28: Sl st in the next st, sc in the next 11sts. (12sts)
- Rnd 29: Sc in each st around. (12sts)
Switch to Color (C) for all variations
- Rnd 30: Sl st in the next st, sc in the next 11sts. (12sts)
- Rnd 31: Sc in each st around. (12sts)
Switch to Color (B) for all variations
- Rnd 32: Sc in the next st, leave the remaining sts unworked. (1st)
- Press the tube flat so the leg is perpendicular to the toe of the shoe. The st worked in Rnd 32 should leave the working loop on the edge when the tube is pressed together. If needed, add or remove sts so this is the case. Cut Color (C) for all variations and tuck the tail inside the leg. Sc the two edges together across the top. (6sts)
- Fasten off leaving a long tail for stitching the leg to the body.
Make the Shoes
(Optional)
Shown in variation 1
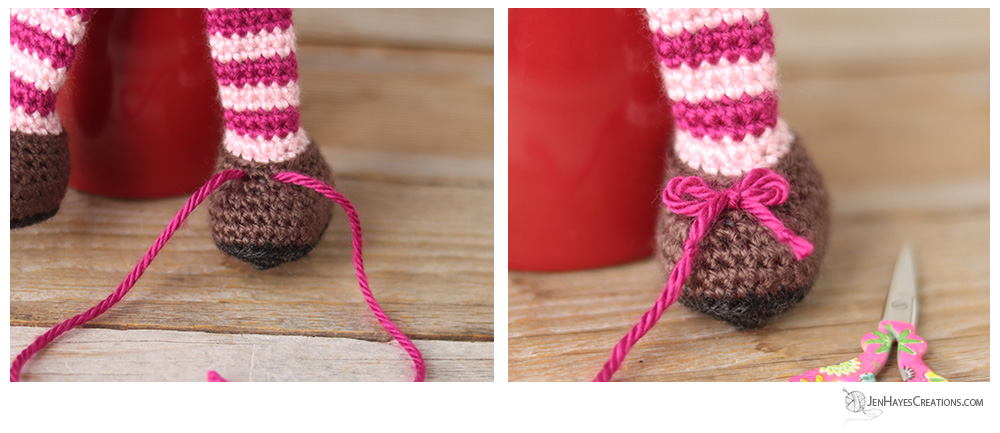
- Using Color (B) (approx 12 in/30cm) and a tapestry needle, thread the length of yarn through the front of the shoe between about Rnd 8 and 9 so it’s equal length on each side.
- Tie a knot and bow as if tying a pair of tennis shoes, then adjust the size of the bows as desired.
- Tie knots in the long lengths of yarn on both sides (approx 0.5 in/1 cm from the center of the bow) to prevent fraying, and cut off the excess yarn.
Design Option: To ensure that the bow cannot be untied use a length of coordinating sewing thread (or an additional length of yarn) to stitch the center of the bow. The bows could also be double-knotted to keep them secure, however it’s sometimes tricky to make them even this way. Small premade bows are also a great option, or the bows can be tied separately and then sewn on afterward.
Braids
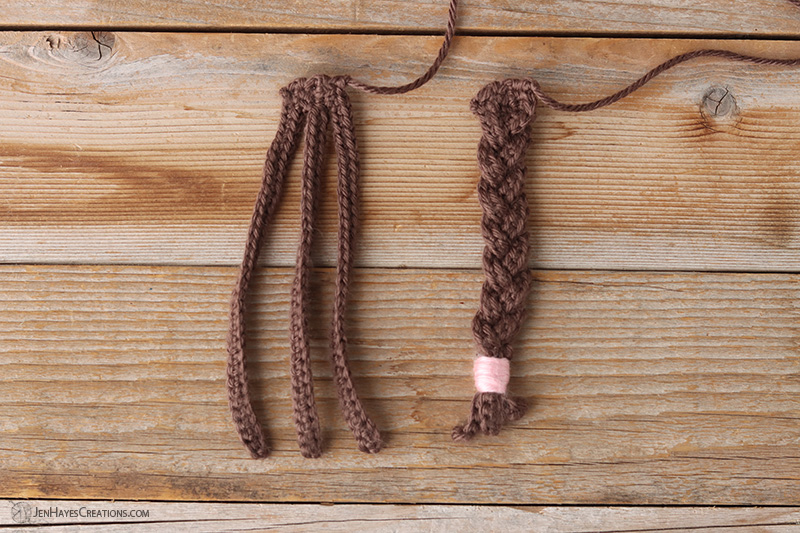
Make 2
Design Note: The braid is made as one piece, worked in turned rows. Once constructed, it will have a top base point (2sts in length) which will be stitched to the body, and three separate strands that will be used to create the braid.
Using Color (E) for all variations
- Ch 35
- Row 1: Working in the back bars of the ch: Sc in the 2nd ch from the hook and in each ch across. (34sts)
- Row 2: Ch 1 (doesn’t count as a st here and throughout), turn, sc in the next 2sts, ch 33. (35sts)
- Row 3: Working in the back bars of the ch: Sc in the 2nd ch from the hook and in each ch across, twist the work at the top base point to be able to sc in the 2sts from Row 2. (34sts)
- Row 4: Ch 1, turn, sc in the next 2sts, ch 33. (35sts)
- Row 5: Working in the back bars of the ch: Sc in the 2nd ch from the hook and in each ch across, twist the work at the top base point to be able to sc in the 2sts from Row 4. (34sts)
- Fasten off leaving a long tail to stitch the braid to the body. Weave in the starting tail.
- Braid the three strands together. Using a long length of Color (C) for variation 1 or Color (B) for variation 2, tack and wrap the base of the braid, leaving about a 3/4 inch (1.9 cm) of the three braided strands sticking out from the bottom of the wrap. Use a tapestry needle to weave the end back into the back side of the wrapping several times to secure it before fastening off.
Design Options: The braids could also be tied together using ribbon or a single piece of yarn or string tied in a bow.
Floppy-Brimmed Hat
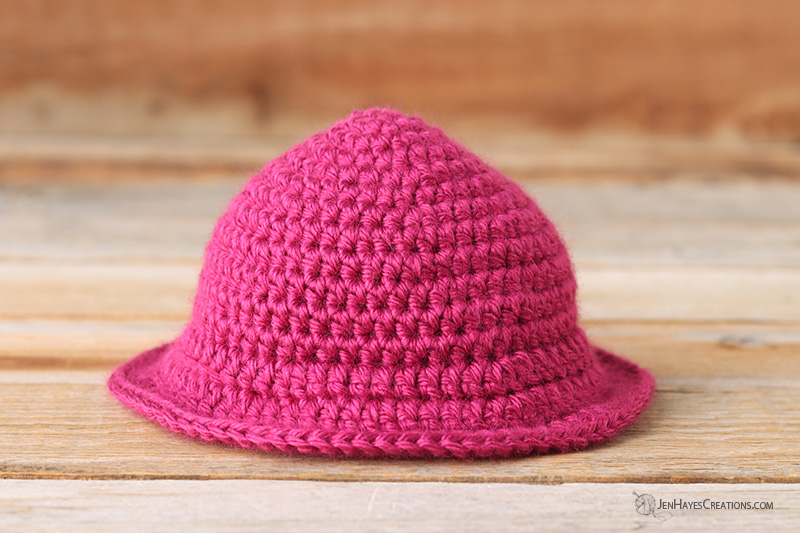
Design Note: The hat is worked in joined rounds. The chain at the beginning of the Rnd and the sl st to join at the end do not count as a stitch. The first stitch of the next Rnd is always worked in the same st as the sl st.
Make 1
Using Color (B) for variation 1 and Color (C) for variation 2
- Rnd 1: 6hdc in MR, sl st to the first st to join. (6sts)
- Rnd 1 alternative: If preferred, ch 2 and then 6hdc in 2nd chain from hook, sl st to the first st to join. (6sts)
- Rnd 2: Ch 1, 2hdc in each st around, sl st to the first st to join. (12sts)
- Rnd 3: Ch 1, [hdc in the next st, 2hdc in next st] 6 times, sl st to the first st to join. (18sts)
- Rnd 4: Ch 1, hdc in the next st, 2hdc in the next st, [hdc in the next 2sts, 2hdc in next st] 5 times, hdc in the next st, sl st to the first st to join. (24sts)
- Rnd 5: Ch 1, [hdc in the next 3sts, 2hdc in the next st] 6 times, sl st to the first st to join. (30sts)
- Rnd 6: Ch 1, hdc in the next 2sts, 2hdc in the next st, [hdc in the next 4sts, 2hdc in the next st] 5 times, hdc in the next 2sts, sl st to the first st to join. (36sts)
- Rnd 7: Ch 1, [hdc in the next 5sts, 2hdc in the next st] 6 times, sl st to the first st to join. (42sts)
- Rnd 8: Ch 1, hdc in the next 3sts, 2hd in the next st, [hdc in the next 6sts, 2hdc in the next st] 5 times, hdc in the next 3sts, sl st to the first st to join. (48sts)
- Rnd 9: Ch 1, [hdc in the next 7sts, 2hdc in the next st] 6 times, sl st to the first st to join. (54sts)
- Rnds 10-12: Ch 1, hdc in each st around, sl st to the front loop of the first st to join. (54sts for 3 Rnds)
- Rnd 13: Ch 2, In FLO: dc in the next 4sts, 2dc in the next st, [dc in the next 8sts, 2dc in the next st] 5 times, dc in the next 4sts, sl st to the first st to join. (60sts)
- Rnd 14: Ch 2, [dc in the next 5sts, 2dc in the next st] 10 times, sl st to the first st to join. (70sts)
- Rnd 15: Ch 2, dc in the next 3sts, 2dc in the next st, [dc in the next 6sts, 2dc in the next st] 9 times, dc in the next 3sts. (80sts)
- Fasten off using the invisible finish and weave in the ends. (Alternatively, sl st to the first st to join and fasten off.)
Heart Applique
(Optional)
Using Color (C) for variation 1, not used in variation 2
- Rnd 1: 5sc in MR. (5sts)
- Rnd 1 alternative: If preferred, ch 2 and then 5sc in 2nd chain from hook. (5sts)
- Rnd 2: 2sc in each st around. (10sts)
- Rnd 3: [Sc in the next st, 2sc in the next st] 5 times. (15sts)
- Rnd 4: [Sl st, ch 2, dc] in the next st, 3tr in the next st, [tr, dc] in the next st, dc in the next st, hdc in the next 3sts, [dc, tr, dc] in the next st, hdc in the next 3sts, dc in the next st, [dc, tr] in the next st, 3tr in the next st, ch 2, sl st in the next st.
- Fasten off leaving a long tail for stitching. Weave in the staring tail.
Flower Applique
(Optional)
Make 1
Using Color (E) for variation 2, not used in variation 1
- Rnd 1: 7sc in MR. (7sts)
- Rnd 1 alternative: If preferred, ch 2 and then 7sc in 2nd chain from hook. (7sts)
- Rnd 2: 2sc in the next 6sts, sc in the next st. (13sts)
Switch to Color (F)
- Rnd 3: Sl st to the first st to join (counts as a st), *ch4, 2tr in the next st, ch4, sl st in the next st, rep from * to end. (6 petals)
- Fasten off leaving a long tail to attach the flower to the hat. Weave in the other ends.
Assembly
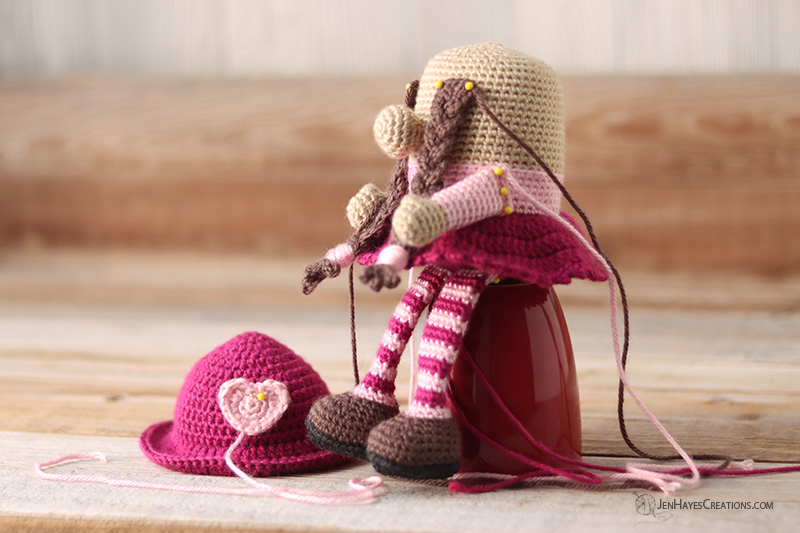
Pin all the pieces together to determine the desired placement for the entire Crochet Girl Gnome and stitch securely into place using a tapestry needle.
General placement and stitching suggestions:
- Arms: The arms are attached on either side of the body about 10-11 stitches away from the edge of the nose on either side, with the top point resting at approximately Rnd 19 of the body (the same color as the arm, where the front loops are showing) and the bottom resting just above the skirt. The thumbs on the hands should be facing up. Look at the Crochet Girl Gnome from the front to ensure that the arms look even before stitching. Stitch the arm to the body along the top of the arm. If desired, the arm can be tacked in additional places to keep it closer to the body.
- Legs: Ensuring that they are centered with the face and that the feet are facing forward, pin the legs side by side about two rows in front of the MR on the base of the body. Attach each leg to the body along the top edge of the leg and at the top of each side of the leg for a couple of rows so the top bit of the leg remains flush against the bottom of the body.
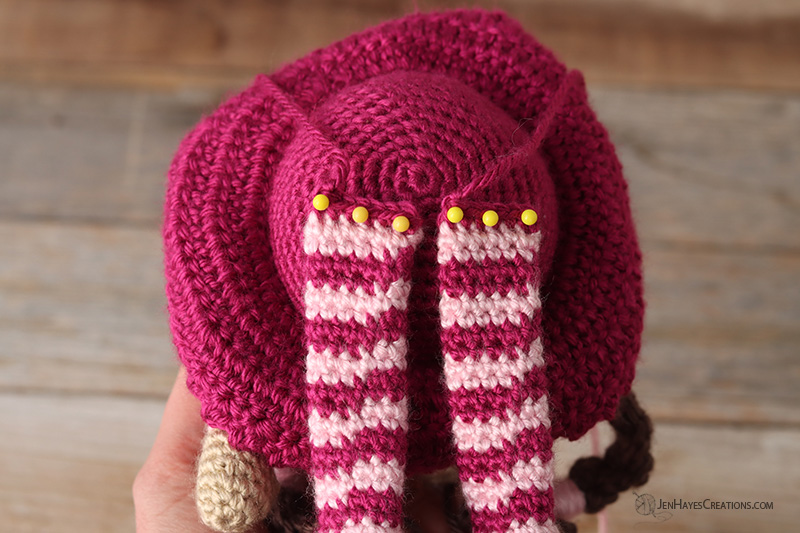
- Braids: The braids can be placed as desired in the front of the body or to the side and at any length desired. As pictured, the top of the braids are placed at about Rnd 29-30 of the body (approximately 11-12 Rnds from the top of the body), approximately 2-3 stitches away from the nose on either side. Stitch the braids to the body along the top of the braid.
- Heart Applique: (shown in variation 1) If using, attach the back of the heart to the hat so it shows above the hat’s brim. As shown, the center of the heart is stitched on the front left of the hat over about Rnds 9-11. Stitching was done at about Rnd 3 of the heart so the edges of the heart are loose. For more of a patch look stitch along the outside edge of the heart.
- Flower: (shown in variation 2) If using, attach the back of the flower to the hat so it shows above the hat’s brim. Stitch close to the bottom of the petals, near the center of the flower, so the edges of the petals are loose. As shown, the center of the flower is stitched on the front left of the hat over about Rnds 9-11.
- Floppy Hat: Pull the hat down over the body so it rests on the top of the nose. Use an additional length of yarn in the same color as the hat to invisibly tack it to the body in several places above the brim so that it cannot be removed. Alternatively, the hat can be left removable. Fold the front up a bit to better expose the nose (optional).