Crochet Arpeggio Scarf and Beanie Pattern

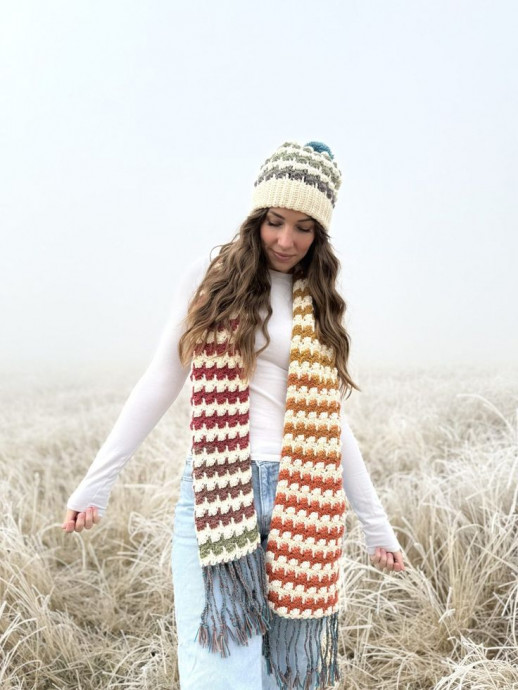
The Crochet Arpeggio Scarf is a beautiful creation that combines warmth and style effortlessly. With its unique design and colorful yarn choices, this scarf is sure to add a touch of charm to any outfit. Whether you're a beginner or a seasoned crocheter, this project is perfect for a fun and relaxing crafting session. So, grab your crochet hook, pick out some lovely yarn, and enjoy creating your very own Crochet Arpeggio Scarf. Get ready to stay cozy and fashionable all winter long!
Materials
- Worsted Weight Yarn, Lion Brand Color Theory in “Ivory”, 2 skeins or 490 yards
- Light Weight Yarn, Lion Brand Mandala in “Groot”, 1 skein or 540 yards
- H/5.00mm Crochet Hook
- Needle
- Scissors
Gauge
15 Sts by 8 rows = 4×4”
To make a gauge swatch, begin scarf and work rows 1-10, measure 4×4” within it to check gauge.
Sizes
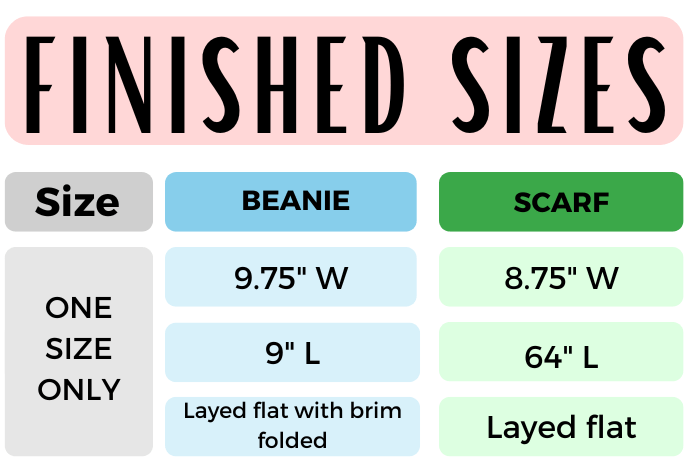
One size only, beanie fits the average adult woman’s head.
Finished Measurements
Notes
- The yardage above is enough to make 1 scarf, including fringe and 1 beanie, including pompom.
- The starting Ch 3 counts as 1 St (both beanie and scarf).
- The starting Ch 4 counts as 1 St and 1 Ch Sp (scarf).
- The Ch 3’s within the row do not count towards the St count (both beanie and scarf).
- The Ch 1 on the beanie ribbing rows does not count as a St.
You will change colors every 2 rows. I recommend cutting and joining the yarn for the scarf, tying the ends into knots and crocheting the first few stitches directly over the ends to hide. For the beanie, I recommend not cutting the yarn. You will leave the yarn attached, and when it’s time to switch colors, simply bring up the yarn on the inside of the beanie, leaving a small float.
Stitches and Abbreviations (US Terms)
- Ch(s) - Chain(s)
- Fsc - Foundation Single Crochet
- Sc - Single Crochet
- Sp - Space
- St(s) - Stitch(es)
- Sk - Skip
- YO - Yarn Over
- Dc - Double Crochet
- Sl St - Slip Stitch
- RS - Right Side
- BLO - Back Loop Only
Special Stitch
YO, insert hook in the first Dc of the set of 3, YO and pull up a loop, YO, pull through 2 loops on hook, YO, insert hook in next Dc, YO and pull up a loop, YO, pull through 2 loops on hook, YO, insert hook in SAME Dc, YO, pull up a loop, YO and pull through 2 loops on hook, YO, insert hook in last Dc, YO, pull up a loop, YO and pull through 2 loops on hook, YO and pull through all 5 loops on hook.
Legend
- Color A - Ecru
- Color B - Groot
Pattern
Scarf
With Color A
- Row 1: 33 Fsc, turn. (33 Sc) Alternatively, you can Ch 1 more than the number listed above, work 1 Sc in the second Ch from the hook and each Ch across for the same St count.
- Row 2 (RS): Ch 3, 3 Dc in first St, *Sk 3 Sts, 1 Sc in next Sc St, Ch 3, 3 Dc in the same St as the Sc*, repeat from * to * across row until 4 Sts remain, Sk 3, 1 Sc in final St, turn. (33 Sts) Switch to Color B.
- Row 3: Ch 4, *Special St in next 3 Dc, Ch 1, 1 Sc in Ch-3 Sp, Ch 1*, repeat from * to * across row until 4 Sts remain, Special St in last 3 Dc, Ch 1, 1 Sc in top of last St (the starting Ch 3), turn. (33 Sts)
- Row 4: Ch 3, 3 Dc in first St, *Sk 3 Sts, 1 Sc in next Sc St, Ch 3, 3 Dc in same St as the Sc*, repeat from * to * across row until 4 Sts remain, Sk 3, 1 Sc in final St (the 3rd Ch of the starting Ch 4), turn. (33 Sts)
Switch back to Color A. You will switch your colors back and forth every 2 rows from here on out.
- Rows 5-129: Repeat Rows 3 & 4. You will end on a Row 3 repeat, don’t forget to switch your colors every 2 rows.
- Row 130: Ch 1, 1 Sc in each St across, turn. Don’t forget your Ch 4 counts as 1 St and 1 Ch Sp so be sure to work 1 Sc into both the 3rd and 4th Ch. (33 Sc)
Beanie
With Color A
- Ch 22
- Row 1: 1 Sc in second Ch from hook and each Ch across, turn. (21 Sc)
- Rows 2-72: Ch 1, 1 Sc in first St, 1 Sc BLO in each St across until 1 St remains, 1 Sc in last St, turn. (21 Sc)
Fold your ribbing in half and Sl St the first and last row together working through the outer loops only. Turn your ribbing RS out so that the seam is now on the inside. You will now be working Round 1 of the beanie into the ends of the ribbing rows. Your ribbing will be snug and stretch to fit.
- Round 1: Ch 1, work 1 Sc into the end of each ribbing row around, Sl St to the first Sc to join, do NOT turn. (72 Sc)
- Round 2: Ch 1, 1 Sc in same St as join, Ch 3, 3 Dc in same St as Sc, *Sk 3 Sts, 1 Sc in next Sc St, Ch 3, 3 Dc in the same St as the Sc*, repeat from * to * around until 3 Sts remain, Sk last 3 Sts, Sl St in first Sc St to join, TURN. (72 Sts) Switch to Color B.
- Round 3: Ch 3 (counts as 1 Dc here and throughout), *Special St in next 3 Dc, Ch 1, 1 Sc in Ch-3 Sp, Ch 1*, repeat from * to * around, ending your last repeat at **, Sl St into the top of the starting Ch 3 to join, TURN. (72 Sts)
- Round 4: Ch 1, 1 Sc into the first Sc (not the Ch 3), Ch 3, 3 Dc in same St as Sc, *Sk 3 Sts, 1 Sc in next Sc St, Ch 3, 3 Dc in the same St as the Sc*, repeat from * to * around, Sl St to first Sc St to join, TURN. (72 Sts) Switch back to Color A. You will switch your colors back and forth every 2 rounds from here on out.
Rounds 5-13: Repeat Rounds 3 & 4. You will end on a Round 3 repeat.
We will now begin to decrease.
- Round 14: Ch 1, 1 Sc into the first Sc, Ch 3, 3 Dc in same St as Sc, *Sk 3, 1 Sc in next Sc, Sk 3, 1 Sc in next Sc, Ch 3, 3 Dc in the same St as the Sc* repeat from * to * around until 1 Sc remains in between the last 2 special Sts, 1 Sc into it, Sl St to first Sc to join, TURN. Don’t forget to switch colors. (45 Sts)
- Round 15: Ch 3, Sk the first Sc, Special St in next 3 Dc, Ch 1, 1 Sc in Ch-3 Sp, Ch 1, *Sk the Sc in between the 3-Dc sets, Special St in next 3 Dc, Ch 1, 1 Sc in Ch-3 Sp**, Ch 1*, repeat from * to * around, ending your last repeat at **, Sl St into the top of the starting Ch 3 to join, TURN. (36 Sts)
- Round 16: Ch 1, 1 Sc into the first Sc, Ch 3, 3 Dc in same St as Sc, *Sk 3, 1 Sc in next Sc, Sk 3, 1 Sc in next Sc, Ch 3, 3 Dc in the same St as the Sc*, repeat from * to * around, Sl St to first Sc made to join, TURN. (24 Sts) Do not change colors.
- Round 17: Ch 1, 1 Sc into each of the Dc Sts around, skipping over the Ch-3 Sps and the Sc Sts, Sl St to first Sc made to join. (15 Sc)
Fasten off, leave a long tail to sew the top of the beanie shut.
Finish Up The Scarf And Beanie
Using your needle, weave the yarn tail through each Sc St, going from the outer loop towards the center. Pull tight to close.
Optional: With remaining yarn leftover after making both the beanie and scarf, you can add a pompom to the top of your beanie and fringe to the scarf. Use a pompom maker to create the pom and sew to the top of the beanie.
Feel free to follow your preferences for the fringe. I cut remaining yarn into strands about 20” long in sets of 3. Join fringe to the bottom of the scarf. Separate the strands into 3 sets of 2 and braid. Tie a knot at the bottom to secure each braid. After adding each braid, trim the ends to be even.
Weave in any remaining ends.
- Funny Pictures
-
 Relatable and Funny Memes to Distract You From the Routine
-
 Hilarious Cat Snapchats That Will Leave You With the Biggest Smile
-
 Today’s Top Funny Tweets to Scroll Before Bed
- Recipes
-
 Cappuccino Brownies
-
 Chicken Mushroom Tortellini Bake
-
 Spinach Pie
- Lifehacks
-
 8 Necessary Tips for Baking Bread
-
 Tips & Hacks for Clean Carpets
-
 10 Uses For Old TV Armoires
- Crochet Ideas
-
 Crochet Watermelon Amigurumi
-
 Crochet Flower Hat for your Pet
-
 Crochet Shark Applique
- DIY
-
 Crochet Titus the Barn Owl
-
 Crochet Rainbow Bunny
-
 DIY Washer Ornaments
- Knitting Ideas
-
 Knitted Star Square Dishcloth
-
 Knitted Free 2025 Year Dishcloth
-
 Knitted Ribbed Adult Hat