Crochet Snowman John Amigurumi: A Festive Winter Craft

Introducing Crochet Snowman John Amigurumi
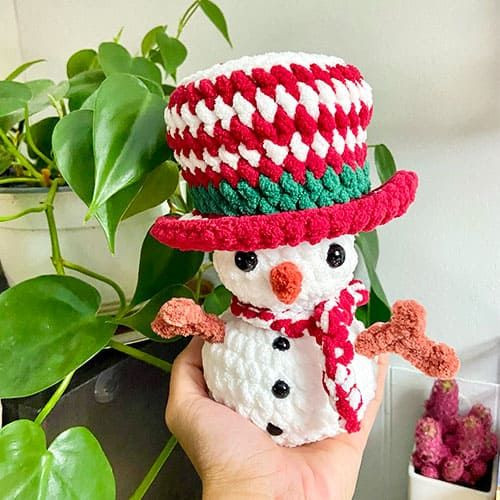
This adorable winter creation is sure to bring a smile to your face with its charming design and festive spirit. Handcrafted with love and attention to detail, Snowman John is the perfect addition to your holiday decorations or a wonderful gift for a special someone. With his cozy scarf and cute carrot nose, he is ready to spread joy and warmth wherever he goes. Embrace the magic of the season with Crochet Snowman John Amigurumi and let his cheerful presence brighten up your day!
Materials
The materials you'll need for creating the Crochet Snowman John Amigurumi include:
- Yarn (honey bunny)
- Base color body (white)
- Hat color (dark blue)
- Arm color (brown)
- Hat ribbon (light blue)
- Nose color (orange)
- 5 mm crochet hook
- 2x 8 mm & 3x 5 mm safety eyes
- 3 safety eyes for buttons
- Black cotton yarn (mouth detail)
- Stitch marker, scissors, stuffing
- Needle for sewing (details only)
Abbreviations
Here are some abbreviations that will be used throughout the pattern:
- MR - Magic ring
- Sc - Single crochet
- CC - Change colors
- Inc - Increase
- Dec - Decrease
- Ch - Chain
- Slst - Slip stitch
- BLO - Back loop only
- FLO - Front loop only
- IF - Invisible finish
Hat and Ribbon
Creating the hat involves the following steps:
- MR: 8 sc
- inc x8 (16)
- (1sc, inc)x8 (24)
- (2sc, inc)x8 (32)
- BLO: 32 sc
- 32 sc (2 rounds)
- (6sc, dec)x4 (28)
- 28 sc
- CC to hat ribbon color (light blue)
- 28 sc
- Mark first BL with a stitch marker CC to primary hat color.
- FLO (6sc, inc)x4 (32)
- 5 sc, 5 inc, 12 sc, 5 inc, 5 sc (42)
- 42 sc
- IF: fasten off, and weave in end (see picture “IF”).
Head to Body
Transitioning from the hat to the body involves:
- Join white yarn with a slst and sc in the same marked stitch of round 12 (this counts as your first stitch).
- Don’t stuff the hat.
- (5sc, dec)x4 (24)
- (4sc, dec)x4 (20)
- (3sc, dec)x4 (16)
- (2sc, dec)x4 (12)
- (1sc, dec)x4 (8)
- (1sc, inc)x4 (12)
- (2sc, inc)x4 (16)
- (3sc, inc)x4 (20)
- (4sc, inc)x4 (24)
- 24 sc (3 rounds)
- Place safety eyes between rounds 10 and 11 with 5 stitches apart, centered with the flaps of the hat on each side.
- Start stuffing the head only: not the hat.
- (1sc, dec)x8 (16)
- (dec)x8 (8)
- FLO: (inc)x8 (16)
- (1sc, inc)x8 (24)
- (3sc, inc)x6 (30)
- 30 sc (4 rounds)
- (3sc, dec)x6 (24)
- Insert safety eyes as buttons on the center of the belly, aligned with each other between rounds: 16-17 and 18-19 and 20-21.
- Start stuffing the body.
- (1sc, dec)x8 (16)
- (dec)x8 (8)
- Fasten off, leaving a long tail in case you want to make a booty, or weave in the end tail.
Arms and Nose
Creating the arms and nose requires:
Use a smaller crochet hook (4 mm).
Nose with orange:
Insert hook 1 row underneath the eyes, centered with the eyes (see photo 1). Chain 3: 1 slst in the 2nd ch from hook, 1sc in the next ch. Slst back into the same stitch on the head where you started. Fasten off and weave in the end tail.
Arms with brown:
Insert hook 5 st away from the first button, repeat on both sides (see photo 2). Chain 8: 1 slst in the 2nd ch from hook, 3 slst, ch 3, 1 slst in the 2nd ch from hook, 1 slst and slst back into the same stitch where you started the ch (see photo 3). Slst down to the body and slst back into the stitch where you started. Fasten off and weave in the end & starting tail.
Booty
For the booty, you can either use the end tail of the body after fastening off or take a separate piece of yarn in the same color as the body (approx 15 cm).
Tip: You can use the same yarn as used for the body, but to create a sharper curve, try using cotton yarn.
Insert embroidery needle in the center of the back: between rounds 13-14. Exit between rounds 21-22 in the middle of the bottom side. Make a knot, pull tight (be careful not to break the yarn), make a second knot and weave in ends.
Mouth and Scarf
Embroider the mouth with black cotton yarn under the nose, covering 3 stitches.
For the scarf in hat ribbon color: light blue, chain 30: sc in 2nd ch from hook, 28 sc. Make an IF and weave in ends. Knot around the neck.
- Funny Pictures
-
 Hilarious Memes for Those Bored to Tears
-
 Weekly Treat of Funniest Parenting Memes for Good Laugh out Loud Right Now
-
 Really Funny Pics to End These Weekend Perfectly
- Recipes
-
 Crispy Baked Avocado Fries
-
 Baked Beans and Hot Dogs with Biscuit Topping
-
 Roasted Rosemary Lemon Chicken Breasts
- Lifehacks
-
 Crochet Basics: Twisted Fringe
-
 7 Crochet Tips And Tricks
-
 How To Work Crochet Into Denim
- Crochet Ideas
-
 Crochet Snorlax Plushie Doll
-
 Crochet Cat in 1 Row
-
 Crochet Beautiful Penguin Toy
- DIY
-
 Popsicle Stick and Jingle Bell Christmas Tree Ornament
-
 DIY Santa Craft For Kids
-
 Paper Plate Angel Craft
- Knitting Ideas
-
 Knitted Bridger Cowl
-
 Knitted Keepsake Bag
-
 Knitted Cutie Cupcake Dolls