Crochet Kelp the Deer Amigurumi Pattern

Introduction
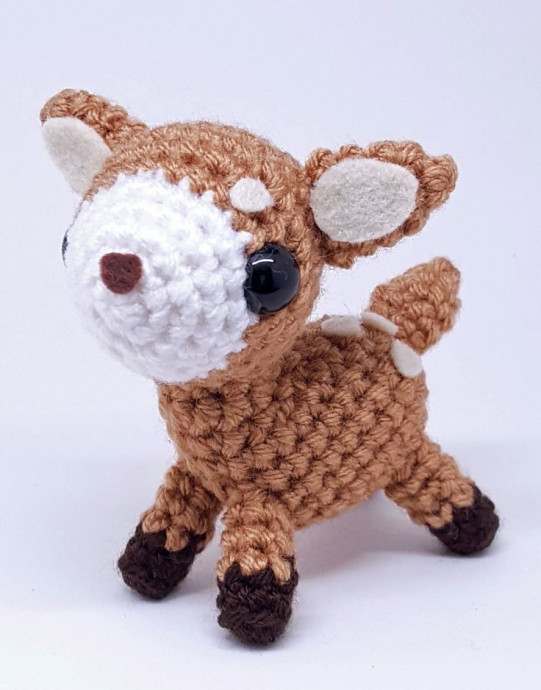
Crochet Kelp the Deer is an adorable amigurumi pattern that is sure to bring a touch of whimsy and charm to any space! With its intricate design and detailed features, this cute little deer is a joy to create and perfect for both beginner and experienced crocheters alike. You'll love how the soft yarn brings Kelp to life with its endearing expression and tiny antlers, making it a delightful addition to your collection or a heartwarming gift for a loved one. Embrace the art of crochet and let Kelp the Deer bring a smile to your face with its sweet and friendly presence!
Supplies
2.25mm Crochet hook
Worsted weight yarn in three different colors: light brown, white, and cream (for optional antlers)
Safety eyes 12mm
Yarn needle
Fiberfill
Stitch marker
Dowel
Cream and brown felt sheets
Glue
Abbreviations
- MC = Magic Circle
- SC = Single Crochet
- Sl st = Slip Stitch
- CC = Yarn Color Change (Counts as first stitch of the round and is followed by a slip stitch)
- Sc rnd = Single Crochet in every stitch around
- Inc = Increase, 2 SC in the same stitch
- Dec = Decrease, next 2 stitches crocheted together
- Ch = Chain
- Sts = Stitches
- B. Lps = Back Loops of the Stitch
- […] = Repeat instructions for the entire round or as specified
Techniques
Magic Circle
Essential to the start of most amigurumi projects.
Invisible Decrease
Good for preventing gaps and giving a more uniform look to your SCs.
Working in Front Loops
For my patterns, I always work SCs in the front loops of the stitch, unless otherwise specified. This method allows the SCs to stack up straighter than if you worked them in both loops.
Stitch Markers
I use a stitch marker (bobby pin) for tracking the beginning of my rounds, placing it in the first stitch of the round.
Staggered Rounds
Staggered rounds offset the pattern's increases or decreases, preventing a pinwheel look and creating a more circular shape. For example, [4 SC, inc] x6 is an even increase round that can become staggered: 2 SC, inc, [4 SC, inc] x5, 2 SC, splitting the even SCs at the beginning of the round.
Close
Closing a piece involves threading your yarn needle with the yarn end and putting it through each of the front loops of the last round’s SCs, usually six, and pulling tight. It should resemble a mini magic circle; then, put the needle through the center and out through the piece. Tie your knot and stuff the ends back into the piece.
Whip Stitch
This usually means the finished piece is folded flat with the last SC or yarn end at the edge. Thread the yarn needle with the yarn end, and using only the front loops, ‘zigzag’ or whip stitch the opening closed.
Pattern
Head
Starting with white:
- RND 1: 6 SC in MC (6 sts)
- RND 2: 6 Inc (12 sts)
- RND 3: [SC, Inc] x6 (18 sts)
- RND 4: SC RND (18 sts)
- RND 5: SC, Inc, [2 SC, Inc] x5, SC (24 sts)
- RND 6: CC light brown, Sl st, 22 SC (24 sts)
- RND 7: [3 SC, Inc] x6 (30 sts)
- RND 8: 2 SC, Inc, [4 SC, Inc] x5, 2 SC (36 sts)
- RND 9: 2 SC, Dec, [4 SC, Dec] x5, 2 SC (30 sts)
Place eyes between RNDs 6 and 7, approximately ten stitches apart.
- RND 10: [3 SC, Dec] x6 (24 sts)
- RND 11: SC, Dec, [2 SC, Dec] x5, SC (18 sts)
- RND 12: [SC, Dec] x6 (12 sts)
- RND 13: 6 Dec (6 sts)
Fully stuff the head and close.
Ears (x2)
Using light brown:
- RND 1: 4 SC in MC (4 sts)
- RND 2: 4 Inc (8 sts)
- RND 3-5: Three SC RNDs (8 sts)
Whip stitch the openings closed and attach to the head between RNDs 10 and 11, about eight stitches apart.
Antlers (Optional)
Using cream:
Right Antler
- ROW 1: CH 6 +1, turn
- ROW 2: 3 Sl st, CH 2 +1, turn
- ROW 3: 2 Sl st, 3 SC
Weave in the beginning yarn end and thread the ending yarn end through a yarn needle. Attach to the head between RNDs 8 and 9 in front of an ear.
Left Antler
- ROW 1: CH 5 +1, turn
- ROW 2: 2 Sl st, CH 3 +1, turn
- ROW 3: 3 Sl st, 3 SC
Weave in the beginning yarn end and thread the ending yarn end through a yarn needle. Attach to the head between RNDs 8 and 9 in front of the other ear, with approximately five stitches between the antlers.
Body
- RND 1: 6 SC in MC (6 sts)
- RND 2: 6 Inc (12 sts)
- RND 3: [SC, Inc] x6 (18 sts)
- RND 4: SC, Inc, [2 SC, Inc] x5, SC (24 sts)
- RND 5-9: Four RNDs of SC (24 sts)
- RND 10: 6 Dec, 12 SC (18 sts)
- RND 11: 6 Dec, 6 SC (12 sts)
- RND 12: 4 Sl st, 7 HDC (12 sts)
Fully stuff the body and start attaching it to the head. The HDC should run along the color change RND of the head when attaching.
Tail
Using light brown:
- RND 1: 4 SC in MC (4 sts)
- RND 2: [SC, Inc] x2 (6 sts)
- RND 3: [2 SC, Inc] x2 (8 sts)
- RND 4: SC RND (8 sts)
- RND 5: 2 SC, 3 Dec (5 sts)
Stuff the tail and attach to the body down the center of the back, around RNDs 3 and 4.
Front Legs
Starting with dark brown:
- RND 1: 6 SC in MC (6 sts)
- RND 2: SC RND in the back loops only (6 sts)
- RND 3: CC light brown, Sl st, 4 SC (6 sts)
- RND 4-6: Three SC RNDs (6 sts)
Using a dowel, stuff down the yarn ends; this should be enough stuffing for them. Attach to the body between RNDs 6-8 with one stitch between them.
Back Legs
Starting with dark brown:
- RND 1: MC 6 SC (6 sts)
- RND 2: SC RND in the back loops only (6 sts)
- RND 3: CC light brown, Sl st, 4 SC (6 sts)
- RND 4-5: Two SC RNDs (6 sts)
Using a dowel, stuff down the yarn ends; this should be enough stuffing for them. Attach to the body between RNDs 1-3 with two to three stitches between them.
Felt Details
Felt details can be done with felt sheets, or can also be easily achieved through felting.
Nose
Cut out a rounded triangle from the brown felt sheet and glue it to the face.
Inner Ears
Cut out oval shapes from the cream felt sheet and glue them to the ears.
Spots
Cut out as many small circles as desired and glue them to the body and head.
And your little deer is complete!
- Funny Pictures
-
 Hilarious Memes for Those Bored to Tears
-
 Weekly Treat of Funniest Parenting Memes for Good Laugh out Loud Right Now
-
 Really Funny Pics to End These Weekend Perfectly
- Recipes
-
 Crispy Baked Avocado Fries
-
 Scrambled Chickpea and Spinach Pitas
-
 Cinnamon Pancakes
- Lifehacks
-
 Crochet Basics: Aligned Cobble Stitch
-
 Brick Stitch Crochet Tutorial
-
 Crochet Basics: Wattle Stitch
- Crochet Ideas
-
 Crochet Snorlax Plushie Doll
-
 Crochet Beautiful Penguin Toy
-
 Crochet Tiny Snowman
- DIY
-
 DIY Santa Craft For Kids
-
 Paper Plate Angel Craft
-
 Upcycled Mason Jar Chicken Vase
- Knitting Ideas
-
 Knitted Bridger Cowl
-
 Knitted Keepsake Bag
-
 Knitted Cutie Cupcake Dolls