Crochet Camden Blanket: A Charming DIY Project

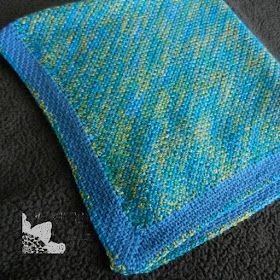
The Crochet Camden Blanket is a charming project that brings warmth and coziness to any space. With its intricate stitches and lovely texture, this blanket is perfect for snuggling up on a chilly evening or as a stylish addition to your home decor. Whether you're a crochet enthusiast looking for a new challenge or a beginner eager to try your hand at something special, the Camden Blanket is a delightful pattern to dive into. With a mix of creativity and patience, you'll soon have a beautiful piece that not only keeps you warm but also fills your heart with a sense of accomplishment and joy. So grab your hook, choose your favorite yarn colors, and let the magic of crocheting this lovely blanket begin!
Materials Needed
Yarn: Bernat Softee Baby 100% acrylic, 4.25 oz./120 g., 310 yrds/283 m, 4 balls needed (3 marls, 1 solid)
Hook: 4.00 mm, US G/6
Notions: Tapestry needle
Size: 40 by 40 inches
Gauge: 16 sts X 19 = 4 inches
Stitches Used
- Single crochet (sc)
- Chain (ch)
- Slip Stitch (sl st)
- Skip Stitch (sk st)
- Single crochet 2 stitches together (sc2tog)
- Single crochet 3 stitches together (sc3tog)
Notes
- This pattern is worked on a diagonal so the first half looks like a triangle and then the second half is closing the triangle into a square.
Pattern Instructions
Increasing Rows
Row 1: Ch 2, make 3 sc in the second ch from the hook. (3 sc made)
Row 2: Ch 1, turn, 2 sc in the first st, ch 1, sk 1 st, 2 sc in the last st. (4 sc made, 1 ch made)
Row 3: Ch 1, turn, 2 sc in the first st, {ch 1, sk 1 st, sc in the next ch}, Repeat {to} to the last 2 stitches, ch 1, sk 1 st, 2 sc in the last st. (2 stitch increase every row)
Keep repeating row 3 until the triangle is 36 inches or until you have reached your desired width.
Decreasing Rows
Row 1: Ch 1, turn, sc in the first st, sc2tog in the next st and ch, {ch 1, sk 1 st, sc in the next ch}, repeat {to} to the last 4 sts, ch 1, sk 1 st, sc2tog in the next ch and sc, sc in the last st. (2 decreases in each row)
Keep repeating row 1 until there are only 5 sts left
Row 2: Ch 1, turn, sc in the first st, sc3tog in the next 3 sts, sc in the last st
Row 3: Ch 1, turn, sc3tog in the last 3 sts.
Finish off.
Edging
Row 1: Attaching the yarn at any corner, ch 1, {(sc, ch 1, sc) in the corner st, sc in each st to the next corner} repeat {to} until the last corner, sl st into the first st.
Row 2: Sl st into the corner ch st, {(sc, ch 1, sc) in the same corner st, ch 1, sk 1 st, sc in the next st} repeat {to} to the last corner, sl st into the first st.
Continue repeating row 2 until you have your desired width of edging.
Last row: Ch 1, reverse sc in each st, sl st in first st.
Finish off.
Weave in your ends.
- Funny Pictures
-
 Relatable and Funny Memes to Distract You From the Routine
-
 Hilarious Cat Snapchats That Will Leave You With the Biggest Smile
-
 Today’s Top Funny Tweets to Scroll Before Bed
- Recipes
-
 Cappuccino Brownies
-
 Chicken Mushroom Tortellini Bake
-
 Spinach Pie
- Lifehacks
-
 8 Necessary Tips for Baking Bread
-
 Tips & Hacks for Clean Carpets
-
 10 Uses For Old TV Armoires
- Crochet Ideas
-
 Crochet Watermelon Amigurumi
-
 Crochet Flower Hat for your Pet
-
 Crochet Shark Applique
- DIY
-
 Yarn Wrapped Christmas Wreath Ornaments
-
 Egg Carton Snowman Ornament
-
 Stick Peppermint Candy Ornament
- Knitting Ideas
-
 Knitted Star Square Dishcloth
-
 Knitted Free 2025 Year Dishcloth
-
 Knitted Ribbed Adult Hat