How to Crochet a Charming Teapot

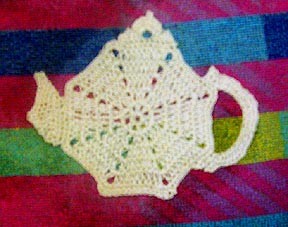
Crochet teapots are not only functional but also charming additions to any kitchen or tea party. The intricate stitches and patterns create a cozy and inviting feel, perfect for enjoying a soothing cup of tea on a lazy afternoon. The handmade touch of a crochet teapot adds a unique and personalized touch to your home decor, making it a lovely conversation starter for guests. Whether you're a crochet enthusiast looking for a new project or someone seeking a special gift for a tea lover, a crochet teapot is sure to bring warmth and whimsy to your tea-drinking experience. So grab your favorite yarn, needles, and a cup of tea, and let's get crocheting!
Materials Needed
Size 10 (bedspread weight) cotton
- Steel crochet hook size 1.75mm
- Finished size: App. 5" wide by 4" tall
- For a smaller ornament, use size 20 or 30 thread and suitable hook
Notes on Techniques
Always start rounds of dc with ch3, which counts as the first dc.
- To work decrease (dec): draw up a loop in each of the next 2 sts. YO, draw through all 3 loops.
- To dc 3 sts together: (YO, draw up a loop in the next st. YO draw through 2 loops) 3 times. YO, draw through all loops.
- To hdc 3 sts together: (YO, draw up a loop in the next st) 3 times. YO, draw through all 7 loops.
Instructions to Crochet the Teapot
Starting the Teapot
To start:
Ch5, join with sl st in first ch to form a circle.
Rnd 1: (Dc, ch1) 8 times in the ring. Join to 3rd ch of beginning ch 4. (8dc, 8ch1 sps)
Rnd 2: *Dc in dc. (Dc, ch2, dc) in ch1 sp. Repeat from * around. (8 groups of 3dc)
Rnd 3-5: *Dc in each dc and (dc, ch2, dc) in each ch1 sp. Repeat from * around. (8 groups of 9dc at end of rnd 5)
Rnd 6: ch1. Sc in same st and in each st around, working 3sc in each ch2 corner. (96 sc) FO.
Creating the Lid
Lid:
With RS facing: Join thread in 3rd sc of any 3sc corner.
Row 1: Ch1. Sc in same st and in next 10 sts. Turn. (11sc)
Row 2: Dec, sc in 3 sts, ch4, sk 1 st, sc in 3 sts, dec. (8sc)
Row 3: Dec twice. (4dc, ch2, sl st in top of last dc, 4dc) in ch4 sp. Dec twice, FO.
Making the Base
Base:
With RS facing, directly opposite the lid:
Join thread in 1st sc of ch3 corner. Ch2. Hdc in next st, sc in 11 sts, hdc in next. Ch2, sl st in next st, FO.
Adding the Handle
Handle:
With RS facing, sk 6 sts to the right of base. Join thread with a sl st in the next st.
Row 1: Sc in 4 sts. Ch15, sk 13 sts, sc in 4, turn. (8sc)
Row 2: Dec twice. 2sc in each of 15 chs, dec twice. (34)
Row 3: (Sc, hdc, sc) in 1st st. Sk 1 st, sc in 6 sts, (2sc in 1 st, sc in next 2) 6 times. Sc in 6 sts. (Sc, hdc, sc) in the last st. FO.
Crafting the Spout
Spout:
With RS facing, sk 18 sts to the left of base. Join with sl st in the next st.
Row 1: Ch1. Sc in the same st and in next 7 sts, turn. (8sc)
Row 2: 2sc in 1st st, sc in 6 sts, 2sc in last. (10)
Row 3: 2sc in 1st st, sc in 2 sts, hdc in 3. Dc in 1, dc last 3 sts together. (9)
Row 4: Ch2. Dc next 2 sts together. Hdc in 5 sts, 3hdc in last. (9)
Row 5: Ch4. Hdc in 3rd ch from hook and in next ch. Hdc in 2 sts, sc in 4, hdc last 3 sts together, FO.
- Funny Pictures
-
 Relatable and Funny Memes to Distract You From the Routine
-
 Hilarious Cat Snapchats That Will Leave You With the Biggest Smile
-
 Today’s Top Funny Tweets to Scroll Before Bed
- Recipes
-
 Cappuccino Brownies
-
 Chicken Mushroom Tortellini Bake
-
 Spinach Pie
- Lifehacks
-
 8 Necessary Tips for Baking Bread
-
 Tips & Hacks for Clean Carpets
-
 10 Uses For Old TV Armoires
- Crochet Ideas
-
 Crochet Watermelon Amigurumi
-
 Crochet Flower Hat for your Pet
-
 Crochet Sophia and Bennet Love Birds
- DIY
-
 DIY Beaded Christmas Tree
-
 Crochet Titus the Barn Owl
-
 DIY Washer Ornaments
- Knitting Ideas
-
 Knitted Star Square Dishcloth
-
 Knitted Free 2025 Year Dishcloth
-
 Knitted Ribbed Adult Hat