Crochet Baby Chick Amigurumi Pattern

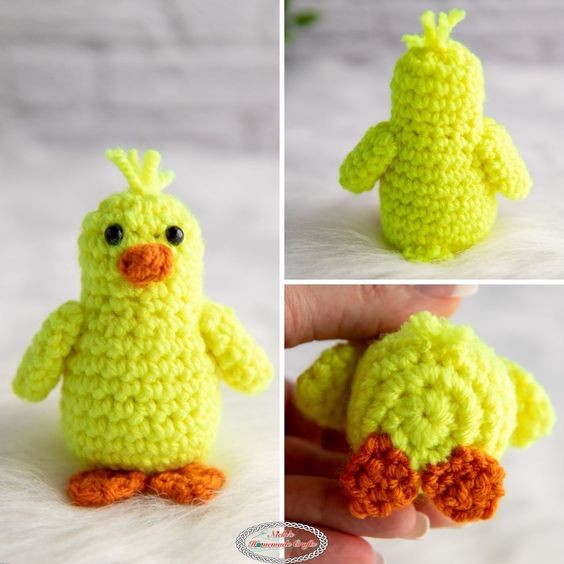
Create your very own adorable baby chick using the art of crochet with this fun and engaging amigurumi pattern. This project is perfect for beginners and experienced crocheters alike, allowing you to practice your skills while making a cute and cuddly toy for yourself or a loved one. The finished chick will be a charming addition to any nursery or Easter basket, bringing joy and whimsy to any space.
Materials You Will Need
- Premier Yarns Anti-Pilling, worsted yarn
- Fluorescent Yellow
- Pumpkin
- 4.0 mm hook -> I used a WeCrochet Dots Hook
- 2 tiny 6mm plastic eyes
- Scissors
- Tapestry needle
- Polyfill
Gauge
6 sts x 5 rds = 1 square inch
Size
3.5 x 3 inches
Stitches Used in the Pattern (US Terms)
- st/sts = stitch/stitches
- ch = chain
- sc = single crochet
- inc = increase
- dec = decrease
- sl st = slip stitch
Crochet Baby Chick Body & Head
Written Pattern:
RND 1: Magic Ring and add 8 sc, close ring (use stitch marker as you’re crocheting continuous rounds)
RND 2: 2 sc per st
RND 3: *1 sc, 2 sc in the next st, repeat from * until the end of the round
RND 4 – 10: 1 sc per st
RND 11: *1 sc, 1 inv sc dec, repeat from * until the end of the round
RND 12: *1 sc in the next 2 sts, 1 inv sc dec, repeat from * until the end of the round
RND 13: *1 sc in the next 2 sts, 2 sc in the next st, repeat from * until the end of the round
RND 14 – 16: 1 sc per st
Stuff the body and part of the head, add the plastic eyes between the 15th and 16th row and 2 sts apart
RND 17: 1 inv sc dec all around
Stuff the head more, then close the hole (weave through each front loop and pull), weave in your ends
Crochet Peak
MR, ch 1, 4 sc, pull hole/ring closed, sl st to the first st, squish circle into oval (stitch 1 and 2 will touch, so will 3 and 4)
Sew peak 1 row below centered between the eyes
Crochet Feet (Make 2)
RND 1: ch 4, starting from the 2nd ch from the hook, 1 sc per st, turn (3 sts)
RND 2: 1 sc per st, turn
RND 3: 1 sc dec, 1 sc, fasten off
Sew both feet to the bottom of the chick’s body
Crochet Wings (Make 2)
RND 1: MR, ch 1, 6 sc into ring, use a stitch marker for continuous rounds
RND 2: *1 sc, 2 sc in the next st, repeat from * until the end
RND 3 – 5: 1 sc per st, fasten off
Sew both wings 180 degrees apart from each other flat (unstuffed) to the side of the chick
Hair & Tail
Do the same for the hair and tail (just different locations).
- Cut 3 pieces of yarn 3-4 inches long each, fold each one in half.
- Insert a hook into the area where you want the hair/tail, pull one folded yarn piece halfway through, then pull the 2 yarn ends through the pulled through loop, and pull to attach the yarn tightly.
- Repeat this step 2 more times such that you have 6 pieces of yarn standing up per hair or tail then trim depending on how long you want your hair or tail to be.
Now your Baby Chick Amigurumi is complete!
- Funny Pictures
-
 Cute Cat Memes That Will Make Your Day Brighter
-
 Spot-on and Funny Memes About Introverts Struggles
-
 Top Wonderful Cat Memes on Their Way to Better Your Day
- Recipes
-
 Creamy Old Fashioned Rice Pudding
-
 Russian Tea Cakes (Snowball Cookies)
-
 Rigatoni with Sausage, Tomatoes, and Zucchini
- Lifehacks
-
 How to Crochet a Harlequin Stitch
-
 Removing The Toughest Stains
-
 Crochet Basics: Crumpled Griddle Stitch
- Crochet Ideas
-
 Crochet Christmas Tree
-
 Crochet Goblet of Fire
-
 Crochet Adorable Ammonite
- DIY
-
 DIY Snowman Wreath
-
 Mini Santa Sleigh Ornament
-
 Crochet Gingerbread House Blanket
- Knitting Ideas
-
 Knitted Easter Bunny
-
 Knitted Mobile Phone/Glasses Case
-
 Knitted Cabled Wallet