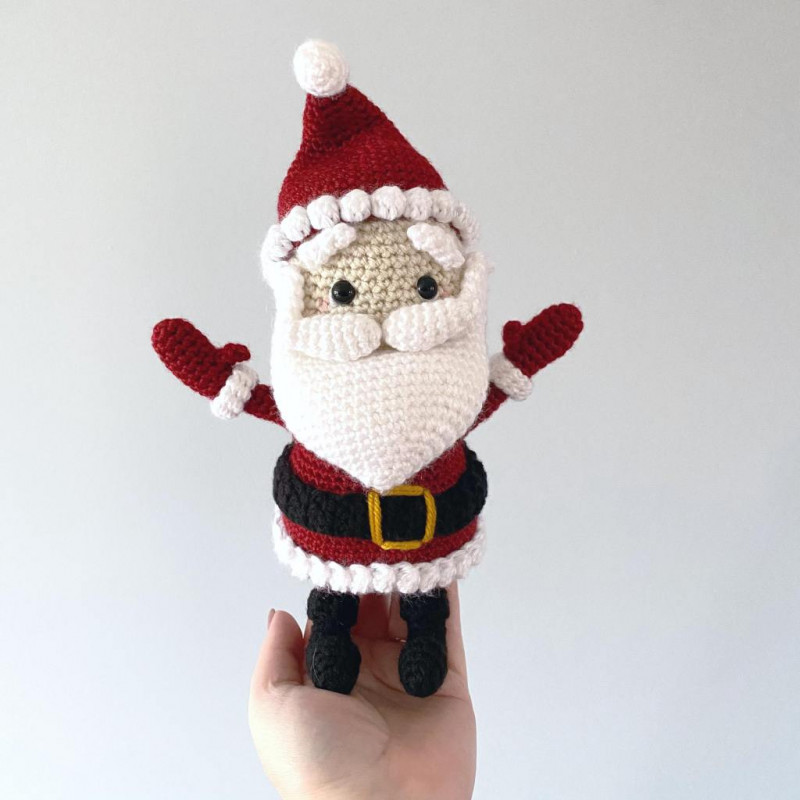
Santa Crochet Toy

Mia
Dec 24, 2021 02:38 AM
Hello, everyone!
Not so long ago I saw a post of Julia, when she asks for at least 20 comments and then post the instructions.
I think it's a good idea how we can "say thank you"!
So, if you like my Santa - you know what to do!
Oh my I love this! Can you please send me the pattern? Thank you so much!
Can I get the pattern please.
haberern2039@yahoo.com
would love the pattern. Thank you
Votre Père Noël est très bien réussi. JJ'aimerais bien avoir le patron. Merci
Thank you! I would love the pattern.
Merry Christmas!
This is the cutest little Santa! You did a great job and I would love to have the paytern
Hello!
Love the Santa amigurumi toy you made!
I would like to have a copy of the pattern please.
Thank you.
Janet
Thank you! I would love the pattern.
🎄Merry Christmas🎄
awesome
Adorable & one I would love to do. I have a great niece I know I would love to make this for, for next year. Would very much appreciate the pattern if you do post it & I'm sure you'll have way more than 20 responses.
Could you please send me the pattern for this adorable Santa? Thank you so much! Kim
He' adorable. Would love the pattern for next year.
Could you send me the santa pattern p!ease
Would love the pattern. Make it to go with my other Christmas pattern that I made for my father. Never seen one as beatuiful.
Instructions
Body:
Work in continuous rounds. Start in Red.
Rnd 1: Work 6 sc into MR (6 sts), pull closed.
Rnd 2: Inc in each st around (12 sts)
Rnd 3: *Sc 1, inc in next st, repeat from * around (18 sts)
Rnd 4: *Sc 2, inc in next st, repeat from * around (24 sts)
Rnd 5: *Sc 3, inc in next st, repeat from * around (30 sts)
Rnd 6: *Sc 4, inc in next st, repeat from * around (36 sts)
Rnd 7: *Sc 5, inc in next st, repeat from * around (42 sts)
Rnd 8: *Sc 6, inc in next st, repeat from * around (48 sts)
Rnd 9: *Sc 7, inc in next st, repeat from * around (54 sts)
Rnd 10: *Sc 8, inc in next st, repeat from * around (60 sts)
Rnd 11: In BLO, sc around (60 sts)
Rnds 12-18: Sc around (60 sts)
Rnd 19: *Sc 18, sc2tog, repeat from * around (57 sts)
Rnd 20: *Sc 17, sc2tog, repeat from * around (54 sts)
Rnd 21: *Sc 16, sc2tog, repeat from * around (51 sts)
Rnd 22: *Sc 15, sc2tog, repeat from * around (48 sts)
Rnd 23: *Sc 14, sc2tog, repeat from * around (45 sts)
Rnd 24: *Sc 13, sc2tog, repeat from * around (42 sts)
Rnd 25: *Sc 12, sc2tog, repeat from * around (39 sts)
Rnd 26: *Sc 11, sc2tog, repeat from * around (36 sts)
Rnd 27: Sc around (36 sts)
Rnd 28: *Sc 4, sc2tog, repeat from * around (30 sts)
Rnd 29: *Sc 3, sc2tog, repeat from * around (24 sts)
Rnd 30: *Sc 2, sc2tog, repeat from * around (18 sts)
Tie off. Stuff.
Turn the body so that it is upside-down (with the neck hole facing the floor). Attach white yarn into the unworked front loop of any stitch at the back of the body and work as follows for the white bobble trim:
Rnd 1: *Bo in first st, slst in next st, repeat from * around.
Join with a slst and tie off.
Head (make 1):
Rnd 1: In Oatmeal, work 6 sc into MR (6 sts), pull closed.
Rnd 2: Inc in each st around (12 sts)
Rnd 3: *Sc 2, inc in next st, repeat from * around (16 sts)
Rnd 4: *Sc 7, inc in next st, repeat from * around (18 sts)
Rnd 5: *Sc 2, inc in next st, repeat from * around (24 sts)
Rnd 6: *Sc 3, inc in next st, repeat from * around (30 sts)
Rnd 7: *Sc 4, inc in next st, repeat from * around (36 sts)
Rnd 8: *Sc 5, inc in next st, repeat from * around (42 sts)
Rnd 9: *Sc 6, inc in next st, repeat from * around (48 sts)
Rnd 10: Sc around (48 sts)
Rnd 11: *Sc 7, inc in next st, repeat from * around (54 sts)
Rnds 12-15: Sc around (54 sts)
Rnd 16: *Sc 7, sc2tog, repeat from * around (48 sts)
Rnd 17: *Sc 6, sc2tog, repeat from * around (42 sts)
Rnd 18: *Sc 5, sc2tog, repeat from * around (36 sts)
Rnds 19-24: Sc around (36 sts)
Insert 9mm safety eyes between rows 18 and 19 with approximately 6 sts between them. Start stuffing and continue to top up stuffing as you go.
Rnd 25: *Sc 4, sc2tog, repeat from * around (30 sts)
Rnd 26: *Sc 3, sc2tog, repeat from * around (24 sts)
Rnd 27: *Sc 2, sc2tog, repeat from * around (18 sts)
Rnd 28: *Sc, sc2tog, repeat from * around (12 sts)
Rnd 29: *Sc2tog, repeat from * around (6 sts)
Top up stuffing and tie off.
Beard (make 1):
Rnd 1: In White, work 6 sc into MR (6 sts), pull closed.
Rnd 2: *Inc, sc 2, repeat from * around (8 sts)
Rnd 3: Sc, inc in next st, sc 3, inc in next st, sc 2 (10 sts)
Rnd 4: Sc, inc in next 3 sts, sc 2, inc in next 3 sts, sc (16 sts)
Rnd 5: Sc 2, inc in next 3 sts, sc 5, inc in next 3 sts, sc 3 (22 sts)
Rnd 6: Sc 3, inc in next 3 sts, sc 9, inc in next 3 sts, sc 4 (28 sts)
Rnd 7: Sc 5, inc in next 3 sts, sc 11, inc in next 3 sts, sc 6 (34 sts)
Rnd 8: Sc around (34 sts)
Rnd 9: Sc 7, inc in next 3 sts, sc 14, inc in next 3 sts, sc 7 (40 sts)
Rnds 10-15: Sc around (40 sts)
In the next round, we will start the sides of the beard.
Rnd 16: Sc 13 to the side of the beard, skip 33 sts (13 sts)
Rnds 17-23: Sc 7 (7 sts)
Tie off. Count 16 sts and insert hook into 17th st on opposite side of the beard. Repeat rounds 17-23 to create a tube on the other side.
Stuff the beard and stitch across the top (between the tubes) to close.
Moustache (make 2):
Rnd 1: In White, work 6 sc into a MR (6 sts)
Rnd 2: *Sc in first 2 sts, inc in next st*, repeat from * around (8 sts)
Rnd 3: *Sc in first 3 sts, inc in next*, repeat from * around (10 sts)
Rnd 4: Sc in each st around (10 sts)
Rnd 5: Sc2tog, sc 8 (9 sts)
Rnd 6: Sc2tog, sc 7 (8 sts)
Rnd 7: Sc2tog, sc 6 (7 sts)
Rnd 8: Sc2tog three times, sc (4 sts).
Stuff and tie off.
Arms (make 2):
The arms are worked from the fingertips down.
Rnd 1: Starting in red yarn, work 6 sc into MR (6 sts)
Rnd 2: Sc 1, inc, sc 2, inc, sc 1 (8 sts)
Rnd 3: Sc 2, inc, sc 3, inc, sc 1 (10 sts)
Rnds 4-6: Sc around (10 sts)
You will now create the thumb in rounds 7-11
Rnd 7: Sc 4, sk 7 sts (4 sts)
Rnds 8-11: Sc 3 (3 sts)
Tie off. Reattach yarn in any stitch of round 6 and work as follows:
Rnd 12: Sc 9, sc2tog (10 sts)
Rnd 13: Sc 1, sc2tog, sc 3, sc2tog, sc 2 (8 sts)
Rnd 14: Sc around (8 sts)
Rnd 15: *Sc 2, sc2tog, repeat from * once more (6 sts)
Rnds 16-17: Sc around (6 sts)
Rnd 18: *Sc 2, inc in next st, repeat from * once more (8 sts)
Rnds 19-20: Sc around (8 sts)
Rnd 21: *Sc 3, inc in next st, repeat from * once more (10 sts)
Rnd 22: *Sc 4, inc in next st, repeat from * once more (12 sts)
Rnd 23: *Sc 5, inc in next st, repeat from * once more (14 sts)
Tie off.
For the second arm you will need to make the thumb on the opposite side. To do that, work rounds 1 to 6 as written. Do not work round 7, instead work the following:
Rnd 7: Sc 9, sk 7 sts (9 sts)
Continue pattern as written for rounds 8 to 23.
Belt (make 1):
The belt is worked in rows.
Row 1: In black yarn, ch 4, starting in 2nd ch from hook, Hdc in each ch across (3 sts), ch 1, turn.
Rows 2-45: Hdc across (3 sts).
Tie off and weave in ends.
Sleeve Cuff (make 2):
The cuffs are worked in continuous rounds (the cuffs are essentially tubes that are then flattened).
Rnd 1: In white yarn, work 5 sc into MR (5 sts)
Rnds 2-11: Sc around (5 sts).
Tie off.
Eyebrows (make 2):
Rnd 1: In white yarn, work 4 sts into a MR (4 sts)
Rnds 2-4: Sc around (4 sts)
Stuff and tie off.
Legs (make 2):
The legs are worked from the boots up.
Rnd 1: In black yarn, work 6 sc into a MR (6 sts)
Rnd 2: Inc in first 2 sts, sc 4 (8 sts)
Rnd 3: Sc 1, inc in next 2 sts, sc 5 (10 sts)
Rnd 4: Sc 2, inc in next 2 sts, sc 6 (12 sts)
Rnd 5: Sc around (12 sts)
Rnd 6: Sc 2, sc2tog twice, sc 6 (10 sts)
Rnd 7: Sc 1, sc2tog twice, sc 5 (8 sts)
Stuff. Continue to stuff as you go. Rows 8 to 10 are worked in turned rows to create the heel.
Row 8: Sc 1, ch 1, turn, sc 4 (5 sts), ch 1, turn
Row 9: sc 4 (4 sts), ch 1, turn
Row 10: Fold rows together and slst across to create the heel (2 sts)
Tie off. Reattach yarn in any stitch and continue:
Rnd 11: Sc 12 evenly around the ankle (12 sts)
Rnd 12: *Sc, sc2tog, repeat from * three more times (8 sts)
Rnds 13-16: Sc around (8 sts)
Switch to red yarn.
Rnds 17-20: Sc around (8 sts)
Stuff and tie off.
Boot Cuff (make 2):
Row 1: In black yarn, ch 3, sc in 2nd ch from hook and in next ch (2 sts)
Rows 2-12: Sc across (2 sts)
Tie off.
Hat (make 1):
The hat is worked from the top down.
Rnd 1: In red yarn, work 4 sc into MR (4 sts)
Rnd 2: Sc around (4 sts)
Rnd 3: *Sc, inc in next st, repeat from * once more (6 sts)
Rnd 4: *Sc 2, inc in next st, repeat from * once more (8 sts)
Rnd 5: *Sc 3, inc in next st, repeat from * once more (10 sts)
Rnd 6: *Sc 4, inc in next st, repeat from * once more (12 sts)
Rnd 7: Sc around (12 sts)
Rnd 8: *Sc 5, inc in next st, repeat from * once more (14 sts)
Rnd 9: *Sc 6, inc in next st, repeat from * once more (16 sts)
Rnd 10: *Sc 7, inc in next st, repeat from * once more (18 sts)
Rnd 11: *Sc 5, inc in next st, repeat from * twice more (21 sts)
Rnd 12: *Sc 6, inc in next st, repeat from * twice more (24 sts)
Rnd 13: *Sc 7, inc in next st, repeat from * twice more (27 sts)
Rnd 14: *Sc 8, inc in next st, repeat from * twice more (30 sts)
Rnd 15: *Sc 9, inc in next st, repeat from * twice more (33 sts)
Rnd 16: *Sc 10, inc in next st, repeat from * twice more (36 sts)
Rnd 17: *Sc 11, inc in next st, repeat from * twice more (39 sts)
Rnd 18: *Sc 12, inc in next st, repeat from * twice more (42 sts)
Rnds 19-23: Sc around (42 sts)
Rnd 24: BLO sc 42 (42 sts)
Tie off. Attach white yarn into the unworked front loop of any stitch at the back of the hat and work as follows for the white bobble trim:
Rnd 1: *Bo in first st, slst in next st, repeat from * around.
Join with a slst and tie off.
Pompom (make 1):
Rnd 1: In white yarn, work 4 sc into a MR (4 sts)
Rnd 2: Inc in each st (8 sts)
Rnd 3: *Sc 3, inc in next st, repeat from * once more (10 sts)
Rnd 4: Sc around (10 sts)
Rnd 5: *Sc 3, sc2tog, repeat from * once more (8 sts)
Rnd 6: Sc2tog four times (4 sts)
Stuff and close.
Assembly:
Stitch the belt onto the body about 5 rows up from the bobble trim.
With yellow yarn, stitch a square over the centre of the belt to create a buckle.
Stitch the head onto the body using red yarn.
Stitch the beard onto the face about 4-5 rows below the eyes (you need to leave room for the moustache!).
Stitch both moustache pieces onto the face above the beard and below the eyes.
Stitch the eyebrows on the face over the eyes (diagonally spanning about 3 rows).
Stitch on cheeks using pink yarn or colour it on using blush if you wish.
Stitch the sleeve cuffs onto the arms.
Stitch the boot cuffs onto the boots.
Stitch the arms in place.
Stitch the legs in place.
Stitch the pompom onto the tip of the hat.
Place the hat on his head (or stitch it permanently if you prefer) and you’re done!
Well done! I love how smooth his beard is!
Merry Christmas!
Shawn