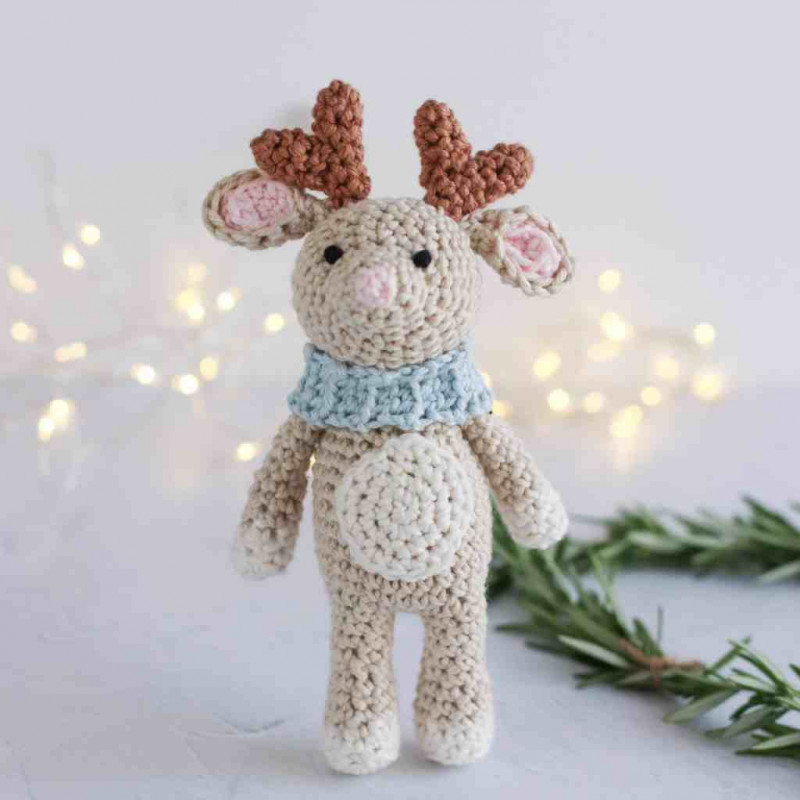
X-mas Reindeer

Thanks a lot for your comments!
I really think, that it's a great idea to ask for certain amount of comments to post a pattern. It's a kind of gratotude, as some of the patterns are paid by another person and she shares them with you for free, so you can "say thank you" by leaving a comment.
What do you think?
And here is my reindeer:
You’ll need:
Paintbox yarn in Vanilla cream color, light champagne color, candy floss pink color, soft fudge color, duck egg blue color;
Crochet hook 3,25 mm;
Scrap black yarn or embroidery floss;
Stuffing;
Scissors;
Yarn needle.
Instructions
Head (light brown)
R1: Into a mr, sc 5. Pull ring tight. (5)
R2: 2 sc into each st around (10)
R3 – 4: sc in each st around (10)
R5: *sc in the next st, 2 sc in the next st. Repeat from * around (15)
R6: *2 sc in the next st, sc in the next 2 st. Repeat from * around (20)
R7: sc around (20)
R8: *sc in the next 3 st, 2 sc in the next st. Repeat from * around (25)
R9 – 10: sc around (25)
R11: *2 sc in the next st, sc in the next 4 st. Repeat from * around (30)
R12: sc around (30)
R13: *sc in next 4 st, sc2tog. Repeat from * around (25)
R14: *sc2tog, sc in next 3 st. Repeat from * around (20)
R15: *sc in next 2 st, sc2tog. Repeat from * around (15)
Stuff
R16: *sc2tog, sc in next st. Repeat from * around (10)
Add more stuffing if needed.
R17: sc2tog around (5)
Fasten off and leave a yarn tail
If there is a hole at the back, weave the yarn tail in and out of the stitches to pull the hole closed. Weave in ends.
Ear outer (light brown, make 2)
R1: Into a mr, sc 5. Pull ring tight. (5)
R2: 2 sc into each st around (10)
R3: sc into the next 2 sts, 2 sc into the next st, sc into the next 3 st, (hdc + dc + hdc) into the next st, sc in the next 3 st, 2 sc in the next st, sc in the next st, slst into the last st.
Fasten off and leave a yarn tail.
Ear inner (pink, make 2)
R1: Into a mr, sc 5. Pull ring tight. (5)
R2: 2 sc in the next st, sc in the next st, (hdc + dc + hdc) in the next st, sc in the next st, slst into the next st.
Fasten off and leave a yarn tail.
Assemble the ears
Place an ear inner on top of an ear outer, with the wrong sides facing. Line up the pointed edges.
Using the pink yarn tail (i.e. the tail from the ear inner), stitch the ear inner in place. Weave in this tail.
Pinch together the bottom of the ear (non-pointy side) and using the light brown tail (i.e. the tail from the ear outer) stitch the 2 sides together over a few stitches to shape the bottom end of the ear. Do not cut the yarn tail as this will be used later on to attach the ears.
Legs and body (cream and light brown)
R1: Start with cream. Into a mr, sc 5. Pull ring tight. (5)
R2: 2 sc into each st around (10)
R3: Into the back loops only, sc around (10)
R4: sc around (10)
R5: Change to light brown and sc around (10)
R6: sc around (10)
R7: *sc2tog, sc in the next 3 st. Repeat from * once more (8)
R8: sc around (8)
R9: sc2tog, sc in the next 6 st (7)
R10 – 12: Sc around (7)
Fasten off and stuff the leg.
Make the 2nd leg by repeating R1 – 12 above, but do not fasten off after R12!
Join the legs and work the body as follows:
R13: With the 2nd leg still on your hook, ch 2 and join the 1st leg anywhere in R12 with a sc. sc in the remaining 6 st around the 1st leg. Continue around by doing a sc into each of the 2 ch stitches, sc into each st of the 2nd leg (18) place a marker.
R14: sc in the next 4 st, 2 sc in the next 2 st, sc in the next 8 st, 2 sc in the next 2 st, sc in the next 2 st (to marker). Remove marker. Sc in the next 2 st and place marker in last st. This is your new end of round (22)
R15: sc in the next 4 st, 2 sc in the next 2 st, sc in the next 12 st, 2 sc in the next 2 st, sc in the next 2 st (26)
R16 – 19: sc around (26)
R20: *sc2tog, sc in next 11 st. Repeat from * once more (24)
R21: *sc2tog, sc in next 10 st. Repeat from * once more (22)
R22: *sc in next 9 st, sc2tog. Repeat from * once more (20)
R23: *sc in next 8 st, sc2tog. Repeat from * once more (18)
Stuff
R24: *sc in next 7 st, sc2tog. Repeat from * once more (16)
R25: *sc in next 6 st, sc2tog. Repeat from * once more (14)
R26: *sc in next 5 st, sc2tog. Repeat from * once more (12)
R27: *sc in next 4 st, sc2tog. Repeat from * once more (10)
Add more stuffing. Fasten off and leave a tail for joining.
Tummy patch (cream)
R1: Into a mr, sc 5. Pull ring tight. (5)
R2: 2 sc into each st around (10)
R3: *sc in the next st, 2 sc in the next st. Repeat from * around (15)
R4: *2 sc in the next st, sc in the next 2 st. Repeat from * around (20)
Fasten off and leave a tail for joining.
Arms (cream and light brown, make 2)
R1: Start with cream. Into a mr, sc 4. Pull ring tight (4)
R2: 2 sc in each st around (8)
R3: Into the back loops only, sc around (8)
R4: sc2tog, sc in next 6 (7)
Change to light brown
R5 – 6: sc around (7)
Stuff
R7: sc2tog, sc in next 5 st (6)
R8 – 14: sc around (6)
Fasten off and leave a tail for joining. No need to stuff the remainder of the arm.
Antlers (medium brown, make 2)
Each antler is made up of 2 parts, make 2 of each part. No need to stuff the antlers.
Part 1 (main stem)
R1: Into a mr, sc 5. Pull ring tight. (5)
R2 – 7: sc around (5)
Fasten off and leave a tail for joining
Part 2 (side stem)
R1: Into a mr, sc 5. Pull ring tight. (5)
R2 – 4: sc around (5)
Fasten off and leave a tail for joining. Assemble the antlers by stitching the side stem onto the main stem, approximately halfway up the main stem.
Scarf (blue)
R1: Ch 5, sc into the 2nd ch from hook, sc across (4)
R2: Ch 1, turn. Sc into the front loop across (4)
Repeat R2 until the scarf is long enough to fit around the Reindeer’s neck, approximately 19 rows. Fasten off and leave a tail for joining.
Nose (pink)
R1: into a mr, sc 3. Pull ring tight and slst to close ring. Leave a tail for joining.
Assembly
Use pins to hold the parts in place before sewing them, this gives a neat finish.
Using black embroidery thread, embroider eyes onto the head; between row 6 and 7, approximately 4 or 5 stitches apart.
Stitch the tummy patch and head onto the body.
Stitch the arms in place on either side of the body.
Stitch the antlers in place along R12 of the head, 3 sts apart.
Stitch the ears in place, just below the antlers.
Stitch the nose in place.
Wrap the scarf around the Reindeer’s neck and join the two open edges at the back, using the yarn tail.
thank you so much for sharing. It's perfectly gorgeous. Merry Christmas to you and yours.
It's so cute. You are an accomplished crocheter. May I please ask you to call it a CHRISTmas reindeer? Thank you.
Encore merci pour le patron, c'est apprécié.