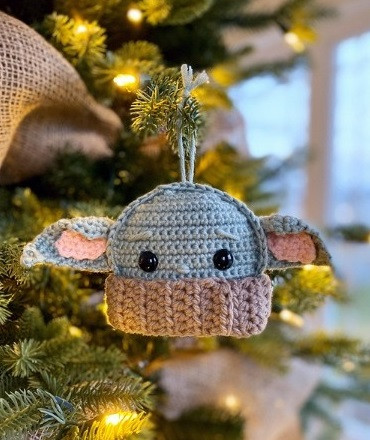
Crochet Baby Yoda Christmas Ball

As many of you asked for the pattern, here it is:
You’ll need:
Caron x Pantone in Terrarium Green (50g);
*This is a bulky (category 5) yarn but you can use a worsted weight to make a smaller ornament.*
Loops & Threads Capri in apricot (very small amounts);
Crochet hook 3,25 mm
Bernat Super Value in Honey for robe;
12mm Safety Eyes;
Stuffing;
Tapestry needle.
Instructions
Body Panels (make 2)
You will make 2 panels using a 3.25mm hook. The panels are worked from the bottom up. Ch 1 and turn at the end of each row.
Row 1: Ch 8, starting in second ch from hook, sc 7 (7 sts)
Row 2: Inc twice, sc 3, inc twice (11 sts)
Row 3: Inc twice, sc 7, inc twice (15 sts)
Row 4: Inc, sc 13, inc (17 sts)
Row 5: Inc, sc 15, inc (19 sts)
Row 6: Sc across (19 sts)
Row 7: Inc, sc 17, inc (21 sts)
Rows 8-14: Sc across (21 sts)
Row 15: Dec, sc 17, dec (19 sts)
Row 16: Sc across (19 sts)
Row 17: Dec, sc 15, dec (17 sts)
Row 18: Dec, sc 13, dec (15 sts)
Row 19: Dec twice, sc 7, dec twice (11 sts)
Row 20: Dec twice, sc 3, dec twice (7 sts)
Row 21: Dec, sc 3, dec (5 sts)
Tie off. Set aside for assembly later.
Ears (make 2)
In green yarn using a 3.25mm hook. Ch 1 and turn at the end of each row.
Row 1: Ch 6, starting in second ch from hook, sc 5 (5 sts)
Row 2: Inc twice, sc 1, inc twice (9 sts)
Row 3: Inc, sc 7, inc (11 sts)
Rows 4-5: Sc across (11 sts)
Row 6: Dec, sc 7, dec (9 sts)
Row 7: Sc across (9 sts)
Row 8: Dec, sc 5, dec (7 sts)
Row 9: Sc across (7 sts)
Row 10: Dec, sc 3, dec (5 sts)
Row 11: Sc across (5 sts)
Row 12: Dec, sc 1, dec (3 sts)
Rows 13-14: Sc across (3 sts)
Row 15: Sc3tog (1 st)
Row 16: Sc 1 (1 st)
Tie off, leaving a long tail for stitching it on. Set aside for assembly later.
Inner Ears (make 2)
Using 3.25mm hook and pink yarn.
Row 1: Ch 4, starting in second ch from hook, sc 3 (3 sts)
Row 2: Inc, sc 1, inc (5 sts)
Rows 3-4: Sc across (5 sts)
Row 5: Dec, sc 1, dec (3 sts)
Row 6: Sc 3 (3 sts)
Row 7: Sc3og (1 st)
Tie off, leaving a long tail for stitching it on.
Stitch the inner ear onto the ear by picking up stitches along the inside of the ear.
Fold the top half of the ear down toward the centre and stitch along the edge to secure it in place. Tie off and weave in ends.
Robe
With 3.25mm hook and brown yarn. Ch 1 and turn at the end of each row.
Row 1: Ch 7, starting in third ch from hook, hdc 5 (5 sts)
Rows 2-31: Hdc across (5 sts)
Tie off, leaving a long tail for stitching it on.
Move on to assembly below!
Assembly
Step 1: Face
First, we need to attach and stitch on our facial features to the front panel.
Insert 12mm safety eyes into the front panel at row 10 and approximately 5 stitches in from each side.
Next, stitch on a nose below the eyes by weaving your green yarn around a stitch several times. Tie a knot in the back to secure.
Finally, stitch on eyebrows above each eye around rows 13-14 using green yarn.
Step 2: Body
Okay, here are the pieces you should now have at this step.
Start by cutting two lengths of the green yarn about 30cm/12″ each. Put them aside for now.
Place the two body panels together, matching up all stitches.
Make sure the front of Baby Yoda is facing you as you crochet around the outside of the piece.
Starting on the left side at the top, begin attaching the panels together by single crocheting around the outside of the panels.
Be sure to crochet loosely around so that the edge keeps its nice curve!
Only crochet three or four stitches and then stop. Using your tapestry needle and a length of yarn that you set aside earlier, sew the first ear in place. Place the ear in the middle of the head and sew through all three pieces; the back panel, the ear and the front panel.
Once the ear is secured, tie a knot in the yarn tails and hide them inside the piece.
Continue single crocheting around. When you get to the ear, crochet in the stitches of the front panel only; this portion is already sewn shut, so it’s just for aesthetics!
Continue crocheting both panels together normally once you’re past the ear.
Sew the second ear in place on the opposite side the same way you did for the first.
Continue crocheting up the other side and stop when you reach the top. Stuff Baby Yoda!
Continue single crocheting across the top. Top up stuffing as you go as necessary. Use the back of your crochet hook to even out the stuffing and keep the shape nice and round.
When you are satisfied with the stuffing, close with a slst to first st. Tie off. With your tapestry needle, poke the yarn tail back inside the piece. Finish with some needle sculpting for the eyes and add the loop for hanging.
Next, wrap the robe around the bottom of the ornament, overlapping one end over the other. Using the long tail and your tapestry needle, stitch the robe onto the ornament along the top edge of the robe as follows:
Insert your needle through a stitch along the top of the robe, push it all the way through the ornament and out the back of the ornament through a stitch along the top of the robe at the back. Re-insert your needle into the next stitch along the top of the robe, then all the way through the ornament and out the front, through a stitch along the top of the robe. Continue all the way across.
Thank you for the pattern!
What a great idea! Do you have other characters?
My sons are keen on Star Wars, so thanks a lot for this Yoda toy!