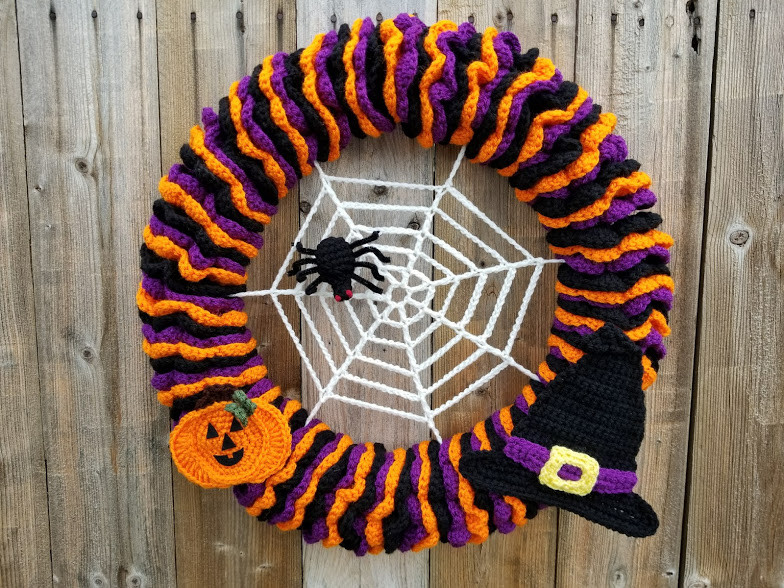
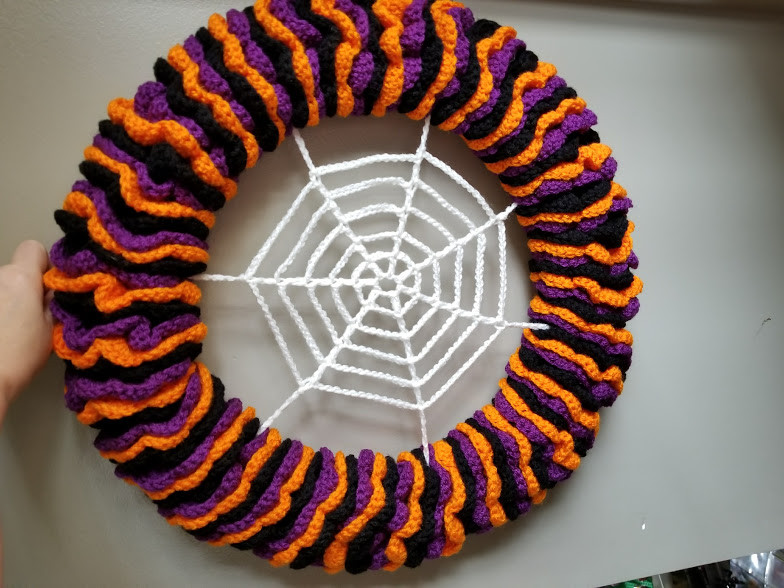
Crochet Halloween Wreath

As many of you asked the pattern for Halloween wrest, here it is.
You’ll need:
2 skeins of Red Heart Super Saver in Black 7 oz/198 g – 364 yds/333m
1 skein of Red Heart Super Saver in Dark Orchid 7 oz/198 g – 364 yds/333m
1 skein of Red Heart Super Saver in Pumpkin 7 oz/198 g – 364 yds/333m
Less than an oz of Red Heart with Love in Daffodil 6 oz/170 g – 315 yds/288 m
Less than an oz of Red Heart Super Saver in Coffee 7 oz/198 g – 364 yds/333m
Less than an oz of Red Heart Super Saver in Medium Thyme 7 oz/198 g – 364 yds/333m
Less than an oz of Red Heart Super Saver in Soft White 7 oz/198 g – 364 yds/333m
Less than an oz of Red Heart Super Saver in Burgundy 7 oz/198 g – 364 yds/333m
H/8 (5.00 mm) hook
F/5 (3.75 mm) hook
18” wire wreath frame
2 black pipe cleaners
Small amount of black felt for pumpkin face
Hot glue or craft glue
Tapestry needle.
Size: 19½” diameter
Special Stitches
Shell Stitch: 5 dc in same space
V-Stitch: (Dc, ch 1, dc) in same space
Instructions
Halloween Wreath Main Body
H hook
Make 3 (one in Black, Dark Orchid and Pumpkin)
FC: Ch 540
Row 1: In 5th ch from hook, dc (V-st was made); continue to V-st in every ch across to the end. Turn.
Row 2: Ch 1 *Sc in ch-1 sp, shell st in next ch-1 sp* Repeat from * to * across. Finish off.
Holding the ends of the three garlands together (Black, Pumpkin and Dark Orchid) and using the F hook and any scrap yarn, sl st through the FCs of all three colors. For example, insert hook into the first FC st of the Black, and then through the corresponding FC st of Pumpkin, and then again through the Dark Orchid, then sl st. Repeat with every st to the end of the FC.
The FCs that you stitched together are what needs to be touching the wreath form when wrapping so that the shells are facing out. Wrap the garland around the form until the two ends are together. Stitch the ends together to secure.
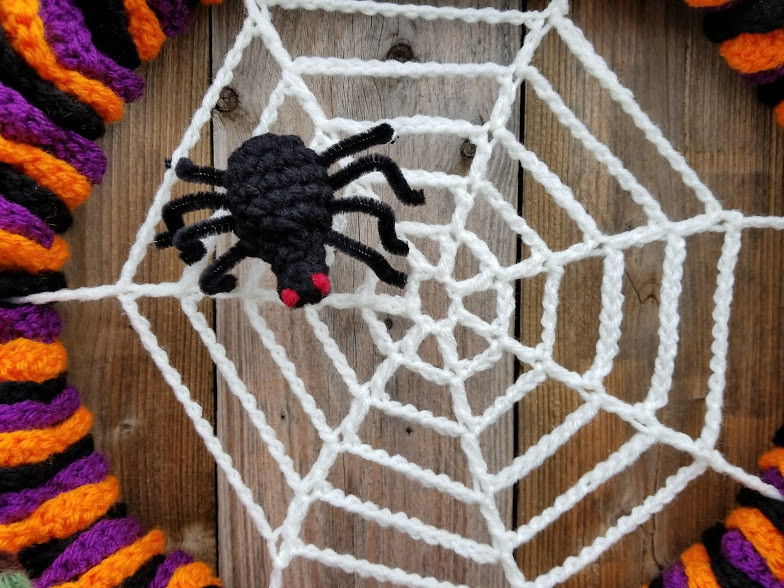
Web
With Soft White and H hook
Round 1: Ch 8, sl st in 1st ch to form a loop.
Round 2: Ch 6 (counts as dc and ch 3) *dc in next ch, ch 3* Repeat from * to * 5 more times, sl st in 3rd ch of the 1st ch-6. (7 ch-3 sps)
Round 3: Ch 9 (counts as dc and ch 6) *dc in next dc from previous round, ch 6* Repeat from * to * around. Sl st in 3rd ch of 1st ch-9.
Round 4: Ch 12 (counts as dc and ch 9) *dc in next dc from previous round, ch 9* Repeat from * to * around. Sl st in 3rd ch of 1st ch-12.
Round 5: Ch 15 (counts as dc and ch 12) *dc in next dc from previous round, ch 12* Repeat from * to * around. Sl st in 3rd ch of 1st ch-15.
Round 6: Ch 18 (counts as dc and ch 15) *dc in next dc from previous round, ch 15* Repeat from * to * around. Sl st in 3rd ch of 1st ch-18. Ch 15. Finish off. Leave a 4”-5” tail.
Attach Soft White at next dc of Round 6, ch 15. Finish off. Leave a 4”-5” tail. Repeat for all remaining dc’s of Round 6.
Gently separate the Halloween wreath body strands to expose the wire frame. Tie one long strand of web loosely to the wreath frame. (Do not knot!) Repeat with each strand evenly around the frame, moving and tightening as necessary. Once you’re satisfied with the placement, complete your knots and hide any loose ends. Weave in any loose ends on the web itself. Fluff Halloween wreath body to hide the frame.
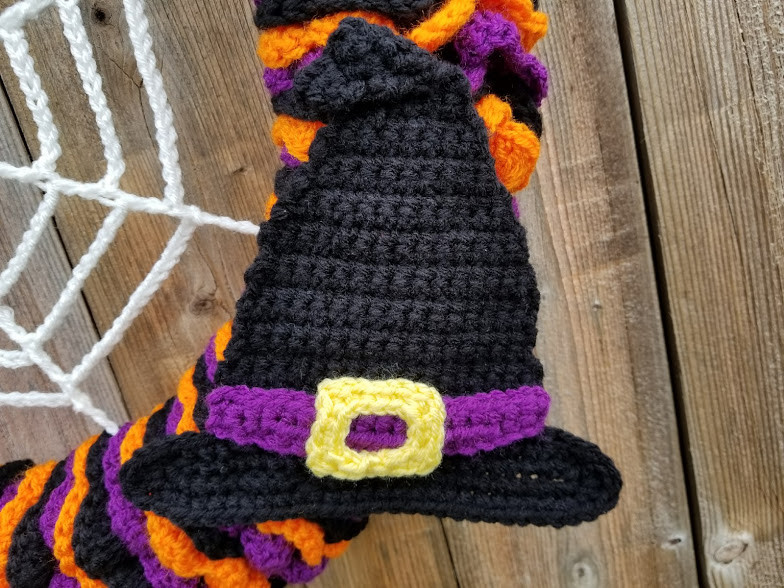
Witch Hat (6.75”H x 7.5”W)
With Black and H hook
FC: Ch 25
Round 1: Working in BLO, sc in 2nd ch from hook. Sc in next 22 sts. In last st, 4 sc. Working along the opposite edge of the FC, sc in next 22 sts. In the last st, 3 sc, sl st into 1st sc made of round.
Round 2: Ch 1, sc in st ch-1 came out of, sc in next 22 sts, 2 sc in next st. In next st (hdc, dc). In next st (dc, hdc). 2 sc in next st. Sc in next 22 sts. 2 sc in next st. In next st (hdc, dc). In next st (dc, hdc). Sc in next st. Sl st in 1st sc made of round.
The brim of the hat is finished and now you will move on to the top portion of the hat. Continue working straight into Row 1. Don’t finish off.
Row 1: Sl st in next 2 sts. Sc in next 18 sts. Turn.
Row 2 – Row 4: Ch 1, Sc in next 18 sts. Turn.
Row 5: Ch 1, skip 1st st, sc in next 16 sts. Sl st in last st. Turn.
Row 6: Ch 1, skip sl st, sc in next 16 sts. Turn.
Row 7 – Row 8: Ch 1, sc in next 16 sts. Turn.
Row 9: Ch 1, skip 1st st, sc in next 14 sts, sl st in last st. Turn.
Row 10: Ch 1, skip sl st, sc in next 14 sts. Turn.
Row 11 – Row 12: Ch 1, sc in next 14 sts. Turn.
Row 13: Ch 1, skip 1st st, sc in next 12 sts, sl st in last st. Turn.
Row 14: Ch 1, skip sl st, sc in next 12 sts. Turn.
Row 15: Ch 1, skip 1st st, sc in next 10 sts, sl st in last st. Turn.
Row 16: Ch 1, skip sl st, sc in next 10 sts. Turn.
Row 17: Ch 1, skip 1st st, sc in next 8 sts, sl st in last st. Turn.
Row 18: Ch 1, skip sl st, sc in next 8 sts. Turn.
Row 19: Ch 1, skip 1st st, sc in next 6 sts, sl st in last st. Turn.
Row 20: Ch 1, skip sl st, sc in next 6 sts. Turn.
Row 21: Ch 1, skip 1st st, sc in next 4 sts, sl st in last st. Turn.
Row 22: Ch 1, skip sl st, sc in next 4 sts. Turn.
Row 23 – Row 24: Ch 1, sc in next 4 sts. Turn.
Row 25: Ch 1, skip 1st st, sc in next 2 sts, sl st in last st. Turn.
Row 26: Ch 1, skip sl st, sc in next 2 sts. Turn.
Row 27: Ch 1, sk 1st st, sl st in next st. Finish off.
Fold the tip of the hat over at an angle between Rows 22 and 23. Stitch down the tip.
Witch Hat Band
With Dark Orchid and H hook
FC: Ch 19
Row 1: Work in the bottom loop of the FC for Row 1. In 2nd ch from hook, sc. Sc in next 2 chs, hdc in next 12 sts. Sc in next 3 sts. Turn.
Row 2: Ch 1, sc in each st across. (18 sc)
Finish off. Leave a long tail for sewing.
Flip the band so that the slight arch is facing downward (see photo below). Place the hat band just above the brim of the witch hat (the ends of the band even with Row 1 and 2 of the witch hat), using a tapestry needle and your Dark Orchid tail, stitch the band to the hat.
Buckle
With Daffodil and H hook
FC: Ch 25
Round 1: Work in the bottom loops of the FC. In 2nd ch from hook, sc. Sc in next ch. Sc3tog using the next 3 chs. Sc in next 2 chs. Sc3tog using the next 3 chs. Sc in next 4 chs. Sc3tog using the next 3 chs. Sc in next 2 chs. Sc3tog using the next 3 chs. Sc in next 2 chs. Finish off. Leave a long tail for sewing.
Arrange the buckle so that it is a rectangle shape.
Using a tapestry needle and Daffodil tail, finish stitching the two ends of the Round 1 together to complete the buckle. In the center of the hat band, place the buckle with the rectangle laying horizontal and stitch into place.
Using a tapestry needle and the black tail from the witch hat, attach the witch hat applique to the Halloween wreath body with a few quick stitches. Hide any loose ends behind the applique.
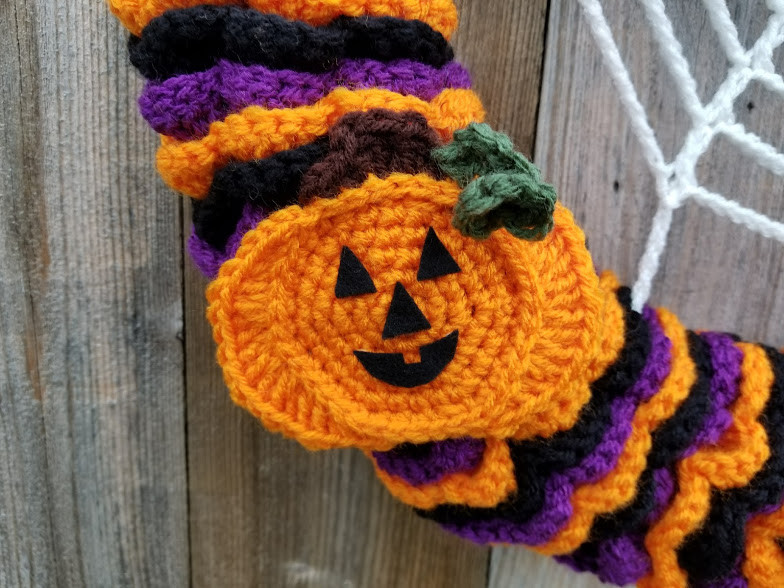
Pumpkin
With Pumpkin and H hook
Round 1: Ch 4, sl st in 1st ch to form a loop.
Round 2: Ch 1, 6 sc in loop, sl st in 1st sc. (6 sc)
Round 3: Ch 1, sc in st ch-1 came out of, 2 sc in next 5 sts, sc in last st, sl st in 1st sc. (12 sc)
Round 4: Ch 1, sc in st ch-1 came out of, sc in next st *2 sc in next st, sc in next st* Repeat from * to * around. Sc in last st, sl st in 1st sc. (18 sc)
Round 5: Ch 1, sc in st ch-1 came out of, sc in next 2 sts *2 sc in next st, sc in next 2 sts* Repeat from * to * around. Sc in last st, sl st in 1st sc. (24 sc)
Round 6: Ch 1, sc in st ch-1 came out of, sc in next 3 sts *2 sc in next st, sc in next 3 sts* Repeat from * to * around. Sc in last st, sl st in 1st sc. (30 sc)
Round 7: Ch 1, sc in st ch-1 came out of, sc in next 4 sts *2 sc in next st, sc in next 4 sts* Repeat from * to * around. Sc in last st, sl st in 1st sc. (36 sc)
My right thumb indicates the stitches you will be working into for Round 8. It’s not the back loop, but a loop that is behind both loops you usually work stitches into.
Round 8: Working in the loops behind the pumpkin circle (shown in the photo), sl st and sc in the next st. Hdc in next 2 sts, dc in next st, 2 dc in next 5 sts, hdc in next 2 sts, sc in next st. Still working in loops behind the circle, sl st in next 5 sts. Sc in next st, hdc in next 2 sts, 2 dc in next 5 sts, dc in next st, hdc in next 2 sts, sc and sl st in next st. Sl st into next st. Finish off. Leave a long tail for sewing to the Halloween wreath body later.
Pumpkin Stem
With Coffee and H hook
Still working in the loops behind the circle, attach Coffee in next st after finishing off Pumpkin, sc. Sc in next st, ch 1. 2 dc in next st, dc in next st, sl st in side of dc (see photos below for where), sc in same st as last dc made. Sc in next st, sl st in last st. Finish off. Leave a long tail for sewing to the Halloween wreath body later.
Vine
With Medium Thyme and H hook
FC: Ch 7
Row 1: Work in bottom loops of FC. In 2nd ch from hook, 3 sc. 3 sc in each of next 4 sts. Sc in last st. Finish off. Attach your curly vine to the pumpkin where the stem meets the pumpkin.
Cut out 3 small triangles and a half moon shape from the felt. You can cut out teeth shapes from the half moon after it’s been cut from the felt piece. Using hot glue or craft glue, place the pumpkin face shapes in the center circle.
Using a tapestry needle and your Pumpkin tail, attach the pumpkin applique to the wreath body with a few quick stitches. Do the same with your Coffee tail to attach the stem. Hide any loose ends behind the applique.
Spider
With Black and H hook
Body
Round 1: Ch 4, sl st in 1st ch to form a loop.
Round 2: Ch 1, 6 sc in loop, sl st in 1st sc. (6 sc)
Round 3: Ch 1, 2 sc in each st around. Sl st in 1st sc. (12 sc)
Round 4 – Round 6: Ch 1, sc in each st around. Sl st in 1st sc. (12 sc)
Round 7: Ch 1, sc2tog around. Sl st in 1st sc. (6 sc)
Finish off.
Cut your pipe cleaners so that you have 4 – 5” pieces. Around Round 2, insert one pipe cleaner into the side of the body and out the other side so that they are level and even on both sides. With the next pipe cleaner, insert near Round 3 and the next around Round 4 and the last around Round 4. Bend the pipe cleaners so that they resemble spider legs. Try to place them evenly along a straight line.
Head
Round 1: Ch 4, sl st in 1st ch to form a loop.
Round 2: Ch 1, 6 sc in loop, sl st into 1st sc.
Round 3: Ch 1, sc in each st around, sl st into 1st sc.
Finish off. Leave a tail for sewing.
With a small amount of Burgundy and a tapestry needle, and working from inside the head toward the outside face, run your needle out through the place where you want your first eye. Tie the first part of a knot, not a full knot—it would be too large. Insert the hook back into the same space you came out of and gently pull out all the slack. Only the knot will remain on the outside of the face. Run your needle out through the place where you want your second eye. Tie the first part of a knot again. Insert the hook back into the same space you came out of and pull out all the slack. Finish off. Tie your two ends of burgundy together.
Attach the spider head to the Round 7 opening of the body using a tapestry needle and the tail from the head. Tuck in any loose ends.