Crochet Sweet Bird

Notice: Undefined index: extension in /home/www/web/craftorator.com/public_html/system/controllers/tune/frontend.php on line 2838
Notice: Undefined index: extension in /home/www/web/craftorator.com/public_html/system/controllers/tune/frontend.php on line 2838
Notice: Undefined index: extension in /home/www/web/craftorator.com/public_html/system/controllers/tune/frontend.php on line 2838
Notice: Undefined index: extension in /home/www/web/craftorator.com/public_html/system/controllers/tune/frontend.php on line 2838
Notice: Undefined index: extension in /home/www/web/craftorator.com/public_html/system/controllers/tune/frontend.php on line 2838
Notice: Undefined index: extension in /home/www/web/craftorator.com/public_html/system/controllers/tune/frontend.php on line 2838
Notice: Undefined index: extension in /home/www/web/craftorator.com/public_html/system/controllers/tune/frontend.php on line 2838
Notice: Undefined index: extension in /home/www/web/craftorator.com/public_html/system/controllers/tune/frontend.php on line 2838
Notice: Undefined index: extension in /home/www/web/craftorator.com/public_html/system/controllers/tune/frontend.php on line 2838
Notice: Undefined index: extension in /home/www/web/craftorator.com/public_html/system/controllers/tune/frontend.php on line 2838
Notice: Undefined index: extension in /home/www/web/craftorator.com/public_html/system/controllers/tune/frontend.php on line 2838
Notice: Undefined index: extension in /home/www/web/craftorator.com/public_html/system/controllers/tune/frontend.php on line 2838
Notice: Undefined index: extension in /home/www/web/craftorator.com/public_html/system/controllers/tune/frontend.php on line 2838
Notice: Undefined index: extension in /home/www/web/craftorator.com/public_html/system/controllers/tune/frontend.php on line 2838
Notice: Undefined index: extension in /home/www/web/craftorator.com/public_html/system/controllers/tune/frontend.php on line 2838
Notice: Undefined index: extension in /home/www/web/craftorator.com/public_html/system/controllers/tune/frontend.php on line 2838
Notice: Undefined index: extension in /home/www/web/craftorator.com/public_html/system/controllers/tune/frontend.php on line 2838
Notice: Undefined index: extension in /home/www/web/craftorator.com/public_html/system/controllers/tune/frontend.php on line 2838
Notice: Undefined index: extension in /home/www/web/craftorator.com/public_html/system/controllers/tune/frontend.php on line 2838
Notice: Undefined index: extension in /home/www/web/craftorator.com/public_html/system/controllers/tune/frontend.php on line 2838
Notice: Undefined index: extension in /home/www/web/craftorator.com/public_html/system/controllers/tune/frontend.php on line 2838
Notice: Undefined index: extension in /home/www/web/craftorator.com/public_html/system/controllers/tune/frontend.php on line 2838
Notice: Undefined index: extension in /home/www/web/craftorator.com/public_html/system/controllers/tune/frontend.php on line 2838
Notice: Undefined index: extension in /home/www/web/craftorator.com/public_html/system/controllers/tune/frontend.php on line 2838
Notice: Undefined index: extension in /home/www/web/craftorator.com/public_html/system/controllers/tune/frontend.php on line 2838
Notice: Undefined index: extension in /home/www/web/craftorator.com/public_html/system/controllers/tune/frontend.php on line 2838
Notice: Undefined index: extension in /home/www/web/craftorator.com/public_html/system/controllers/tune/frontend.php on line 2838
Notice: Undefined index: extension in /home/www/web/craftorator.com/public_html/system/controllers/tune/frontend.php on line 2838
Notice: Undefined index: extension in /home/www/web/craftorator.com/public_html/system/controllers/tune/frontend.php on line 2838
Notice: Undefined index: extension in /home/www/web/craftorator.com/public_html/system/controllers/tune/frontend.php on line 2838
Notice: Undefined index: extension in /home/www/web/craftorator.com/public_html/system/controllers/tune/frontend.php on line 2838
Notice: Undefined index: extension in /home/www/web/craftorator.com/public_html/system/controllers/tune/frontend.php on line 2838
Notice: Undefined index: extension in /home/www/web/craftorator.com/public_html/system/controllers/tune/frontend.php on line 2838
Notice: Undefined index: extension in /home/www/web/craftorator.com/public_html/system/controllers/tune/frontend.php on line 2838
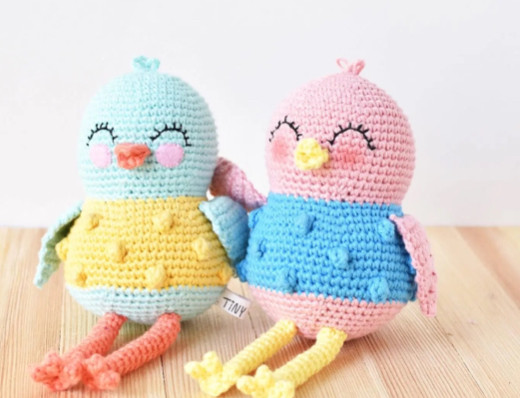
SWEET BIRD AMIGURUMI
US TERMINOLOGY
ch – chain
dec – single crochet decrease
hdc – half double crochet
inc – single crochet increase
inv dec – invisible decrease
rnd(s) – round(s)
sc – single crochet
sl st – slip stitch
st(s) – stitch(es)
3-dc pc st – 3 double crochet popcorn stitch
[ ] – Repeat steps between brackets for the specified number of times
( ) – The number of stitches you should have at the end of each round
SPECIAL TECHNIQUES
- 3-dc popcorn stitch – See photo tutorial below.
- Changing color – Take the last yarn over of previous stitch with new color. Continue working with new color.
- Embroidering on crochet – See tutorial here.
- Finish off – Watch tutorial here.
- Invisible decrease – Watch tutorial here.
- Magic ring – Watch tutorial here.
- Standing sc – Start with a slipknot on your hook. Insert hook into stitch and make a single crochet as normal. See tutorial here.
NOTES
- All sections are worked in a continuous round, except wings which are worked in rows.
- Mark the beginning of each round with a stitch marker.
- All stitches are written in US terminology.
- Demonstration photos are shown using right-handed crochet.
3-DOUBLE CROCHET POPCORN STITCH
BEAK
rnd 1: In color C, ch 6, sc 3 in 2nd ch from hook, sc 3 down chain, sc 3 in last ch, turn to crochet down other side of chain (and over yarn tail to avoid weaving), sc 3 down chain (12 sts)
Sl st 1 into next st. Fasten off, leaving a 15-inch tail for attaching. Weave in and cut beginning yarn tail. Set aside until after head is made.
HEAD
rnd 1: In color A (leave a 15-inch starting yarn tail outside of the top of head for head feathers), start with a magic ring, sc 6 into ring (6 sts)
rnd 2: Inc 6 (12 sts)
rnd 3: [sc 1, inc 1] 6 times (18 sts)
rnd 4: [sc 1, inc 1, sc 1] 6 times (24 sts)
rnd 5: [sc 3, inc 1] 6 times (30 sts)
rnd 6: Sc around (30 sts)
rnd 7: [sc 2, inc 1, sc 2] 6 times (36 sts)
rnd 8: [sc 5, inc 1] 6 times (42 sts)
rnd 9: [sc 3, inc 1, sc 3] 6 times (48 sts)
rnds 10-18: Sc around (48 sts for 9 rnds)
rnd 19: [sc 6, inv dec 1] 6 times (42 sts)rnd 20: [sc 5, inv dec 1] 6 times (36 sts)
Fasten off yarn and weave in ending yarn tail. Attach beak, embroider face, and make head feathers now using the photo tutorials below. Click here to jump to the Shirt & Body section.
ATTACHING THE BEAK & EMBROIDERING FACE
We’ll now be attaching the beak and embroidering Sweet Bird’s face. The key to embroidering on crochet is to make sure to insert your needle through your stitches and not in a hole between stitches so your thread remains secure.
First we’ll attach the beak in steps 1-5 and embroider in steps 6-12.Check out this blog post for more tips on embroidering on crochet!
MAKING THE HEAD FEATHERS
SHIRT & BODY
rnd 1: Using color B, attach yarn to last rnd of head using a standing sc. Sc 4, inc 1, [sc 5, inc 1] 5 times (42 sts)
rnd 2: [sc 3, inc 1, sc 3] 6 times (48 sts)
rnd 3: [sc 7, inc 1] 6 times (54 sts)
rnd 4: [sc 4, 3-dc pc st, sc 3, inc 1] 6 times (60 sts)
rnds 5-6: Sc around (60 sts for 2 rnds)
rnd 7: [sc 9, 3-dc pc st] 6 times (60 sts)
rnds 8-9: Sc around (60 sts for 2 rnds)
rnd 10: [sc 4, 3-dc pc st, sc 5] 6 times (60 sts)
rnd 11: Sc around (60 sts)
rnd 12: Change to color A, sc around (60 sts)
rnd 13: [sc 8, inv dec 1] 6 times (54 sts)
rnd 14: [sc 7, inv dec 1] 6 times (48 sts)
rnd 15: [sc 6, inv dec 1] 6 times (42 sts)
rnd 16: Sc around (42 sts)
rnd 17: [sc 5, inv dec 1] 6 times (36 sts)
rnd 18: [sc 4, inv dec 1] 6 times (30 sts)
rnd 19: [sc 3, inv dec 1] 6 times (24 sts)
rnd 20: [sc 2, inv dec 1] 6 times (18 sts)
rnd 21: [sc 1, inv dec 1] 6 times (12 sts)
rnd 22: inv dec 6 (6 sts)
Sl st 1 into next st. Fasten off and finish off.
WING (MAKE 2)
Made in rows. Leave a 10-inch starting yarn tail for attaching. Use normal decreases, not invisible decreases.
row 1: Using color A, ch 7, sc 6 starting in 2nd ch from hook (6 sts)
row 2: Ch 1, turn, inc 1, sc 4, inc 1 (8 sts)
rows 3-5: Ch 1, turn, sc across (8 sts for 3 rows)
row 6: Ch 1, turn, dec 1, sc 4, dec 1 (6 sts)
row 7: Ch 1, turn, sc across (6 sts)
row 8: Ch 1, turn, dec 1, sc 2, dec 1 (4 sts)
row 9: Ch 1, turn, sc across (4 sts)
row 10: Ch 1, turn, dec 2 (2 sts)
row 11: Ch 1, turn, sc across (2 sts)
row 12: Ch 1, turn, dec 1 (1 st)
Fasten off and weave in ending yarn tail. Attach to body using tutorial below.
LEG (MAKE 2)
rnd 1: With color C, start with a magic ring, sc 6 into ring (6 sts)
rnds 2-15: Sc around (6 sts for 14 rnds)
Fasten off, leaving a 10-inch tail for attaching. Don’t stuff. Weave in remainder of beginning yarn tail. Set aside until after making foot.
FOOT (MAKE 2)
Leave a 10-inch beginning yarn tail for attaching. See foot reference photo below.
rnd 1: Start with a magic ring, sc 7 into ring (7 sts)
rnd 2: Sl st 1 into next st, [ch 3, sc 1 into 2nd ch from hook, hdc 1 into next ch, sl st 1 into next st of round 1] 3 times (3 toes made)
Fasten off and weave in end yarn tail.
ATTACHING WINGS
ATTACHING FOOT TO LEG
ATTACHING LEG TO BODY