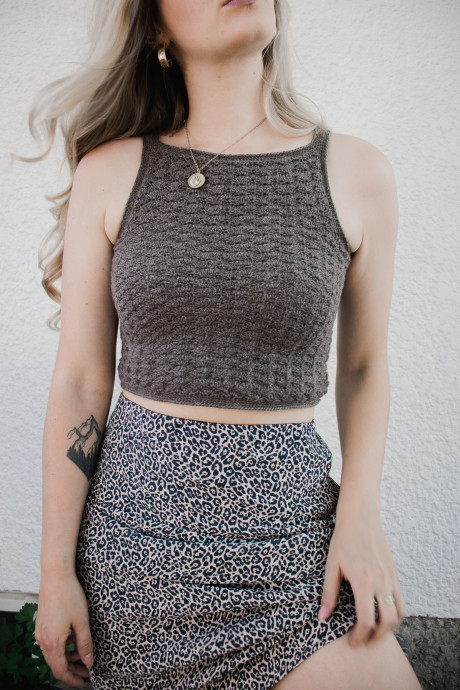
How to Crochet a Stylish Sweater with Shell Stitch

You’ll Need:
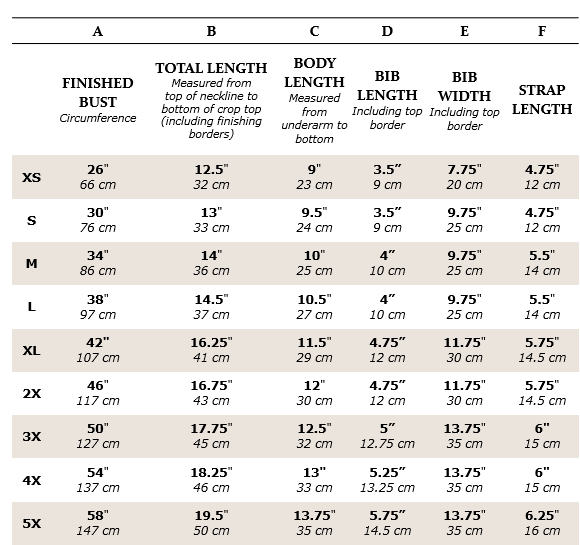
3 (3, 4, 4, 5) (6, 6, 7, 8) skeins of WeCrochet Stroll in Jack Rabbit Heather yarn (75% merino wool, 25% nylon; 210m/50g);
Crochet hook 3,75 mm;
Stitch markers;
Tapestry needle.
Size:
XS (S, M, L, XL) (2X, 3X, 4X, 5X).
Stitch Control:
4 shells x 15 rows = 10 x 10 cm.
Instructions
Front and Back
Foundation Row: Leaving a 24” [61 cm] tail on one of your panels for seaming the sides of your top, FSC 79 (91, 103, 115, 127) (139, 151, 163, 175).
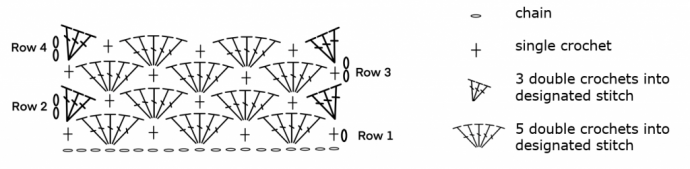
Row 1: Ch 1, sc in first st, *sk next 2 sts, shell in next st, sk next 2 sts, sc in next st; rep from * to end of row, turn. [13 (15, 17, 19, 21) (23, 25, 27, 29) shells]
Row 2: Ch 2, work 3 dc in first sc, *sk next 2 dc, sc in next dc, sk next 2 dc, shell in next sc; rep from * to end of row, omitting very last shell of final rep, work 3 dc in final sc of row, turn.
Row 3: Ch 1, sc in first dc, *sk next 2 dc, shell in next sc, sk next 2 dc, sc in next dc; rep from * to end of row, turn.
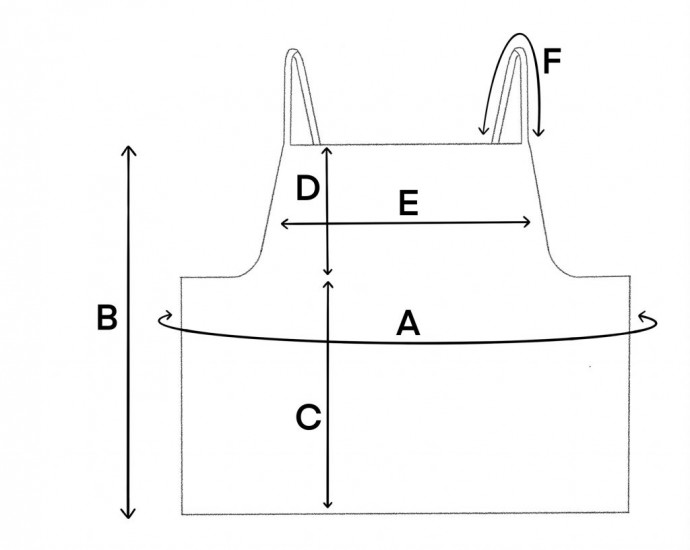
Rep Rows 2-3 until you have worked a total of 32 (34, 36, 38, 42) (44, 46, 48, 50) shell stitch rows, finishing with a Row 2 rep. If you matched gauge, this should be approximately 8.5 (9, 9.5, 10, 11.25) (11.75, 12.25, 12.75, 13.25)” [22 (23, 24, 25, 28.5) (30, 31, 32, 34) cm]. This is the length of the body of your sweater up to your underarm before the shaping begins.
Do not fasten off.
Bib
Since you finished your body on a Row 2 rep, you should have half-shells at the edges of your most recently completed row. Ignoring these edge half-shells, count 3 (3, 4, 5, 5) (6, 6, 7, 8) full shells inward from either side and place a marker in the center dc of this shell (one marker per side = two markers total). The bib piece that extends up to your collarbone will be worked in between these markers.
Before you work the bib, you will crochet a finishing row up to the first marker to even out the undulating shell stitches and get a top edge that is flat and uniform. Next, you will work a section of shells in between your two markers, and then complete the row with similar finishing instructions.
Continuing with the same yarn –
Row 1:
Part 1 (Finishing Row): Ch 1, sl st in first dc, sc in next dc, hdc in next dc, dc in next sc, hdc in next dc, sc in next dc, [sl st in next dc, sc in next dc, hdc in next dc, dc in next sc, hdc in next dc, sc in next dc] 2 (2, 3, 4, 4) (5, 5, 6, 7) times. The marked st should be your next st.
Part 2 (Shell Stitch Section): Sc in marked dc and move marker up to this new st, *sk next 2 dc, shell in next sc, sk next 2 dc, sc in next dc; rep from * 6 (8, 8, 8, 10) (10, 12, 12, 12) more times. Your last sc should be worked into your second marked st; move the marker up to this new st.
Part 3 (Finishing Row): Sc in next dc, hdc in next dc, dc in next sc, [hdc in next dc, sc in next dc, sl st in next dc, sc in next dc, hdc in next dc, dc in next sc] 2 (2, 3, 4, 4) (5, 5, 6, 7) times, hdc in next dc, sc in next dc, sl st in next dc, turn.
Row 2: Ch 1, sc in each st up to first marker, ch 2, work 3 dc in marked sc (move marker up to the first of these three dc), sk next 2 dc, sc in next dc, *sk next 2 dc, shell in next sc, sk next 2 dc, sc in next dc; rep from * across row until working into the final shell, sk next 2 dc, work 3 dc in next sc, turn. [7 (9, 9, 9, 11) (11, 13, 13, 13) shells in between your two markers]
For the rest of this section, you are going to be working back-and-forth between your marked sts to complete the bib. You can remove the markers now.
Row 3: Ch 1, sc in first dc, *sk next 2 dc, shell in next sc, sk next 2 dc, sc in next dc; rep from * to end of row, turn.
Row 4: Ch 2, work 3 dc in first sc, *sk next 2 dc, sc in next dc, sk next 2 dc, shell in next sc; rep from * to end of row, omitting very last shell of final rep, work 3 dc in final sc of row, turn.
Rep Rows 3 and 4 until you have worked a total of 12 (12, 14, 14, 16) (16, 18, 18, 20) rows, finishing on a Row 4 rep. If you matched gauge, your bib should measure approximately 3.25 (3.25, 3.75, 3.75, 4.25) (4.25, 4.75, 4.75, 5.25)” [8.25 (9, 9.5, 10, 10.75) (11.5, 12, 12.75, 13.25) cm]. For a taller or shorter bib than the measurements provided for your size, simply rep Rows 3 and 4 until reaching your desired measurements, making sure to finish with a Row 4 rep.
Do not fasten off; continue below.
Top Finishing Row
Next, you will work one row along the top edge to even out the undulating shell stitches and create a flat, uniform top edge onto which you will crochet the straps.
Ch 1, sl st in first dc, *sc in next dc, hdc in next dc, dc in next sc, hdc in next dc, sc in next dc, sl st in next dc; rep from * to end of row.
Fasten off.
Seaming the Sides
Lay your panels on top of one another with the long tails from your foundation chains on opposite sides. With a tapestry needle, seam the sides of your panels using the whip stitch or seaming method of your choice, doing your best to keep the rows aligned between panels. Fasten off, weave in ends.
Bottom Border
Choose which side you would like to wear as the right side. With right side facing, join yarn to the bottom edge at one of the side seams with a sl st. Ch 1, sc into each st from your foundation chain around the circumference of your top until reaching the first sc [do not join], sc directly into first sc to begin working in a spiral, sc into each sc along your bottom border for 3 more rounds or until desired border width, then sl st into next 3 sts, fasten off, weave in ends.
Straps
With right side facing, join yarn to one of the side seams at the center of the underarm with a sl st, ch 1, sc into each st until reaching the corner where your bib begins, sc2tog in this approximate corner, sc evenly up the bib until reaching the top corner, ch 30 (30, 34, 34, 36) (36, 38, 38 40), sc into top corner of bib on opposite panel, sc evenly down the edge of the bib until reaching the corner where the bib meets the underarm, sc2tog in this approximate corner, sc evenly until reaching the first sc of rnd, sl st directly into this first sc to set yourself up to work in a spiral, sc in each st around for 3 more rnds or until desired width (keep in mind your strap will double in width after you work the neckline). Once you have completed your final rnd, sl st into next 3 sts, fasten off, weave in ends.
Rep these instructions for the second strap.
Neckline Border
This section adds a thin border to match the rest of the design while simultaneously doubling the thickness of your straps.
Designate a front side and back side to your two panels. Lay your tank top flat with the back panel-right side facing and join yarn with a sl st to the right-hand corner where the neckline meets the straps. (If you are a left-handed crocheter, join yarn to the left-hand corner.)
Ch 1, *sc in each st across the top of your bib until reaching the opposite corner where the bib meets the strap, sc2tog in this approximate corner, sc into each st along your strap until reaching the bib on the other panel, sc2tog in this approximate corner; rep from * once more, sc directly into first sc to set yourself up to work in a spiral, sc in each st around for 3 more rnds (for thicker straps, work additional rnds), once you’ve completed your final rnd, sl st into next 3 sts, fasten off, weave in ends.
Weave in any remaining ends and block.