Crochet Spring Blooms Misty Magnolia Square

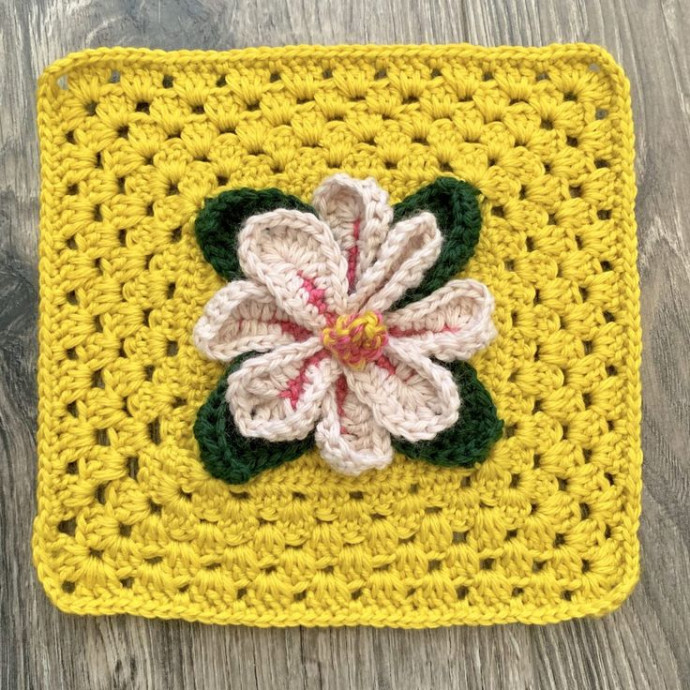
The Crochet Spring Blooms Misty Magnolia Square is a delightful and intricate pattern that captures the essence of nature's beauty. With its combination of soft pastel colors and intricate stitchwork, this square truly showcases the artistry and craftsmanship of crochet enthusiasts. Whether you're creating a cozy blanket or a trendy pillow cover, this design is sure to bring a touch of charm and elegance to your space. Get ready to impress your friends and family with your crocheting skills while adding a splash of springtime joy to any room!
Tools and Materials
- 4mm crochet hook (US size G)
- Knit Picks Mighty Stitch (I used Oyster, Canary, Bubblegum, and Ivy) or any worsted weight yarn
- Yarn needle and scissors
Pattern Notes
- Directions are written in U.S. terms.
- Pattern is worked in rounds, with the yellow granny square portion last.
- You will want to weave in your ends after each round; otherwise, they will be in your way and make working in the round very frustrating.
Abbreviations
- ch, chs – chain, chains
- st, sts – stitch, stitches
- sl st – slip stitch
- sc – single crochet
- hdc – half double crochet
- dc – double crochet
- tc – triple crochet
- fo – fasten off
Beginning the Pattern
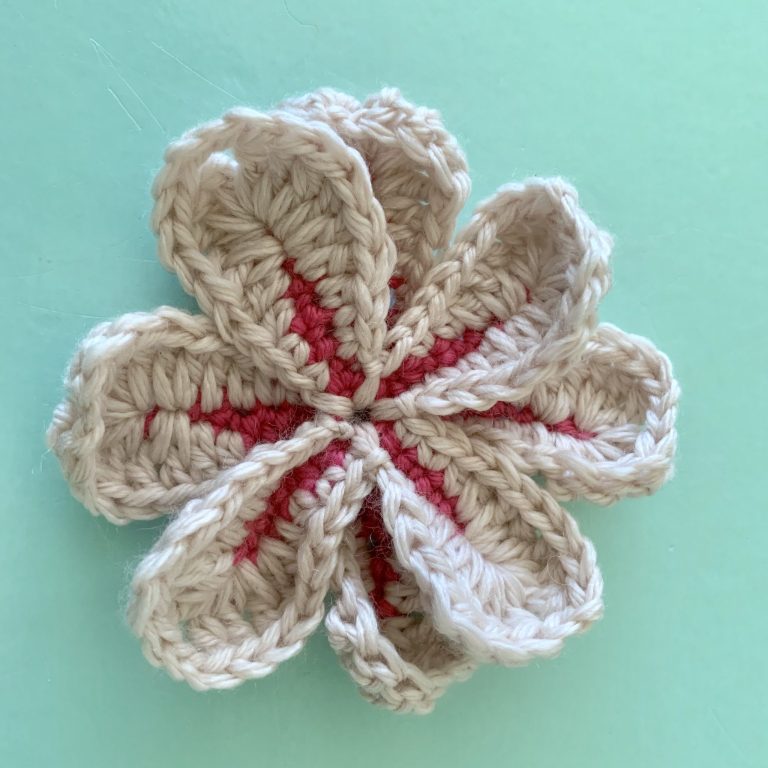
Starting with Bubblegum (pink)
Ch 4, sl st to first ch to join.
Sl st into ring.
Round 1: Inner Petals
[Ch 7, sl st in 2nd ch from hook, sl st in next ch, sc in next 3 chs, hdc in next ch, sl st into ring.]
Repeat 3 more times.
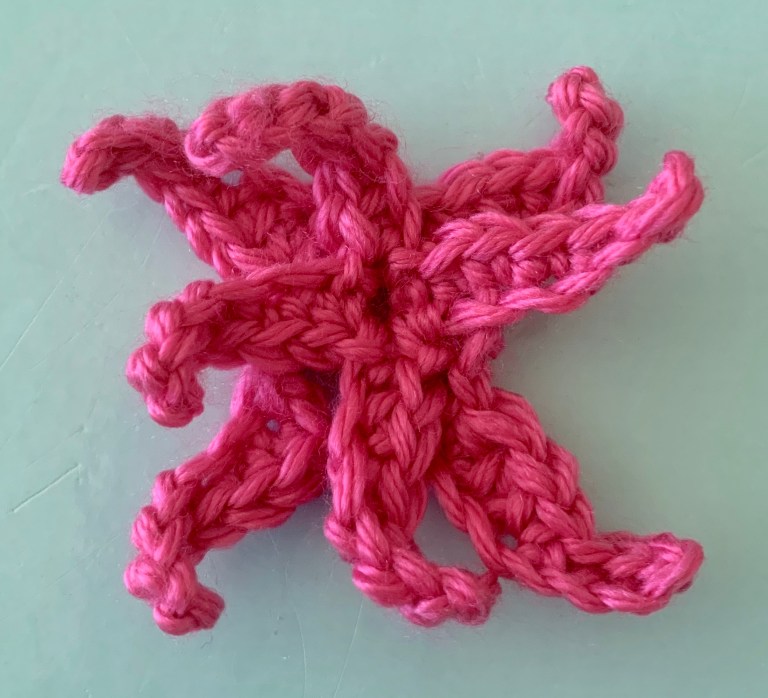
Now you will create another round of pink petals behind the 1st set of 4.
Round 2: Inner Petals
Sl st into the back of the hdc at the base of your first petal, shown below. Exact loop isn’t important.
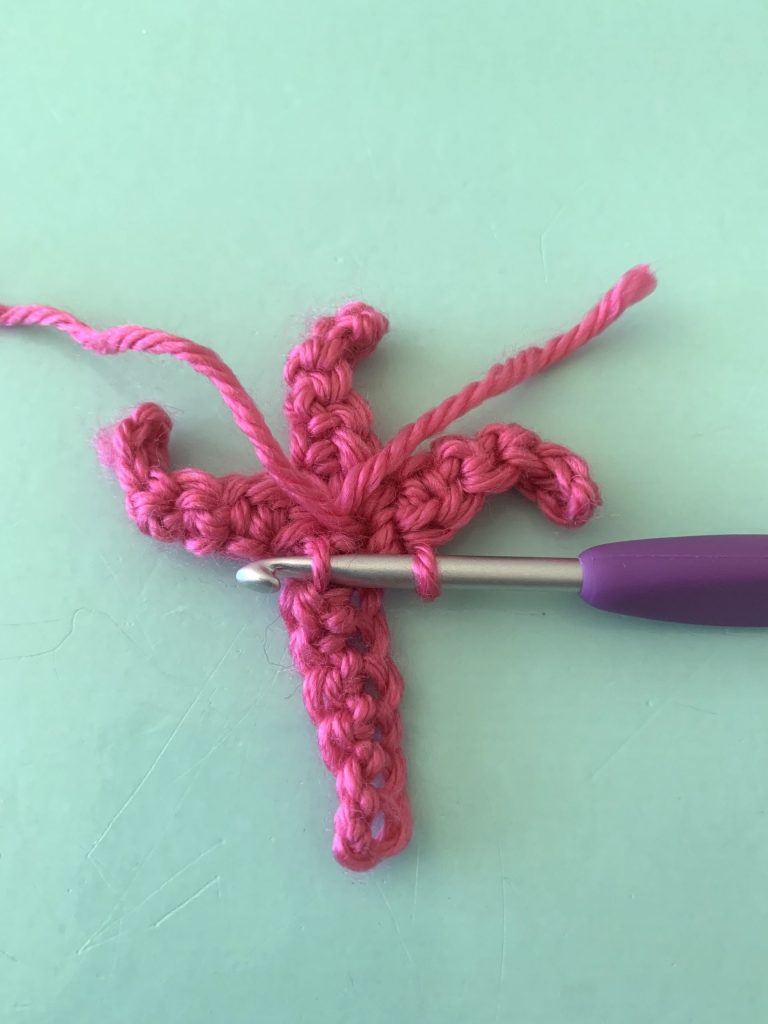
Staying behind the petals, [ch 3, sl st into the back of the hdc on the next petal.] Repeat around, finish with sl st in first ch. Now you will use these chain loops to make 4 more pink petals.
In 1st ch 3 loop, [work Ch 7, sl st 2, sc2, hdc2, sl st in same ch 3 loop, then sl st into next ch 3 loop.] Repeat around, sl st to first ch loop to join.
Fasten off and weave in pink ends. You now have two rounds of pink petals like this:
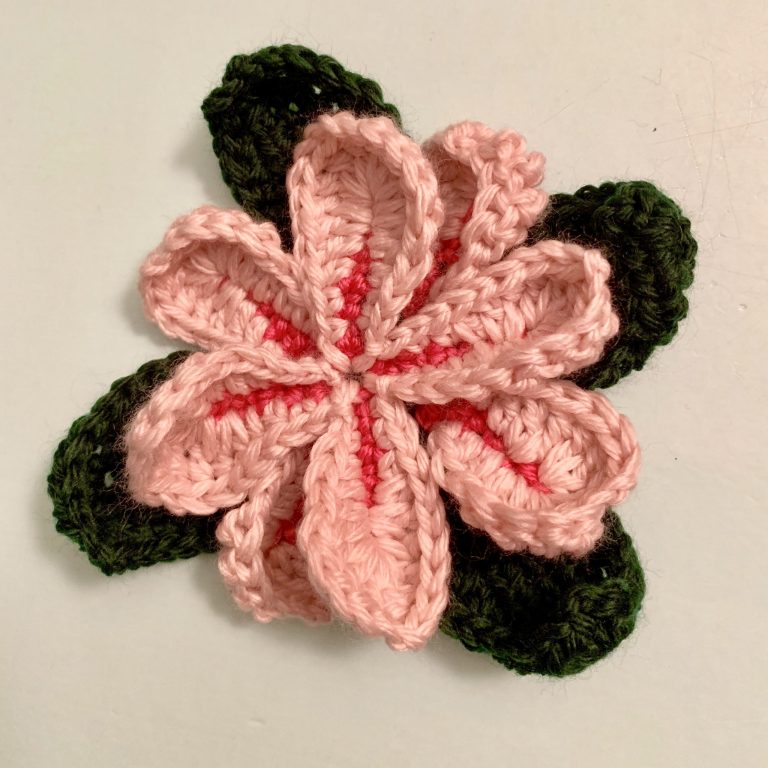
Switch to Oyster (white) and start in the ring between two pink petals in the 1st round.
Round 1: Outer Petals
Working up the right side of the pink stitches, [work a sc in the first 2 sts, hdc in next st, dc in next st, (dc, tc) in next st, 3tc in last st, ch 2, work down the opposite side, work 3tc in 1st st, (tc, dc) in next st, dc in next st, hdc in next st, sc in last 2 sts, sl st into ring.] Repeat for each petal.
Now you have 4 white petals, and four that are still just pink. Let’s fix it!
Round 2: Outer Petals
Find the first pink petal right behind where you worked your last sl st, and work these four petals as follows:
Working up the right side of the pink stitches, ch 1, [work a sc in the first 2 sts, hdc in next st, dc in next st, (dc, tc) in next st, 3tc in last st, ch 2, work down the opposite side, work 3tc in 1st st, (tc, dc) in next st, dc in next st, hdc in next st, sc in last 2 sts, sl st into the same ch 3 space where the pink inner petal was made, then sl st into the next ch 3 space.] Repeat for each petal, sl st into beginning ch 1 to join. Fasten off Oyster yarn and weave in your ends.
Now it’s starting to look like a magnolia blossom!
Attach Ivy Yarn with a sl st in between two petals in Round 2.
Ch 10, sc in 2nd ch from hook and remaining 8 chs, sl st to the same space between petals, turn.
Creating Leaves
Sc in the first two sts, hdc in the next 7 sts, ch 1, working down the other side of the leaf, hdc in 7 sts, sc in 2 sts, sl st into the same space between petals, turn.
Working around the leaf one more time, ch 1, hdc in 3 sts, dc in 3 sts, hdc in 3 sts, in end space work (hdc2, ch 2, hdc2), working down the other side work hdc in 3 sts, dc in 3 sts, hdc in 3 sts, sl st into the same space between petals.
Ch 3, go behind the next petal and sl st into the next space between petals in Round 2. Repeat the leaf pattern 3 more times, then ch 3 and sl st into the base of the first leaf.
Fasten off and weave in green ends.
Here is your centerpiece all finished!
You will help keep the blossom and leaves in place by attaching them to our square as you complete it next.
Square Pattern
Round 1: Find a stitch about 1/3 of the way up on the back of a green leaf, right in the center row, attach the yellow yarn as shown below, ch 1 and work a sc in the same st.
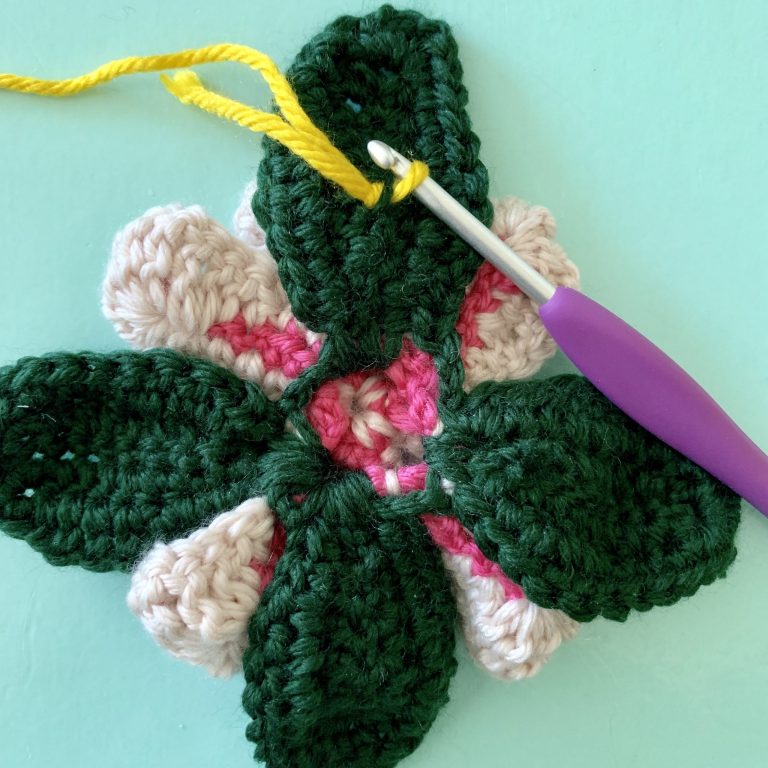
Ch 3, [work a sc halfway up the next Round 2 petal, ch 3, sc in the back of a stitch 1/3 of the way up the next leaf,] repeat around, ending with a sl stitch in the beginning sc. Now you have a little square that you will work into.
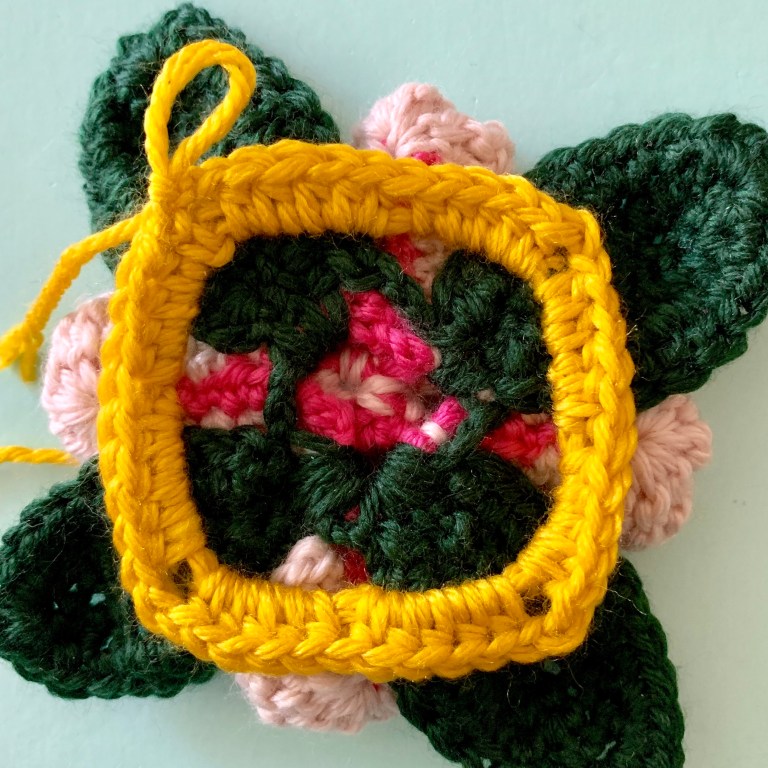
Round 2
Sl st into 1st ch 3 loop, ch 2, 4 hdc in the same loop, [5 hdc in the next ch 3 loop, ch 2, 5 hdc in the next ch 3 loop,] repeat 2 more times, then 5hdc in the next ch 3 loop, sl st to the top of beginning ch 2.
Now we have a little square with 10 hdc on each side:
Round 3: Sl st back into the ch space you just finished. Ch 3, dc in the same space, [dc in all 10 sts across, in the corner work (2dc, ch 2, 2dc)] repeat around, work 2dc in corner, ch 2 and sl st to the top of the beginning ch 3.
Round 4
In this round we will attach our yellow square to the tips of our leaves as we go.
Sl st back into the ch space you just finished. Ch 3, dc in the same space, [dc in all 14 sts across, in the corner (2 dc, sl st to the back of the green leaf, ch 2, sl st again to the back of the green leaf, 2dc in the same ch space)] repeat around, in the last corner work 2 dc, sl st to leaf, ch 2, sl st to leaf one last time and sl st to beginning ch 3.
Round 5
Sl st into next dc, sl st into one more dc. Ch 3, dc in next 2 sts, (sk 1, dc in next 3 sts) 3 times, sk last st, in the ch2 corner work (3dc, ch 2, 3dc). [Sk 2 sts, (dc in next 3 sts, sk 1 st) 3 times, dc in next 3 sts, sk last st, in the ch2 corner work (3dc, ch 2, 3dc)] Repeat around, sl st into the top of beginning ch 3.
Round 6
Sl st back into the space before your join, ch 3. Working around the square, work 3dc between every cluster and in each corner work (3dc, ch 2, 3dc). When you get back to your first space, work 2dc and join to the top of beginning ch 3. Sl st into the next space.
Rounds 7-9
Ch 3, [in each corner work (3dc, ch 2, 3dc), then work 3dc between every cluster] repeat around. When you get back to your first space, work 2dc and join to top of beginning ch 3.
Round 10
Ch 1, sc in the same sp, all around the square work a sc in each space AND in between each cluster (be careful not to miss the first of the 3 dcs; the stitch in between clusters will try to hide it). In each corner work (sc, ch1, sc). Sl st to the 1st sc to join. Fasten off and weave in ends.
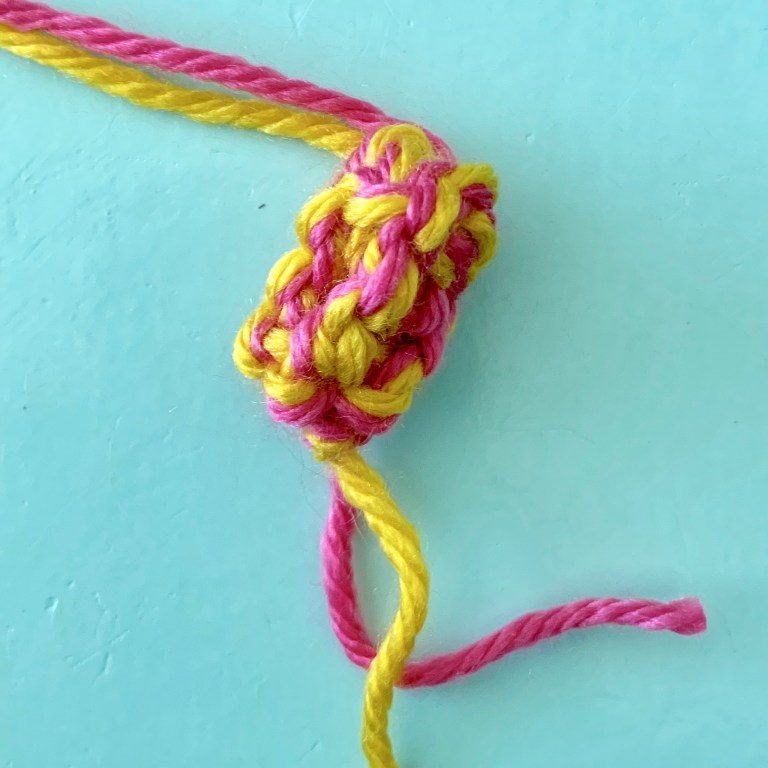
Adding the Center Cluster
Your square is almost done! All you need to do now is add the center cluster.
Holding strands of pink and yellow together, ch 7, tc in the 4th ch from hook and remaining chs, fasten off leaving an 18″ tail. Roll this piece up into a cylinder and then use your tail and yarn needle to sew together, then attach it into the center of the flower. Before you fasten off, use the leftover yarn in your needle to sew down any petals that won’t stay put on their own, working only in the back of the petals to hide the yarn. Weave in all ends and you are done!