Crochet Bobble Hearts Blanket Pattern Guide

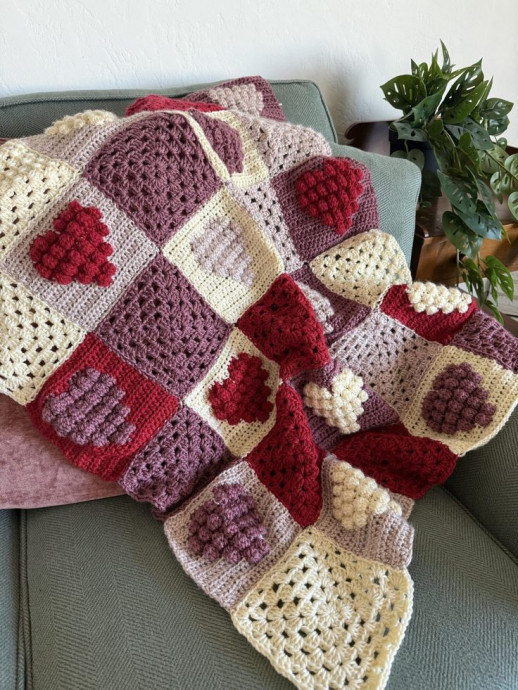
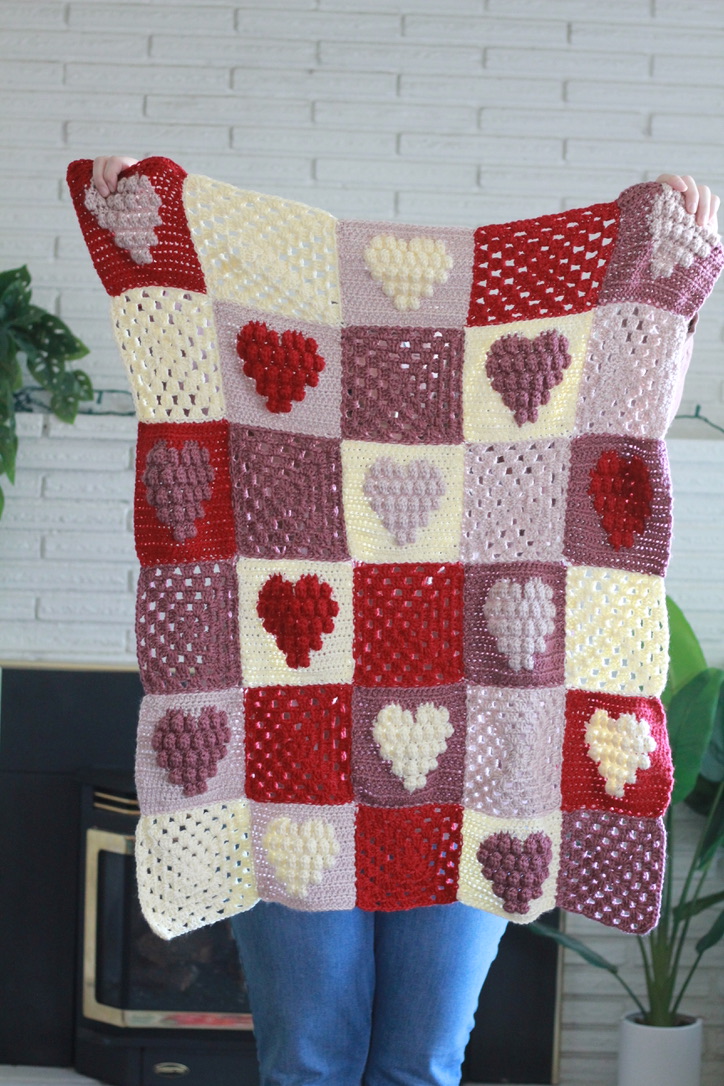
The Crochet Bobble Hearts Blanket is not only a cozy and cute addition to any home but also a heartwarming project to work on. The bobbles in the shape of hearts add a delightful touch, making it perfect for gifting to loved ones or adding a pop of charm to your own space. Whether you're a seasoned crocheter or just starting out, crafting this blanket will surely bring joy with every stitch. So grab your yarn and hook, and let's create something beautiful together!
Materials Needed
Yarn: Lion Brand Basic Stitch Anti Pilling (Worsted Weight 4 yarn, 185yds/170m, 100% acrylic, 3.5oz/100g) in 4 colors:
- Blush Heather (Color A)
- Deco Rose (Color B)
- Ecru (Color C)
- Red Heather (Color D)
Hook Size: 5.5mm crochet hook
Gauge: 4” x 4” square = 14 hdc x 10 rows
6″ x 6″ granny square = 5 rnds (may need to be blocked to get this gauge)
Approximate Yarn Yardage
- Color A = Baby (150yds); Lapghan (278 yds); Throw (370 yds)
- Color B = Baby (150yds); Lapghan (278 yds); Throw (370 yds)
- Color C = Baby (150yds); Lapghan (278 yds); Throw (370 yds)
- Color D = Baby (150yds); Lapghan (278 yds); Throw (370 yds)
Dimensions
The sample of the blanket is the Lapghan size, which has the following dimensions: Lapghan Size: 30″ x 36″ (5 squares across x 6 rows tall).
Abbreviations
- Ch = chain
- st(s) = stitch(es)
- Hdc = half double crochet
- Dc = double crochet
- Bobble = bobble stitch (*yarn over, insert hook into stitch, yarn over, pull through two loops,* repeat till you have 5 loops on your hook, then yarn over and pull yarn through all 5)
- ← = RS (Right Side)
- → = WS (Wrong Side)
Pattern Notes
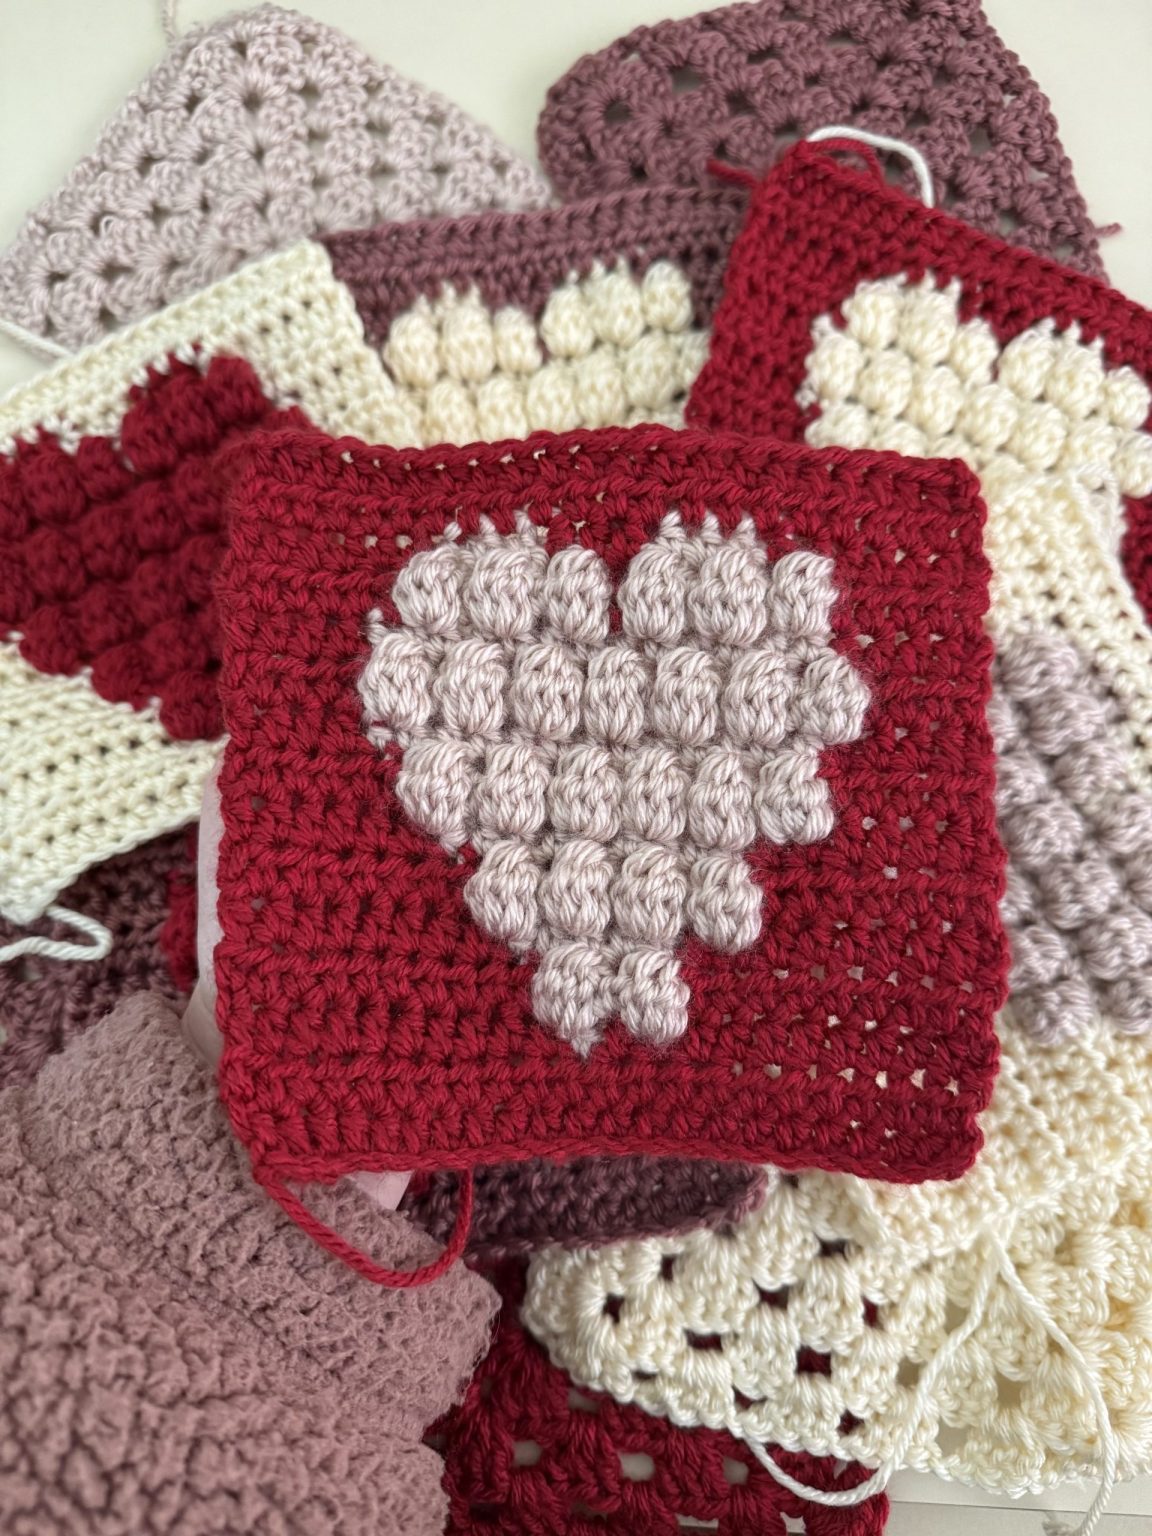
This pattern uses US crochet terminology. It is made up of crochet squares that are then seamed together. There are two types of squares: heart squares and granny squares.
The ch 2 at the beginning of the row does not count as a stitch. The arrows indicate which side you are working on, either right side (RS) or wrong side (WS).
Pattern Breakdown
This pattern is made using the same two square patterns repeated in different colors. You can use any number of colors you would like. I used four different colors for mine. For each size you’ll need the following amount of squares of each type:
Squares Required
Heart Square: 15
Granny Square: 15
Color Combinations for Lapghan Size
Heart Square:
- Color A background:
- Color B heart: 1
- Color C heart: 2
- Color D heart: 1
- Color B background:
- Color A heart: 2
- Color C heart: 1
- Color D heart: 1
- Color C background:
- Color A heart: 1
- Color B heart: 1
- Color D heart: 1
- Color D background:
- Color A heart: 1
- Color B heart: 1
- Color C heart: 1
Granny Squares Breakdown
- Color A: 3
- Color B: 4
- Color C: 3
- Color D: 4
Bobble Heart Square Pattern
Row Instructions
- ← Row 1 [RS]: Using Color A, ch 23, starting in the 3rd ch from the hook, hdc 21 [21 stitches]
- → Row 2 [WS]: (Color A) hdc 21 [21 stitches]
- ← Row 3 [RS]: (Color A) hdc 10, (Color B), (Color A) hdc 10 [21 stitches]
- → Row 4 [WS]: (Color A) hdc 9, (Bobble), (Color B), (Bobble), (Color A) hdc 9 [21 stitches]
- ← Row 5 [RS]: (Color A) hdc 8, (Color B) hdc 5, (Color A) hdc 8 [21 stitches]
- → Row 6 [WS]: (Color A) hdc 7, [(Bobble), (Color B)] x 3, (Bobble), (Color A) hdc 7 [21 stitches]
- ← Row 7 [RS]: (Color A) hdc 6, (Color B) hdc 9, (Color A) hdc 6 [21 stitches]
- → Row 8 [WS]: (Color A) hdc 5, [(Bobble), (Color B)] x 5, (Bobble), (Color A) hdc 5 [21 stitches]
- ← Row 9 [RS]: (Color A) hdc 4, (Color B) hdc 13, (Color A) hdc 4 [21 stitches]
- → Row 10 [WS]: (Color A) hdc 4, [(Bobble), (Color B)] x 6, (Bobble), (Color A) hdc 4 [21 stitches]
- ← Row 11 [RS]: (Color A) hdc 4, (Color B) hdc 13, (Color A) hdc 4 [21 stitches]
- → Row 12 [WS]: (Color A) hdc 5, [(Bobble), (Color B)] x 2, (Bobble), (Color A), [(Bobble), (Color B)] x 2, (Bobble), (Color A) hdc 5 [21 stitches]
- ← Row 13 [RS]: (Color A) hdc 6, (Color B) hdc 3, (Color A) hdc 3, (Color B) hdc 3, (Color A) hdc 6 [21 stitches]
- → Row 14 [WS]: (Color A) hdc 21 [21 stitches]
- ← Row 15 [RS]: (Color A) hdc 21 [21 stitches]
Basic Granny Square Pattern
Rnd 1: Begin by creating a magic circle. You could also ch 4, then sl st into the first ch to create a ring. Once you have the ring, ch 3 (this will count as the first dc), in the ring dc 2, ch 1, dc 2, ch 1, dc 2, ch 1, join with sl st to 3rd ch of ch 3 at the beginning of rnd.
Rnd 2: sl st across the tops of the sts to the first ch 1 space. In first ch 1 space ch 3 (this counts as first dc) then [dc 2, ch 2, dc 3, ch 1]. This forms the first corner. *Ch 2, in next ch 1 space dc 3, ch 2, dc 3, ch 1, repeat from * till you get back to the beginning of the rnd. Join with sl st to 3rd ch at beginning of rnd.
Rnd 3: sl st across the tops of the sts to the first corner. In the first corner space, [Ch 3 (this counts as first dc), dc 2, ch 2, dc 3]. Ch 1, sk to first ch 1 space from previous rnd and in the space [dc 3, ch 1], sk to next corner. *In the corner [dc 3, ch 2, dc 3], ch 1, sk to next ch 1 space, dc 3 in ch 1 space, ch 1, sk to next corner, repeat from * till you reach the ch 3 at the beginning of the rnd. Join with a sl st to the 3rd ch from the beginning of the rnd.
To work additional rnds, start rnd like previous ones, then [dc 3, ch 2, dc 3] in corner spaces. In spaces on sides work 3dc. Work a ch1 in between the dc clusters on the sides.
For the blanket squares, I worked 5 rnds total. You’ll want to make sure each square is 6” x 6”. Work a sixth rnd if needed.
Arranging and Assembling the Blanket Squares
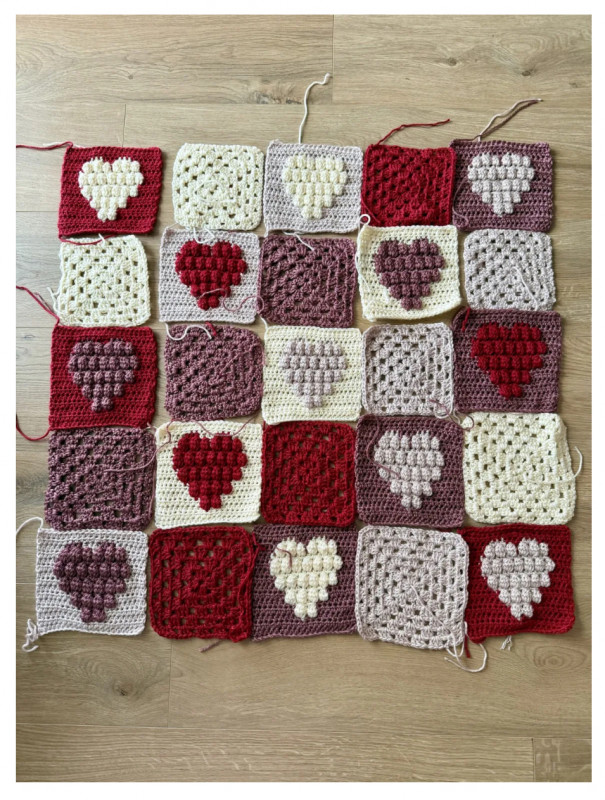
Once you’ve finished all your squares, you’ll want to arrange them into rows before seaming them together. The picture above shows how I laid out my squares. The great thing about this pattern is that you can do any layout you’d like by alternating heart squares and granny squares!
Here’s how many squares across by how many rows you’ll want to do for the Lapghan size: 5 squares x 6 rows
How to Assemble the Blanket
Start with threading a yarn needle with yarn, and knot the end.
Place squares right sides together.
Lift up the squares so that you can begin sewing.
Start sewing by inserting your yarn needle through two loops at the corner of one of the squares.
Insert your needle through two loops on the other side.
Repeat steps 4 and 5 all the way down the side of the square, pulling the yarn tight as you go. Then add new squares until you create a full row.
For seaming the rows, I recommend pinning them. Make sure at each point where the squares line up, that you match all 4 corners together. Place an interlocking stitch marker or pin at the point to keep them together. Then seam the two rows together.
Once you are all done sewing the squares together, your blanket will be finished!