How to Crochet a Daisy Duck Toy

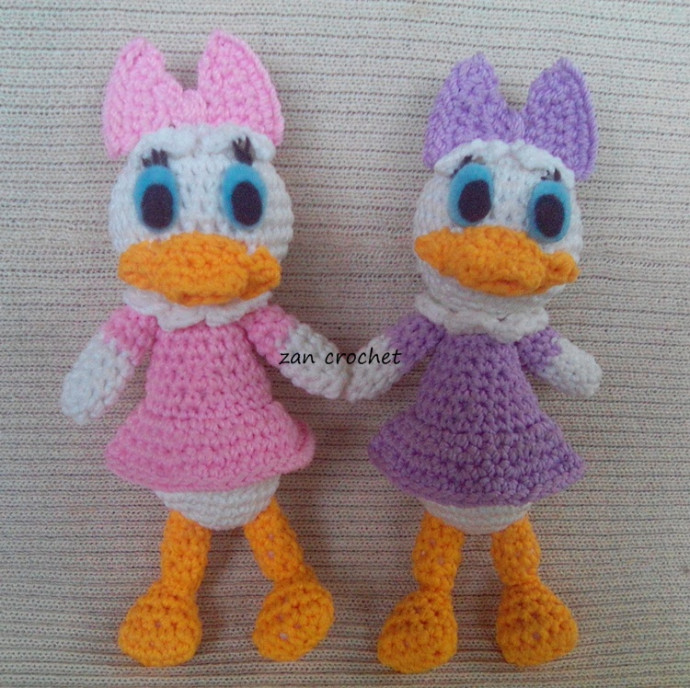
Creating a crochet Daisy Duck toy is a delightful and fun project that guarantees to put a smile on anyone's face. With vibrant yarn colors and a touch of creativity, this adorable toy will surely become a favorite companion for both children and adults alike. The intricate details in crocheting Daisy's signature blue dress and yellow bow add a charming touch to this handmade creation. Whether you're gifting it to a Disney enthusiast or adding it to your own collection, crafting a crochet Daisy Duck toy is a wonderful way to spread joy and creativity through the art of crocheting.
Materials
To create your crochet Daisy Duck toy, you will need the following materials:
- 2 mm crochet hook
- White, pink, and orange yarn
- Needle for sewing
- Stuffing
- Scissors
- Black and light blue felt
- Glue
Abbreviations
Here are some common abbreviations you will use in this project:
- sc: single crochet
- ch: chain
- st: stitch
- inc: increase
- dec: decrease
- hdc: half double crochet
- sl st: slip stitch
- F/O: Fasten off
- BLO: back loop only
- CC: change color
- Rep: repeat
Note: Work in continuous round
Head Instructions
Using white yarn, follow these rounds to create Daisy's head:
- R1: ch 2, starting from second chain from hook 6 sc
- R2: inc, rep 6x (12)
- R3: sc, inc, rep 6x (18)
- R4: 2sc, inc, rep 6x (24)
- R5: 3sc, inc, rep 6x (30)
- R6: 14 sc, inc, rep 2x (32)
- R7: 15 sc, inc, rep 2x (34)
- R8-9: sc around
- R10: 15 sc, dec, rep 2x (32)
- R11: 14 sc, dec, rep 2x (30)
- R12: 3sc, dec, rep 6x (24)
- R13: 2 sc, dec, rep 6x (18)
- Stuff
- R14: sc, dec, rep 6x (12)
- F/O
Body Instructions
Using white yarn, follow these rounds to create Daisy's body:
- R1: ch 2, starting from second chain from hook 6 sc
- R2: inc, rep 6x (12)
- R3: sc, inc, rep 6x (18)
- R4: 2sc, inc, rep 6x (24)
- R5: 3sc, inc, rep 6x (30)
- R6-7: sc around
- R8: 3sc, dec, rep 6x (24)
- R9: sc around
- R10: CC to pink 10sc, dec, rep 2x (22)
- R11: BLO sc around
- R12: 9sc, dec, rep 2x (20)
- R13: sc around
- R14: 2sc, dec, rep 5x (15)
- R15-16: sc around
- R17: 3sc, dec, rep 3x (12)
- Stuff
- F/O leaving a long tail for sewing
- Continue working on the front loop of R10 to make the skirt:
- R18: sc, inc, rep around (33)
- R19: sc around
- R20: 2sc, inc, rep around (44)
- R21: sc around
- F/O
Hands Instructions (Make 2)
Using white yarn, create Daisy's hands as follows:
- R1: ch 2, starting from second chain from hook 4 sc
- R2: inc around (8)
- R3-5: sc around
- R6-8: CC to pink, sc around
- Stuff
- F/O leaving a long tail for sewing
Legs Instructions (Make 2)
Using orange yarn, create Daisy's legs with these steps:
- R1: ch 2, starting from second chain from hook 6 sc
- R2: BLO, sc around
- R3-5: sc around
- Stuff
- F/O leaving a long tail
Feet Instructions (Make 2)
Using orange yarn, follow these steps to create the feet:
- Ch 6
- R1: starting from second chain from hook, 4 sc, 3 sc in corner, 3 sc, 2 sc in last corner (12)
- R2: sc around
- R3: 4sc, dec, rep 2x (10)
- R4: sc around
- R5: 3sc, dec, rep 2x (8)
- Stuff
- R6: dec around (4)
- F/O leaving a long tail for sewing
Beak Instructions
Using orange yarn, create Daisy's beak as follows:
- R1: ch 10, sl st to the 1st stitch to make a ring
- R2: sc in each chain (10)
- R3: 4 sc, inc, rep 2x (12)
- R4: ch 7, starting from second chain from hook, sl st in each chain, sl st to next stitch, sc, hdc, hdc, sc, ch 7, starting from second chain from hook, sl st in each chain, sl st to next stitch
- F/O leave a long tail for sewing
Eyebrow Instructions (Make 2)
Using white yarn, create the eyebrows by following these steps:
- ch 5, starting from second chain from hook, 2 sl st in each chain
- F/O leaving a long tail for sewing
Tail Instructions
Using white yarn, create the tail as follows:
- R1: ch 2, starting from second chain from hook 4 sc
- R2: inc, rep 4x (8)
- R3: 3sc, inc, rep 2x (10)
- R4: sc around
- Stuff
- F/O leaving a long tail for sewing
Dress Collar Instructions
Using white yarn, create the dress collar with these instructions:
- ch 14
- R1: starting from second chain from hook, *sl st, ch1, 3 dc to next st*, rep * 6 times, sl st to last st (there will be 6 fan stitches)
- F/O leaving a long tail for sewing
Daisy's Ribbon Instructions
Using pink yarn, follow these steps to create Daisy's ribbon:
- Ch 9
- R1: starting from second chain from hook, sc in each ch (8)
- R2: ch1, turn, dec, 4sc, dec (6)
- R3: ch1, turn, dec, 2sc, dec (4)
- R4: ch1, turn, 2 dec (2)
- R5: ch1, turn, dec (1)
- R6: ch1, turn, inc (2)
- R7: ch1, turn, 2 inc (4)
- R8: ch1, turn, inc, 2sc, inc (6)
- R9: ch1, turn, inc, 4sc, inc (8)
- R10: ch1, turn, sl st in each st
- F/O leaving a long tail for sewing, give a little sew to put the yarn in center of ribbon (R5)
Finishing Touches
To complete your crochet Daisy Duck toy, follow these finishing steps:
- Cut black and blue felt in an oval shape for Daisy's eyes.
- Attach all parts of the face (eyebrows, eyes, and beak); pin all parts before you sew them to ensure a perfect face.
- Sew the beak and eyebrows in place.
- Using black yarn, sew the eyelashes and glue her eyes on.
- Sew the body to the head.
- Sew the open gap on the hands and attach hands to the body.
- Sew dress collar in place.
- Sew legs onto the feet and then sew the legs to the body.
- Attach the ribbon on her head.
- Sew the tail to the back of her body.
Now you've finished your Daisy Duck toy!