Crochet Christmas Campervan: A Festive Project for All Crochet Enthusiasts

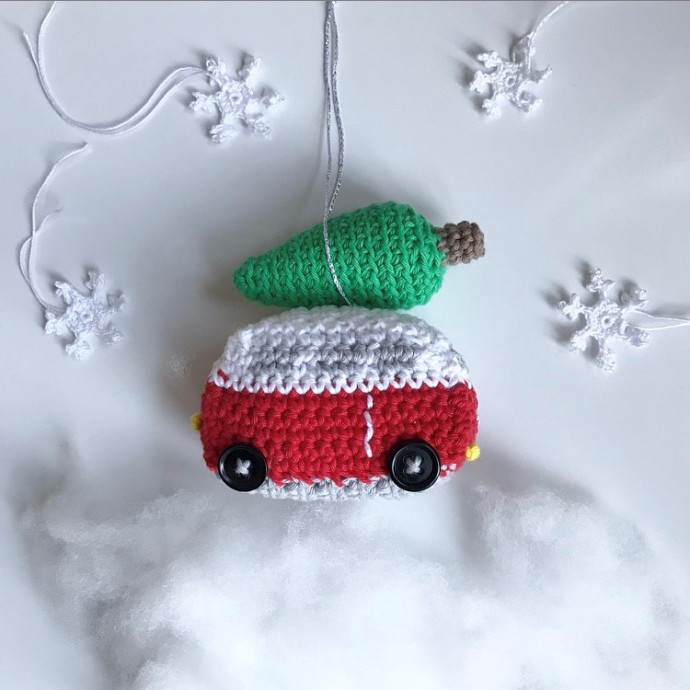
The Crochet Christmas Campervan is the perfect festive project for all crochet enthusiasts out there! With its cozy and charming design, it brings the holiday spirit to life in the most adorable way. This adorable campervan pattern is great for beginners and experienced crocheters alike, offering a fun and rewarding crafting experience. Imagine the joy of creating your own miniature Christmas campervan, complete with tiny details like wreaths, lights, and presents. It's not just a decoration; it's a labor of love that will bring smiles and warmth to your home during the holiday season. So grab your yarn, hook, and get ready to embark on a journey of creativity and holiday cheer with the Crochet Christmas Campervan!
Ingredients
For the Christmas campervan you will need:
- 3mm crochet hook (or the size appropriate for your yarn/tension)
- Ricorumi DK cotton, 1 x 25g ball of each (available from LoveCrochet)
- Red 028, White 001, Silver Grey 058 and Grass Green 044
- A small amount of Light Brown 052, Black 060 and Yellow 006
- A small amount of Silver yarn or thread
- Toy stuffing
The Campervan
Right Side
Using Red, make 16ch.
Row 1: dc in second ch from hook and in each ch to the end, turn (15).
Rows 2 to 5: ch, 15dc, turn.
Row 6: Join White, ch, 15dc, turn.
Row 7: Working in White and Grey, carry the yarn not being used along the back, ch, 2dc in White, 3dc in Grey, (1dc in White, 3dc in Grey) twice, 2dc in White, turn.
Row 8: ch, 2dc in White, 3dc in Grey, (1dc in White, 3dc in Grey) twice, dc2tog in White, turn (14).
Row 9: Using White, ch, dc2tog, 10dc, dc2tog (12).
Fasten off.
Using White, embroider a few back stitches for a door.
Weave in ends.
Left Side
Using Red, make 16ch.
Row 1: dc in second ch from hook and in each ch to the end, turn (15).
Rows 2 to 5: ch, 15dc, turn.
Row 6: Join White, ch, 15dc, turn.
Row 7: Working in White and Grey, carry the yarn not being used along the back, ch, 2dc in White, 3dc in Grey, (1dc in White, 3dc in Grey) twice, 2dc in White, turn.
Row 8: ch, dc2tog in White, 3dc in Grey, (1dc in White, 3dc in Grey) twice, 2dc in White, turn (14).
Row 9: Using White, dc2tog, 10dc, dc2tog (12).
Fasten off.
Using White, embroider a few back stitches for a door.
Weave in ends.
Joining Strip
Using Grey, make 8ch.
Row 1: dc in second ch from hook and in each ch to end, turn (7).
Rows 2 to 15: ch, 7dc, turn.
Rows 16 to 20: Join Red, ch, 7dc, turn.
Row 21: Join White, ch, 7dc, turn.
Rows 22 & 23: Working in White and Grey, carry the yarn not being used along the back, ch, 1dc in White, 5dc in Grey, 1dc in White, turn.
Rows 24 to 37: Using White, ch, 7dc, turn.
Rows 38 & 39: Working in White and Grey, carry the yarn not being used along the back, ch, 1dc in White, 5dc in Grey, 1dc in White, turn.
Row 40: Using White, ch, 7dc, turn.
Rows 41 to 45: Join Red, ch, 7dc, turn.
Fasten off.
Using Yellow, embroider French knots for headlights and taillights.
Using Silver, embroider a badge.
Sew joining strip together along narrow edge joining Row 1 to Row 45.
Weave in ends.
Wheels
Make 4 wheels:
Using Black, make 2ch.
Rnd 1: 8dc in second ch from hook (8).
Fasten off.
Tree
Using Green, make 2ch.
Work in back loops only till end of Rnd 16.
Rnd 1: 6dc in second ch from hook (6).
Rnd 2: (dc, 2dc in next st) three times (9).
Rnd 3: 9dc.
Rnd 4: (2dc, 2dc in next st) three times (12).
Rnd 5: 12dc.
Rnd 6: (3dc, 2dc in next st) three times (15).
Rnd 7: 15dc.
Rnd 8: (4dc, 2dc in next st) three times (18).
Rnd 9: 18dc.
Rnd 10: (5dc, 2dc in next st) three times (21).
Rnd 11: 21dc.
Rnd 12: (6dc, 2dc in next st) three times (24).
Rnd 13: 24dc.
Rnd 14: (2dc, dc2tog) six times (18).
Rnd 15: (dc, dc2tog) six times (12).
Stuff tree.
Rnd 16: dc2tog six times (6).
Rnds 17 to 19: Join Brown, work in both loops, 6dc.
Fasten off.
Stuff trunk, sew gap closed through back loops of each st leaving front loops un-stitched.
Weave in ends.
To Finish
Sew right side panel to joining strip, starting with base first and matching colour changes around.
Attach left side panel in same manner, before finishing stuff campervan and sew gap closed.
Using Silver, sew on wheels.
Sew tree to roof.
Weave in ends.
Finally, tie a length of yarn or twine around the campervan and tree to hold in place or hang.