How to Crochet Charming Ear Warmers and Headbands


Crochet ear warmers or headbands are not just a winter accessory; they’re a charming way to keep your ears toasty and your hair in place all year round! With endless colors, patterns, and styles to choose from, you can effortlessly add a touch of coziness to your outfit while showcasing your unique personality. These handcrafted creations are not only stylish but also practical, making them a delightful gift for yourself or a loved one. Whether you're a beginner or an experienced crocheter, diving into the world of ear warmers and headbands is a fun and rewarding way to unleash your creativity and stay fashionably warm in any season.
Materials Used
10 ply/Worsted Weight approx 40 gm's/1.41 ounces
4mm/G Hook
Sewing needle and scissors
Stitches Used
US terms:
- ch = chain
- hdc = half double crochet
- dc = double crochet
Special Stitches Used
V st = (dc, ch, 2 dc) in same stitch
Instructions to Begin
To begin: chain 16
Row Instructions
Row 1: work 1 hdc in 2nd ch from hook and in each chain across (15 hdc)
Rows 2 to 14: ch 1, work 1 hdc into each hdc to end, turn (15 hdc, 14 rows made)
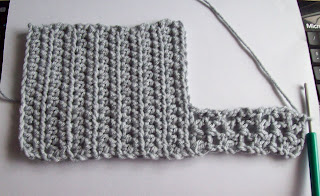
Creating the Braids
Working on the first braid using 5 stitches only. When making the ch 1 at the beginning of each row, make it loose/high (you can chain 1 and turn or turn and chain 1 your choice).
Row 15: ch 1, work 1 dc in 1st hdc, skip 1 hdc, work a V st in next hdc, skip 1 hdc, work 1 dc in next hdc, turn (1 dc, 1 V st and 1 dc).
Please ensure you work your 1st dc into the top of the dc loops and not the chain 1.
Row 16 to 25: ch 1, work 1 dc into the 1st dc, work a V st into the chain 2 space of the V st, work 1 dc into the last dc of the row, turn (you will have 1 dc, 1 V st and another dc).
Second Braid: Break off yarn and join to the 6th hdc of row 14 and repeat rows 15 to 25.
Third Braid: Break off yarn and join to the 11th hdc of row 14 and repeat rows 15 to 25, then break off yarn.
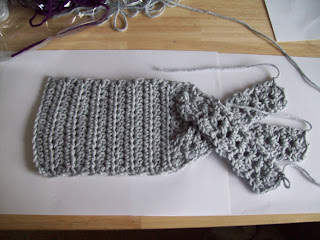
Assembling the Braids
Make one braid with your 3 lengths. Hold or pin your braids in place and make a row across the top of the 3 braids as per instructions in row 26 below.
Attaching Yarn
Row 26: ch 1, *work 1 hdc into the first dc, work 1 hdc into the 1st dc of the V st, work 1 hdc into the ch 2 space, work 1 hdc into each of the next 2 dc's*, repeat from *to* for the next 2 braids (15 hdc), ch 1 and turn.

Row 27: ch 1, work 1 hdc in each st across, turn. For a small size work 7 more rows of row 27. For a medium size work 9 more rows of row 27. For a large size work 11 more rows of row 27.
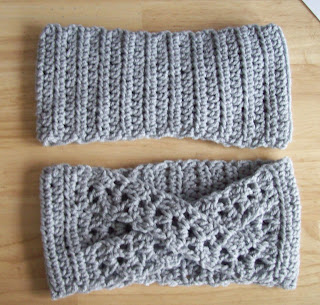
Finishing Touches
To join, with the right side facing you, fold in half and line up the end stitches. Join by either whip stitching, sl st loosely or sc across, using the stitches from the beginning chain row and the back loops only of the last row of hdc's made. Sew in all loose ends and wear your new creation!