How to Crochet a Cute Strawberry: A Comprehensive Guide

Imagine creating an adorable strawberry using the art of crochet. This charming project involves using colorful yarn to carefully craft each detail of the fruit, from the vibrant red body to the delicate green leaves on top. By following a pattern and using basic crochet techniques, you can bring this kawaii strawberry to life, adding a touch of cuteness to your collection of handmade creations.
Delving into the world of crochet allows you to explore your creativity and create unique pieces that reflect your personality. The process of crocheting a kawaii strawberry can be both relaxing and rewarding, as you see your creation take shape with each stitch. Whether you are a seasoned crocheter or a beginner looking to try something new, this project offers a fun and enjoyable way to hone your skills and produce a charming piece of art.
Materials
- 3.5mm hook
- Small amounts of Caron Simply Soft in the following colours:
- Plum Wine
- Off White for seeds
- Soft Green for leaves and stem


Stitches and Special Terms (US Terminology)
Ch – Chain
Slst – Slip stitch
Sc – Single crochet
Inc – Increase. Work 2 sc in the same st.
Dec – Decrease. Work a regular sc decrease.
Hdc – Half double crochet
Reading This Pattern
There is some colour work involved in this pattern to incorporate the seeds. Simply carry your yarn on the back of the panels by dropping the working yarn when you switch colours and picking it back up again when you need it. Always carry the yarn on the wrong side (instead of carrying it inside the stitch as you go); this ensures the front of the panel has clear lines and colours without any of the yarn carries showing through.
When switching to a new colour, insert your hook into the stitch for the last stitch of Colour A and pull up a loop, then, with Colour B, yarn over and complete the stitch by pulling through both loops with Colour B. Drop your working yarn in Colour A and continue with Colour B. You will pick your Colour A working yarn back up again when you need it.
Since the whole pattern is worked in sc stitches, I have omitted the usual “sc” in front of the stitch counts and used the associated colour letter instead. For example, “P3, W1” means to work the next 3 stitches in pink and the next stitch in white, “Pinc” means to work a regular sc increase in pink, and so on.
Colour Legend
P – Pink (Plum Wine)
W – White (Off White)
Body (Make 2 Panels) with 3.5mm Hook
The panels are worked from the bottom up. Ch 1 and turn at the end of each row. Start in Plum Wine.
Row 1: Ch 4, P3 (3 sts)
Row 2: [P1, W1] in same st, P1, Pinc (5 sts)
Row 3: Pinc, P3, Pinc (7 sts)
Row 4: [P1, W1] in same st, P3, W1, P1, Pinc (9 sts)
Row 5: Pinc, P7, Pinc (11 sts)
Row 6: *W1, P3*, repeat * once more, W1, P2 (11 sts)
Row 7: Pinc, P9, Pinc (13 sts)
Row 8: [W1, P1] in same st, P2, *W1, P3*, repeat * once more, W1, Pinc (15 sts)
Row 9: P15 (15 sts)
Row 10: P2, *W1, P3*, repeat * two more times, P3, W1 (15 sts)
Row 11: Pdec, P11, Pdec (13 sts)
Row 12: Pdec, P1, *W1, P3*, repeat * once more, Wdec (11 sts)
Tie off.
Leaves (Make 3) with 3.5mm Hook and Soft Green Yarn
The leaves are worked around both sides of the foundation chain.
Round 1: Ch 4, slst, sc, [sc 6] in last ch, working on opposite side of chs, sc, slst (10 sts)
Tie off.
Stem (Make 1) with 3.5mm Hook and Soft Green Yarn
Row 1: Ch 8, start in 2nd ch from hook, hdc 3, sc 2, slst (6 sts)
Tie off.
Assembly
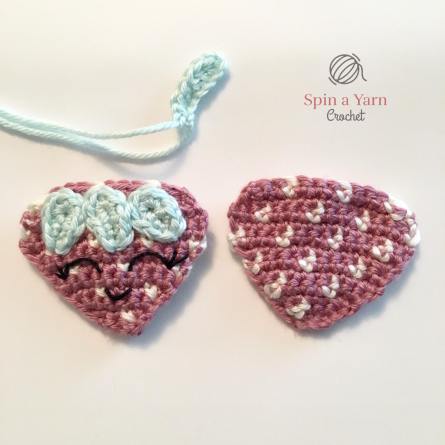
Step 1: Attaching Leaves and Face
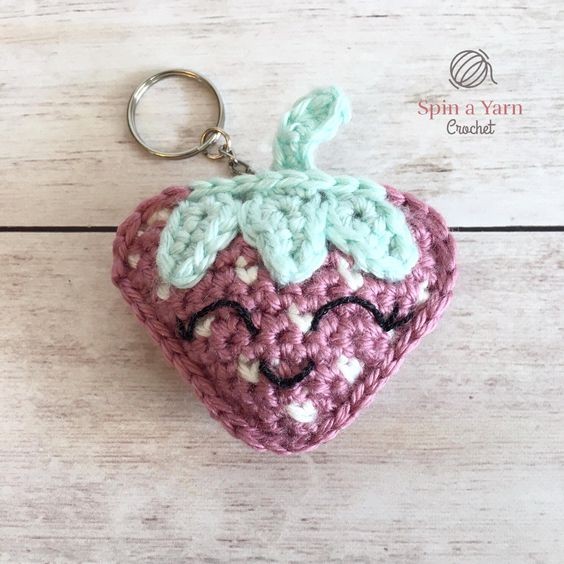
The first thing we need to do is sew the leaves and stitch on the face to the front panel. I stitched on the two leaves on the left and right first, and then stitched on the middle leaf so that it overlapped the other two slightly.
Next, add your eyes and mouth. I used black crochet thread to stitch on happy eyes and a little mouth.
Step 2: Joining the Panels
Time to join! You will have two panels now, one with a face and leaves and one without, plus your stem.
Place the two panels together, matching up all sides.
Make sure the front (the side with the face) is facing you as you crochet around the outside.
Starting on the left side at the top, begin attaching the panels together by chaining one and single crocheting around the outside of the panels in Plum Wine.
Crochet down the side, around the bottom and back up to the top and stop. Pull up a loop and leave this for now.
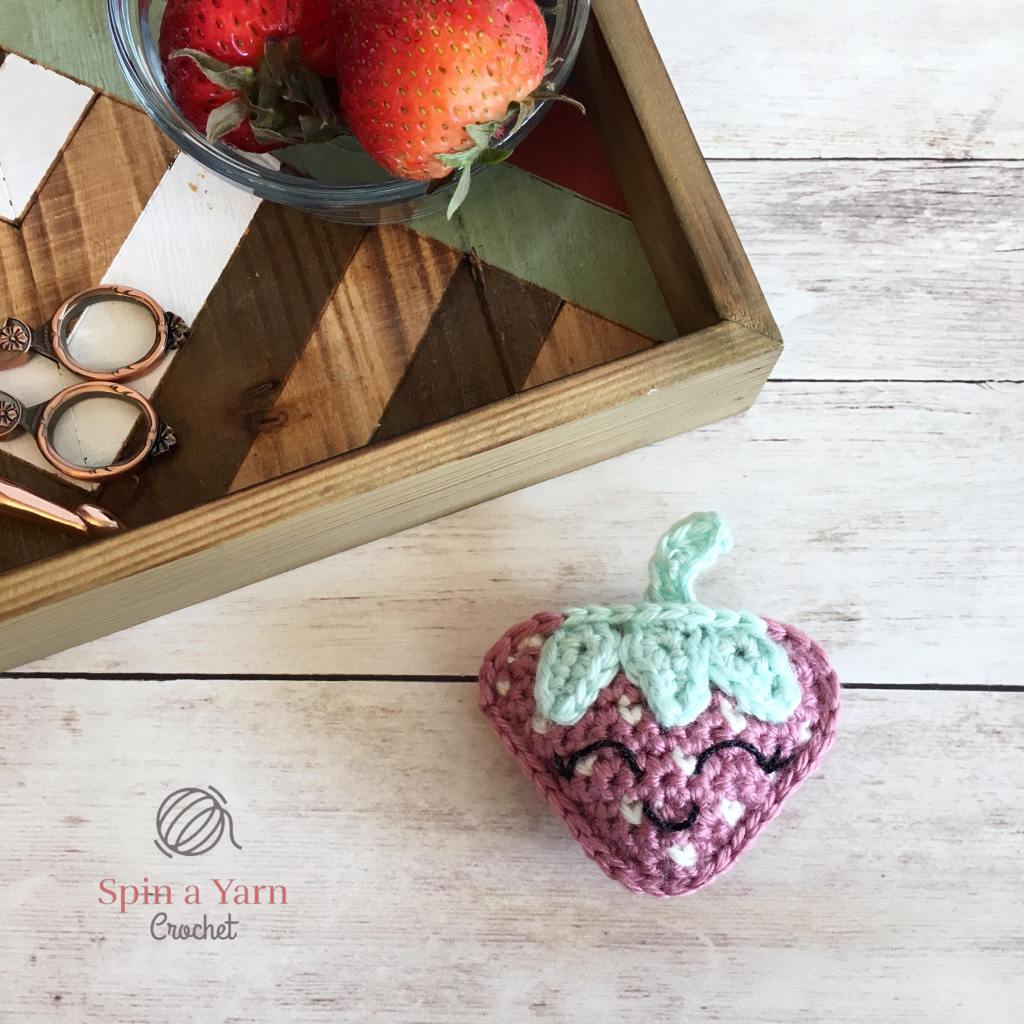
Stuff your strawberry.
Place the stem between the panels and stitch in place by sewing through all three; the back panel, the stem, and the top panel. Tie a knot in the yarn tails and hide them inside the panels.
Pick up your working yarn again. Sc only two stitches across the top and then switch to Soft Green. Continue to crochet across the top in Soft Green. When you get to the leaves, pick up a stitch or two across the top of each leaf so that the Plum Wine colour doesn’t peek through too much.
When you get to the stem, simply crochet in the stitches of the front panel only since this section is already sew shut. Switch back to Plum Wine when you get past the leaves (for the last couple of stitches on the top). Top up stuffing as necessary.
Close with a slst to first st and tie off. Poke the yarn tails back inside the piece. Add a keyring.