How to Make a Crochet Drawstring Bag

A drawstring bag made using the crochet technique is a versatile and stylish accessory that can be customized to suit your personal style. Crochet drawstring bags are perfect for carrying small items like keys, wallets, and phones, making them ideal for quick trips to the store or running errands. The intricate crochet stitches add a unique texture to the bag, giving it a handmade and artisanal feel.
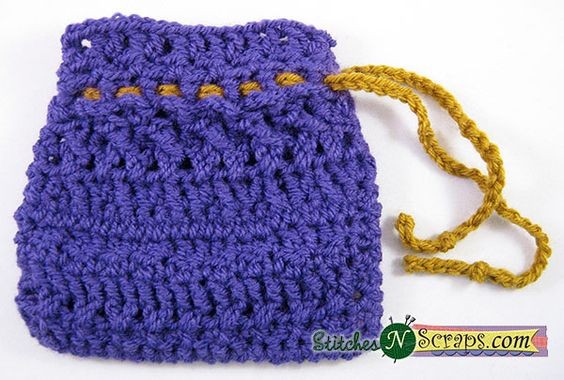
Crochet drawstring bags can be made in a variety of colors and patterns, allowing you to create a one-of-a-kind accessory that reflects your individuality. The drawstring closure ensures that your belongings are secure while also adding a decorative element to the bag. Whether you're a seasoned crocheter or a beginner looking for a fun and rewarding project, making a crochet drawstring bag is a great way to showcase your creativity and craftsmanship.
Materials Needed
- Yarn
- Crochet Hook
Abbreviations Used
- sc = single crochet
- hdc = half double crochet
- dc = double crochet
- ldc = linked double crochet
- fpdc = front post double crochet
- bpdc = back post double crochet
- fphdc = front post half double crochet
- st(S) = stitch(es)
- sk = skip
Back Section
Row 1: Work 20 foundation sc. Mark Row 1 as the right side.
Row 2: Ch 1, turn, sc in front loop of next st, sc in back loop of next st across.
Row 3: Ch 2, turn, sk first sc, *sk next sc, dc in next sc, working in front of last dc, dc in skipped sc, repeat from * to last sc, hdc in last sc.
Row 4: Ch 2, turn, hdc in first st, fpdc in every st across to last st, hdc in last st.
Row 5: Ch 1, turn, *sc in next st, dc in next st, repeat from * across.
Row 6: Ch 1, turn, sc in first 2 sts, *hdc, dc in the next 2 sts, hdc, sc in the next 2 sts, repeat from * across.
Row 7: Ch 1, turn, ldc in each stitch across.
Row 8: Ch 2, turn, hdc in first st, *sk next st, (fpdc, hdc) in next st, repeat from * across to last st, hdc in last st.
Row 9: Repeat Row 3.
Row 10: Ch 1, turn, hdc in first 2 sts, *sk next st, fpdc in next st, fpdc in skipped st (create an ‘x’), hdc in next st, repeat from * to last st, work hdc in last st.
Row 11: Ch 2, turn, sk next st, (sc, ch 3, sc) in next st, [sk next 2 sts, (sc, ch 3, sc) in next st] 5 times, sk next st, hdc in last st.
Row 12: Ch 2, turn, bpdc in each st across to last st, dc in last st. (14 sts)
Row 13: Ch 1, turn, fphdc in first st, hdc in next st, *fphdc in next st, hdc in next st, repeat from * across.
Row 14: Ch 3 (counts as dc), turn, [sk next st, (dc, ch 1, dc) in next st] 6 times, sk next st, dc in last st. Fasten off.
Front Section
Repeat rows 1-14 of back, but do not fasten off at the end of row 14.
Joining Sections
- Hold front and back together with wrong sides facing. Working through both thicknesses to join them together:
- Work 15 reverse sc evenly spaced along sides of rows, then turn work 90 degrees counter-clockwise.
- Working in the bottom of row 1, reverse sc in each st across, then turn work 90 degrees counter-clockwise.
- Work 15 reverse sc evenly spaced along sides of rows, then fasten off.
Finishing Touches
Sew in all ends. Weave a ribbon or cord through the stitches of row 12 to act as a drawstring.